With this version we are introducing the possibility to add a UT frame and UT functionality in a Projektor project.
Please note that the feature only works on dedicated devices (containing ISO in the article number).
Demo project with UT functionality
There are two demo projects included in the OPUS Projektor, the ISOBUS project sample and the Welcome Project.
With the Welcome Project, if you bought a device with ISO in the article number, you can test the UT functionality directly out of the box. Just check the necessary configuration to prepare the device so it can show the UT content properly.
Change the project to UT plugin type
To create a new project with UT plugin functionality, choose the type UT-Plugin in the new project dialog.
To add the functionality to an existing project, use the project conversion and convert the project to the type UT-Plugin.
The project type can be checked in the Project Properties.
Added content in a UT plugin project
When a project has the type UT plugin, some additional things will be added:
•several UT plugin variables to control the UT
•two new objects, UT Primary View and UT Secondary View
UT Plugin Functionalities
The functions of the variables are explained in detail in the Variable Reference.
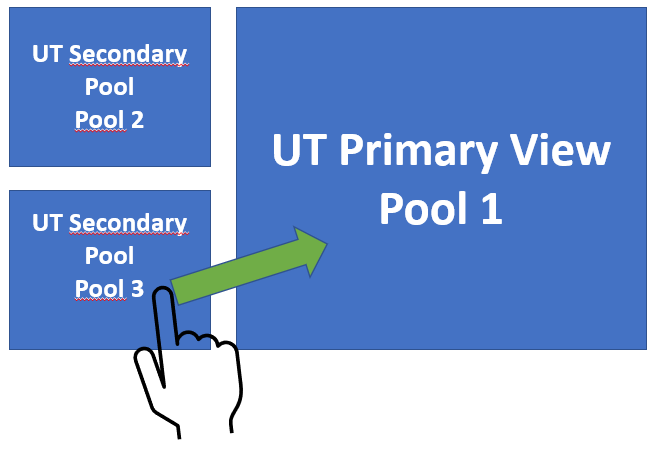
The UT Primary View is the main view for a UT pool. If there is more than one pool, additional pools can be shown in a mini view in the UT Secondary View.
To switch the currently shown pool in the Primary View, it is possible to swipe from a Secondary View to the Primary View.

Necessary configuration
There are several variables available to configure the UT experience. Many of them are optional for the essential functionality, but the following should be set in every project, either as a user setting or in an init script.
General configuration
•@IsobusCanInterface - the device needs to know on which CAN bus the ECU will send the UT pool.
•@UTActive - the ON switch for the UT. By default this should be set to 1 - active, but you can make sure and set it yourself.
Soft Keys
•@UTKeysPerRow - the UT needs to know how many soft keys there should be (on each side)
•@UTKeyLayout - the UT needs to know whether you want soft keys on the left / top side and/or on the right / bottom side and whether it should be one row or 2
Note that if you have a device with physical soft keys and you want to use these soft keys, you have to set these variables so the settings fit with the physical soft key layout.
Additionally, you need to configure the soft key frames on the UT page(s) so that the physical keys will be used for the UT soft keys on that page.
You need to configure the following properties:
•ISOBUS UT Softkey Frame - Checking this property means that this softkey frame (and with it the physical keys) will be used as a UT softkey frame
•ISOBUS UT First Key Number - This configures which softkey number will be the first in that softkey frame. Depending on the selected @UTKeyLayout (see above) this should be 0 for one side and 0 + number of softkeys on the other side (for devices with softkeys on both sides).