When you install a PClient on a device, you will see the following welcome project (the versions shown on the display may differ).
Please note that the welcome project is also available as a sample project.
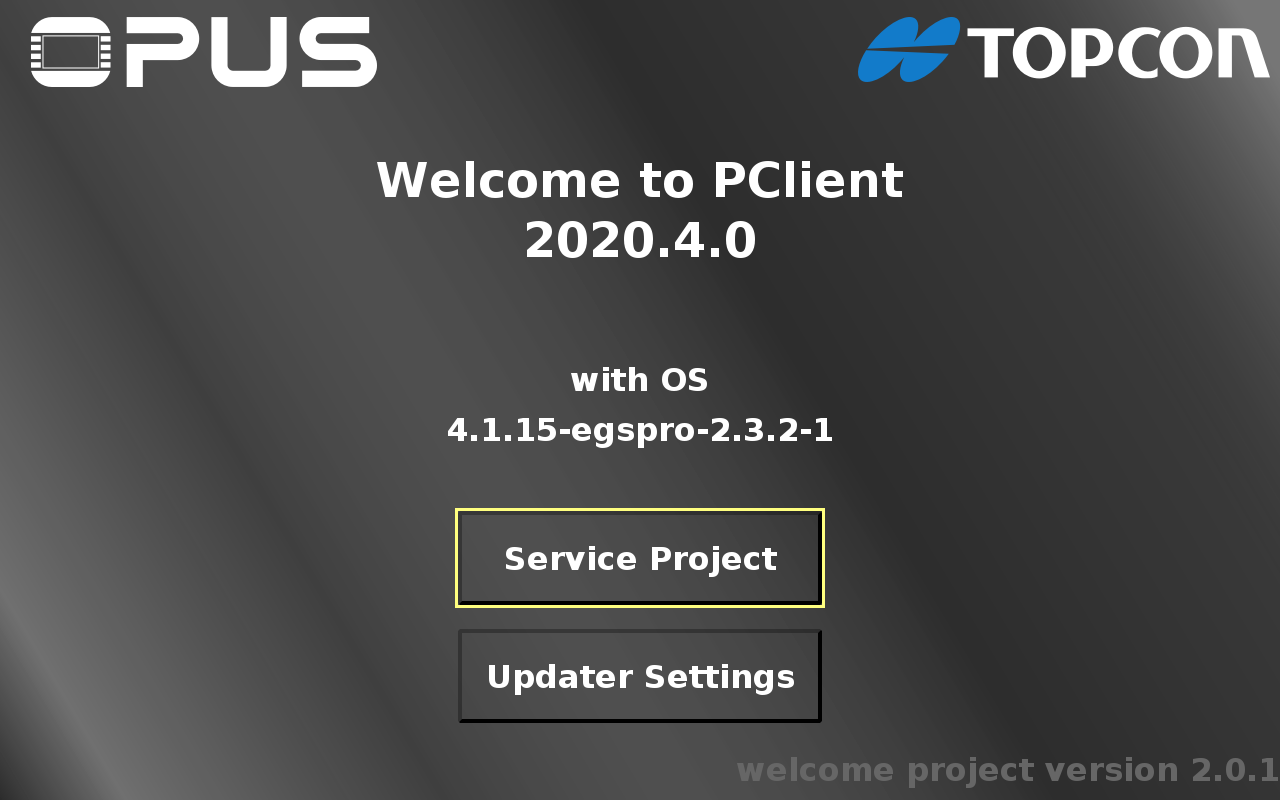
Updater Settings
By pressing the Updater Settings button you can navigate to the Updater Settings page.
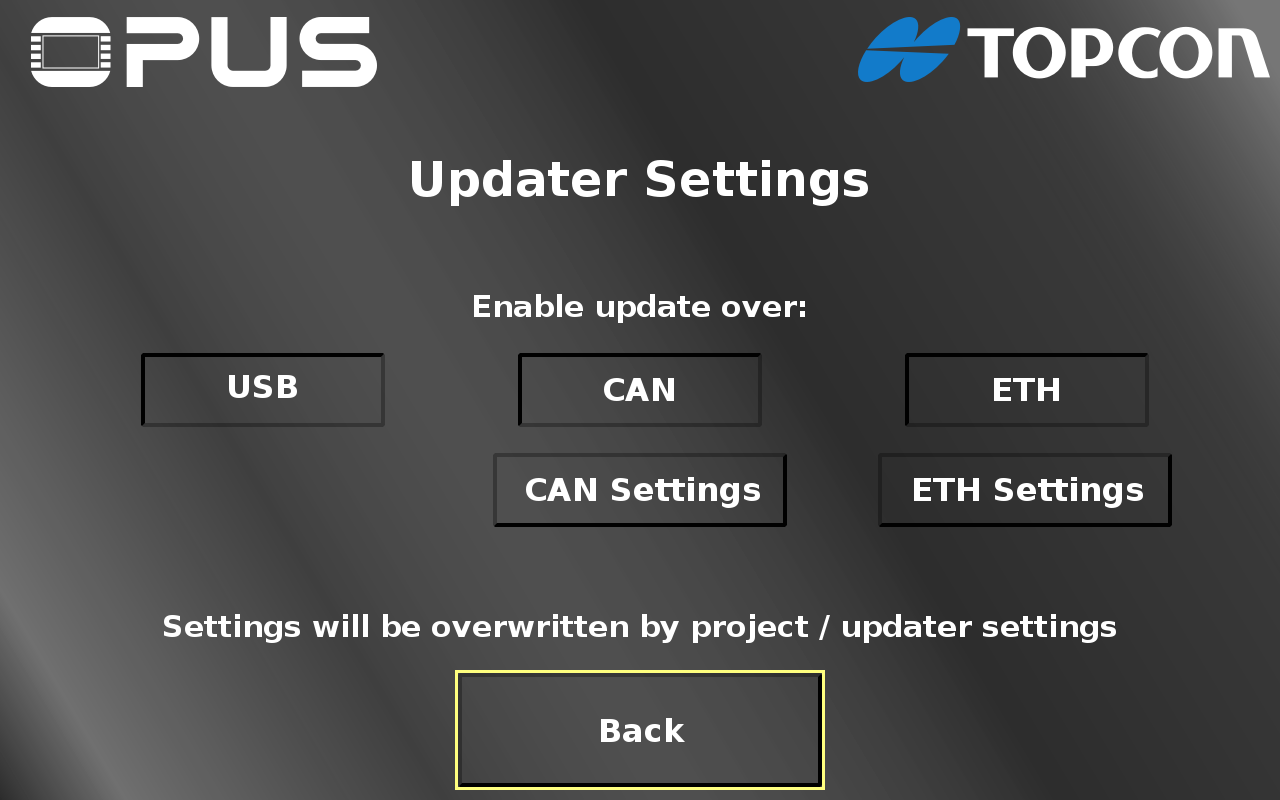
On this page you can enable / disable the project download over USB, CAN and ETH (Ethernet) by pressing the according buttons. Pressing them again will inverse the current setting. By pressing the CAN Settings button you can navigate to the CAN Settings page. By pressing the ETH Settings button you can navigate to the Ethernet Settings page. Both settings buttons will only be visible when the according transfer medium is enabled.
Back returns to the main welcome page.
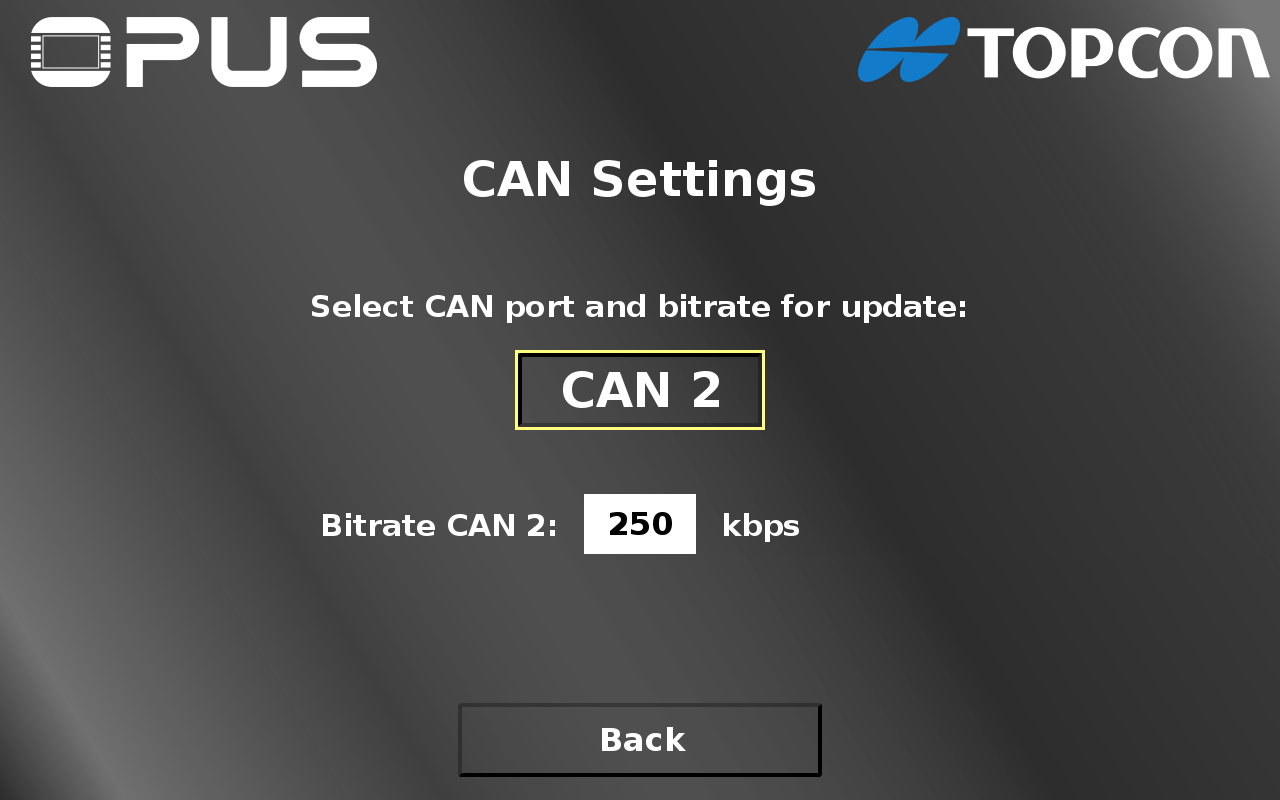
On the CAN Settings page you can set the CAN port that should be used for the project download and the Bitrate for the project download for that port.
Back returns to the Updater Settings page.
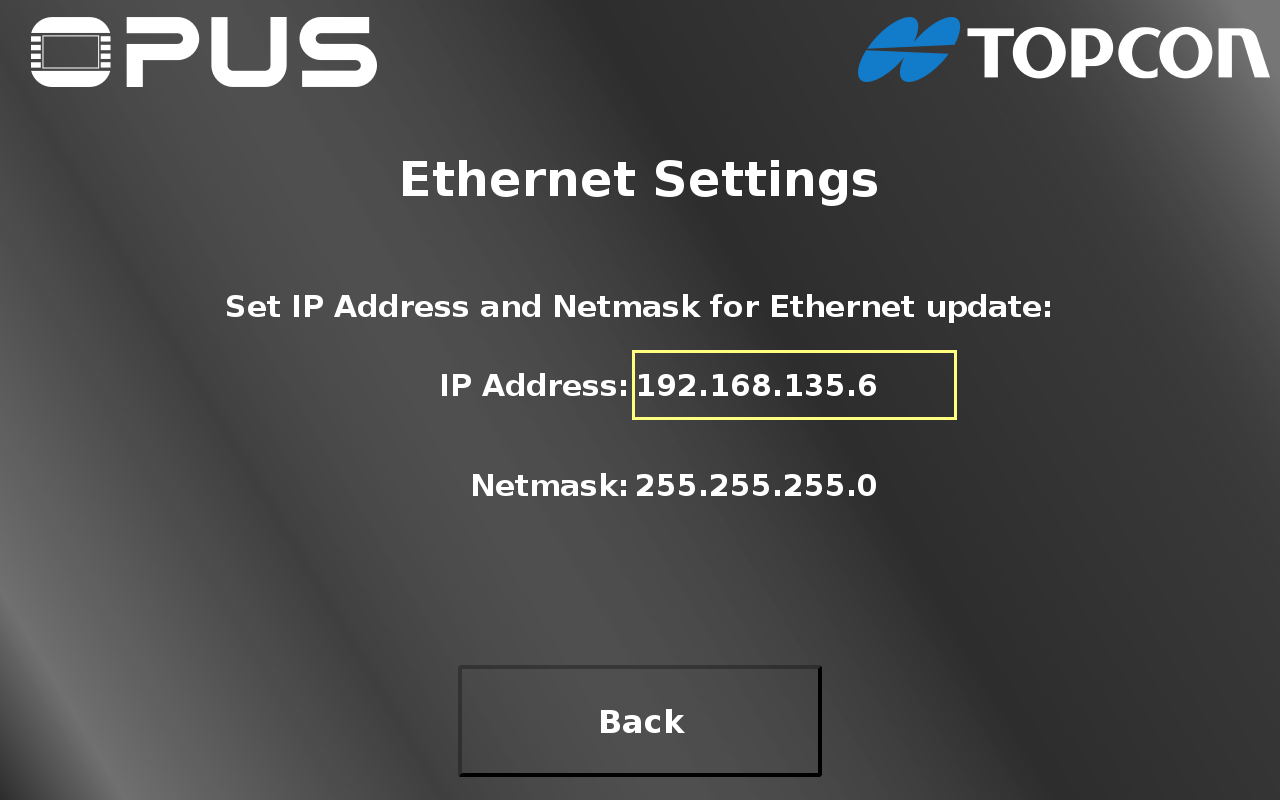
On the Ethernet Settings page you can set the IP Address (10) and Netmask (11) that the device should have in the network. With the Back button (12) you can go back to the Updater Settings page.
Please note: All settings made in this project are temporary and only valid for the first project transfer. All settings will be overwritten by settings in the transferred project.
You should make the according settings in the project you want to transfer to the device:
- The variable @EnableUpdater variable controls which update is allowed
- The CAN bus bitrate will be taken from the bitrate set in the transferred project
- The CAN port used for the transfer can be set with the variable @CANx_Bitrate
- The IP address can be set with the variable @Ethernet0_IPAddress
- The Netmask can be set with the variable @Ethernet0_Netmask
Back returns to the Updater Settings page.
Service Project
By pressing the Service Project button you can navigate to the Service Project main page.
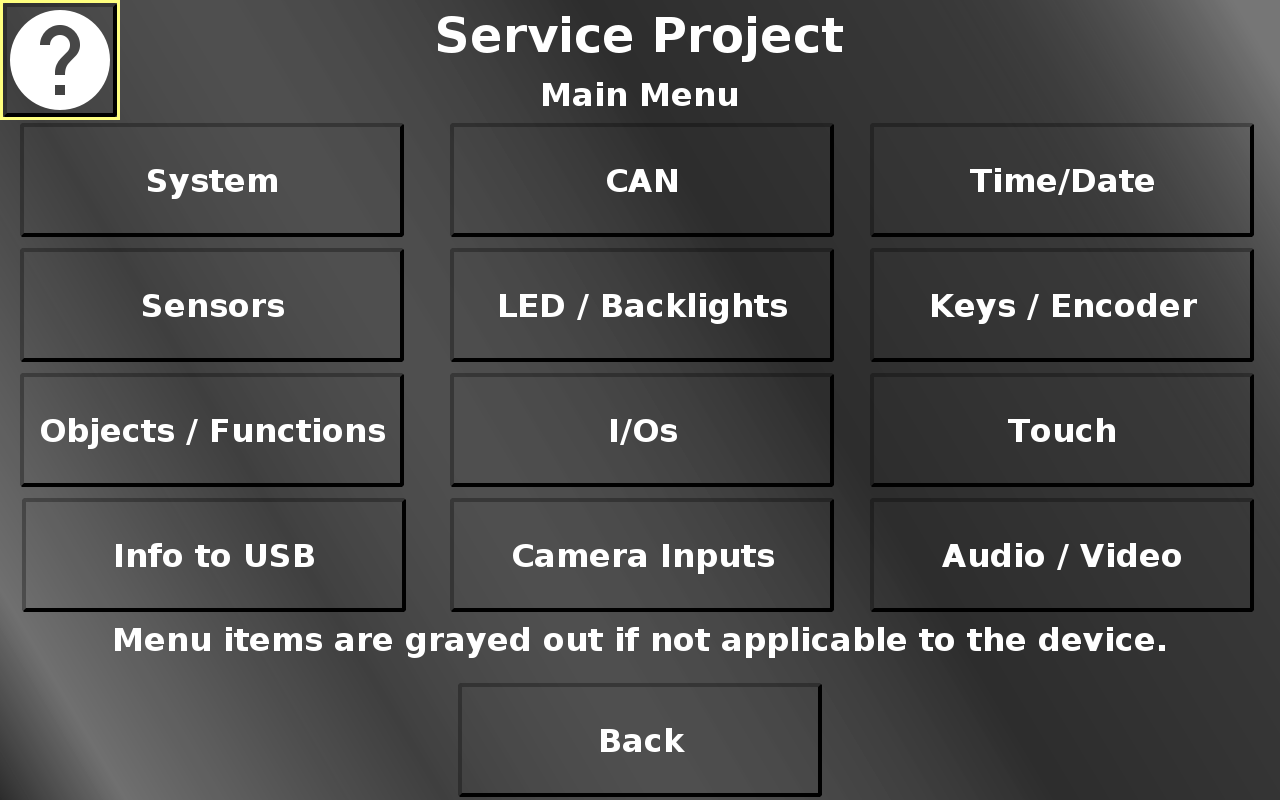
In this screen the different main menu items can be chosen. Back returns to the main screen.
You can press the main menu buttons in this image to jump to the according part of the topic.
On every page, a help button is available, which gives a short explanation what can be done on the page.
Menu items, behind which there are only features that are not available for the current device will be grayed out. It is still possible to go into the according pages or use the according buttons, but nothing will happen or work.
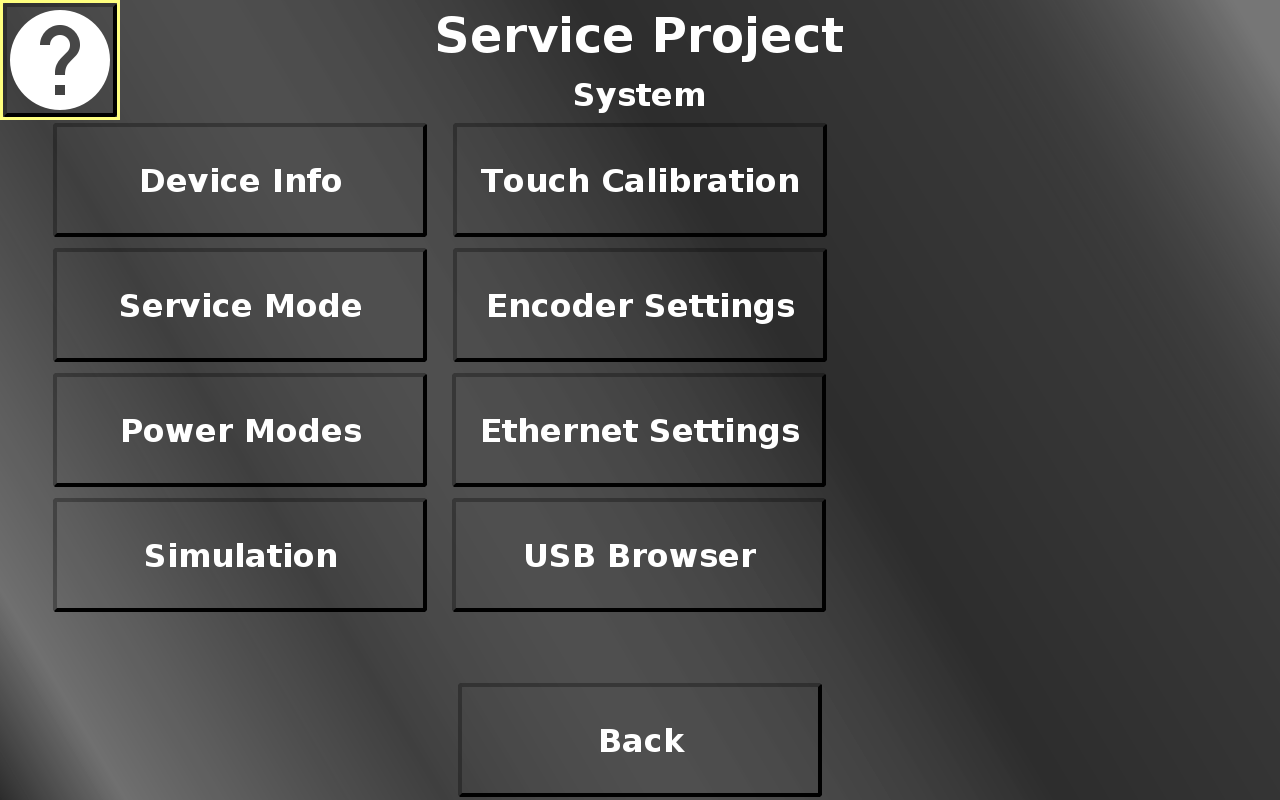
In this screen different system information and system settings can be chosen. Back returns to the main menu.

In this screen different device data is displayed. Back returns to the system menu.
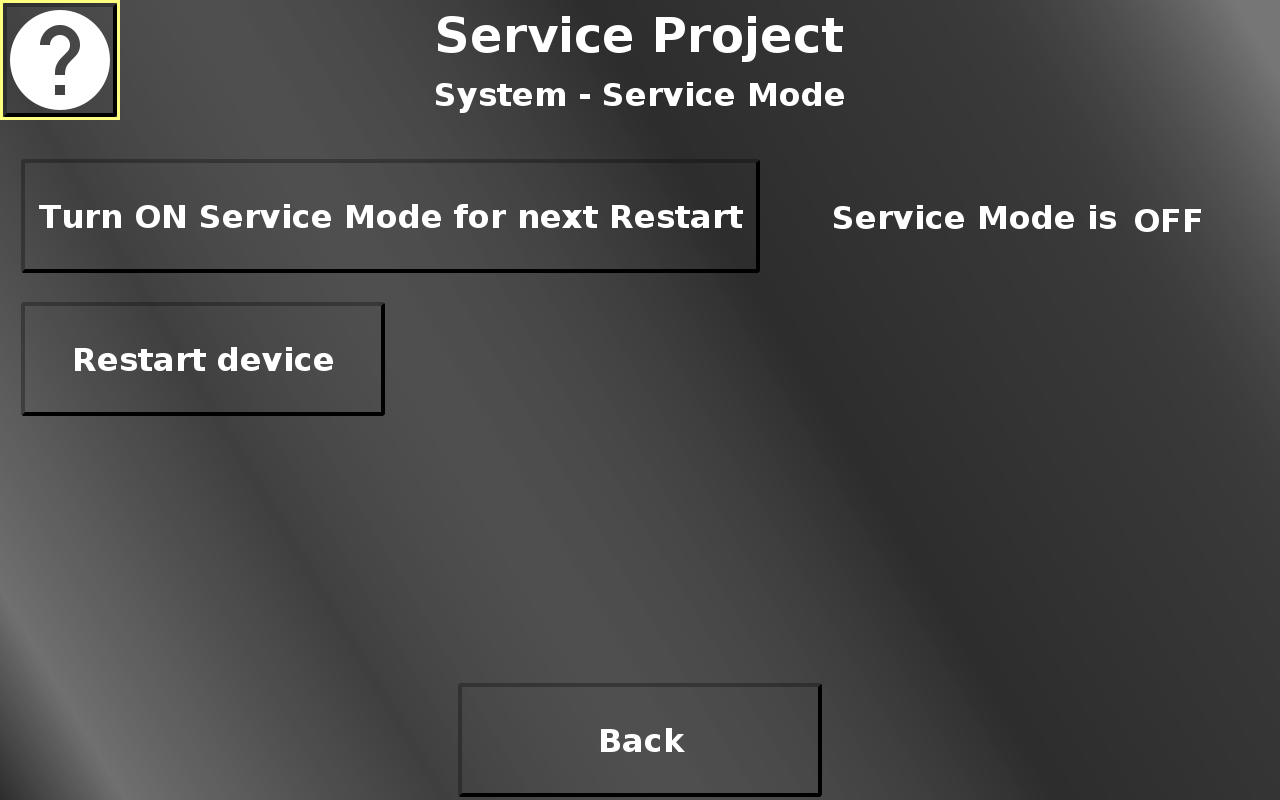
In this screen the service mode can be activated for the next reboot to update OS / PClient.
Pressing the restart button opens a confirmation dialog.
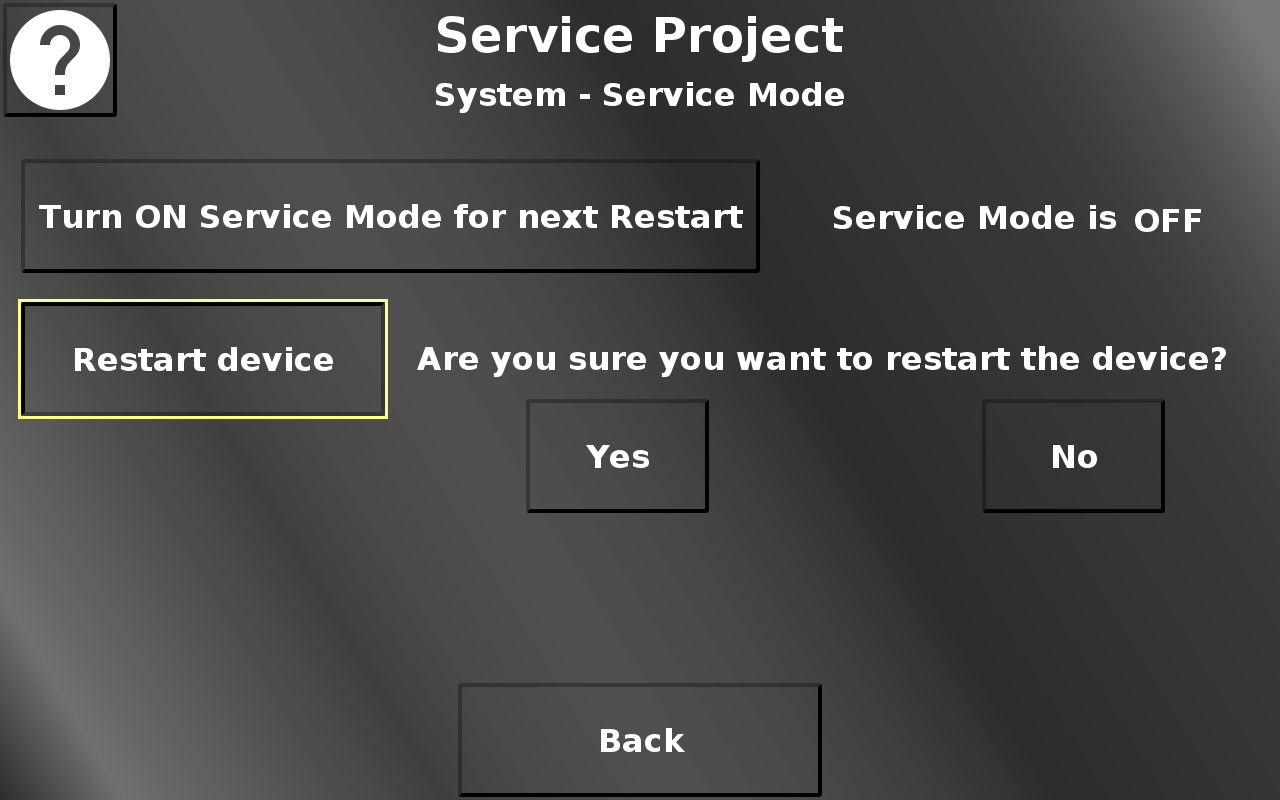
By pressing Yes the device will reboot. By pressing No the dialog will be closed again. The service mode setting will be kept. Back returns to the system menu.
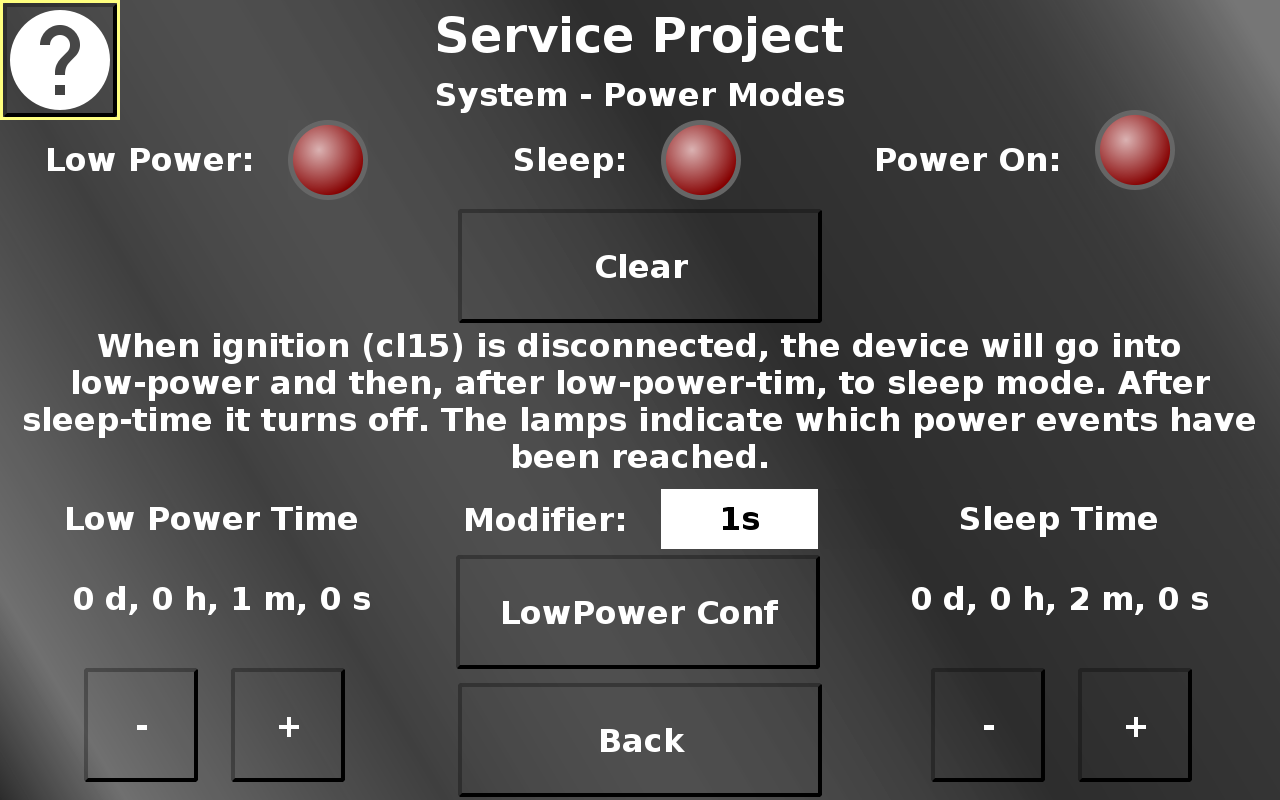
In this screen the different power events can be tested. The lamps will light up when the according power event is used. Disconnect clamp 15 /ignition pin to enter low-power mode, and then sleep mode, after which the device will turn off. Clear turns all lights back off.
Additionally, the times for the low-power mode and the sleep mode can be set. - (minus) decreases the time, + (plus) increases the time. The amount that the current value is modified by, can be chosen with the Modifer dropdown. LowPower Conf leads to a page where hardware elements can be configured for the low-power mode.
Back returns to the system menu.
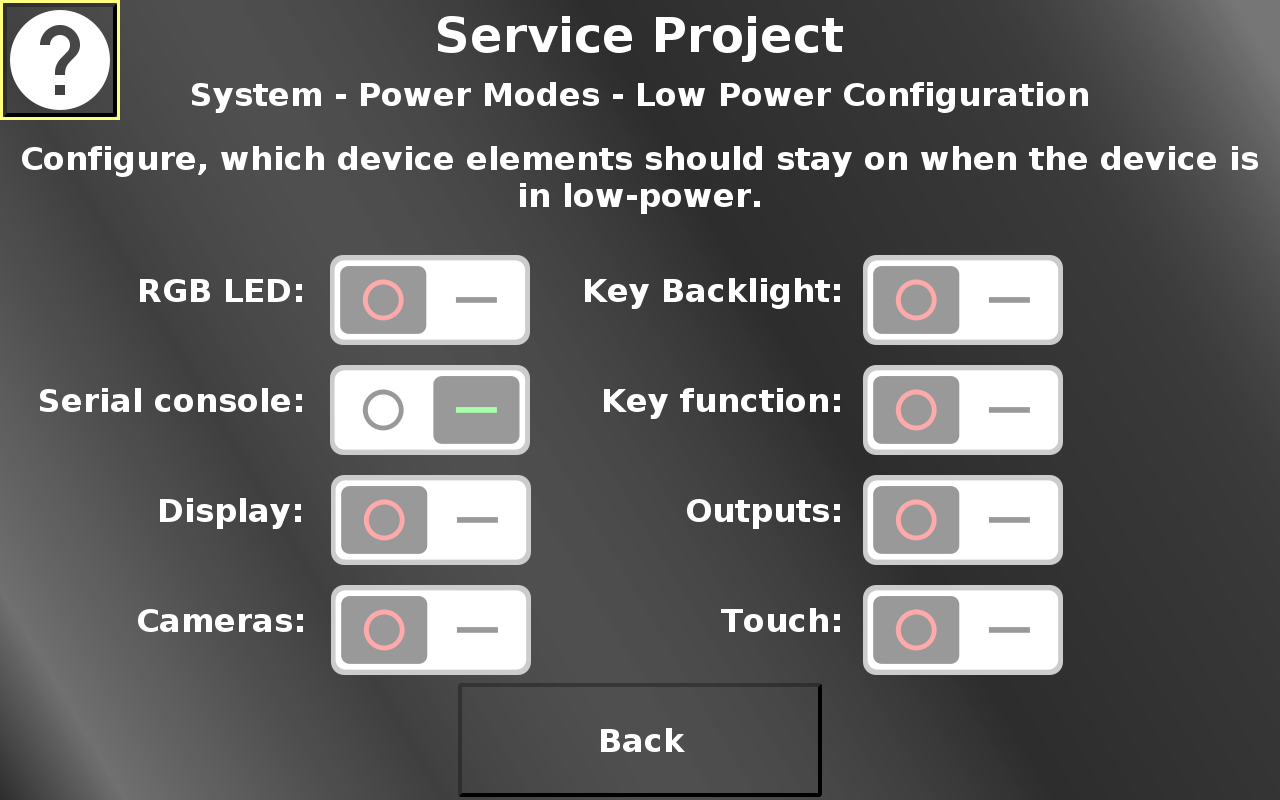
On this page, hardware elements can be configured to stay on or turn off when low power mode is entered. If the switch is in the OFF position, the element will turn off when low-power mode is entered. If the switch is in the ON position, the element will stay on in low-power mode.
Back returns to the power mode screen.
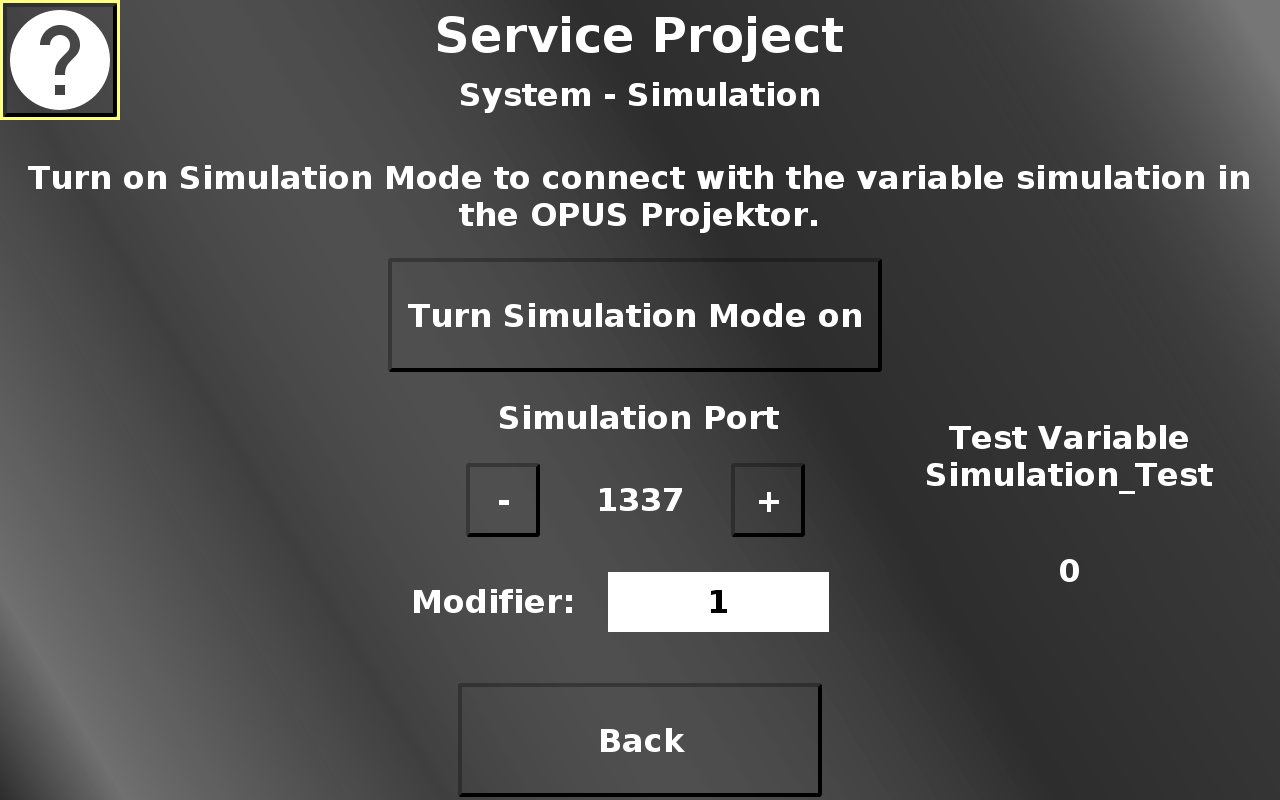
In this screen the simulation mode can be enabled to be able to use the variable simulation in the OPUS Projektor for the device.
Additionally, the port for the simulation can be set by pressing the - (minus) and + (plus) buttons.
The modifier dropdown chooses the value by which the - and + buttons change the port value.
Back returns to the system menu.
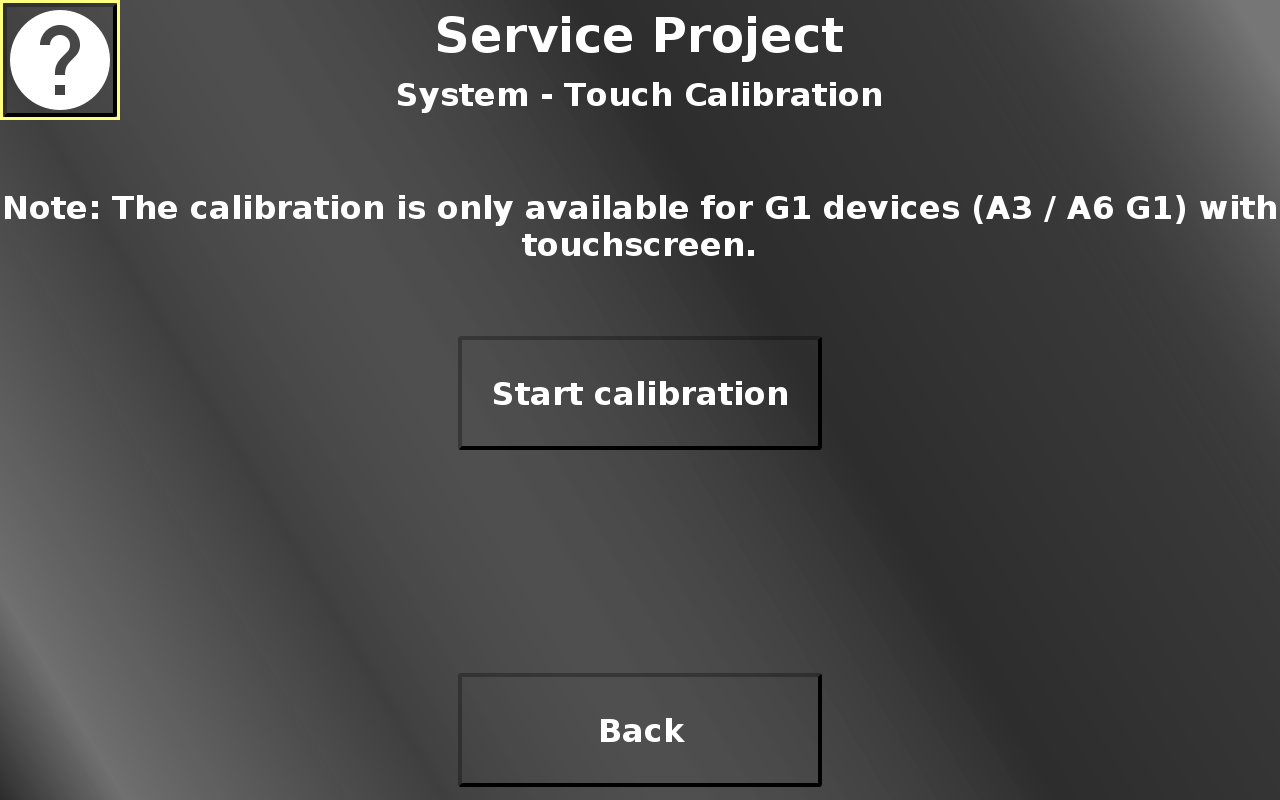
In this screen the touch screen calibration can be started. 5 cross hairs will appear one after another (top left, top right, bottom right, bottom left, center). Press the cross hairs to calibrate the screen.
Please note that the PClient stays on during this operation, so the cross hairs will be painted over this screen.
Please note that the calibration is only available for A3/A6 G1 touch screens. Devices with capacitive touch screens do not neet this calibration.
Back returns to the system menu.
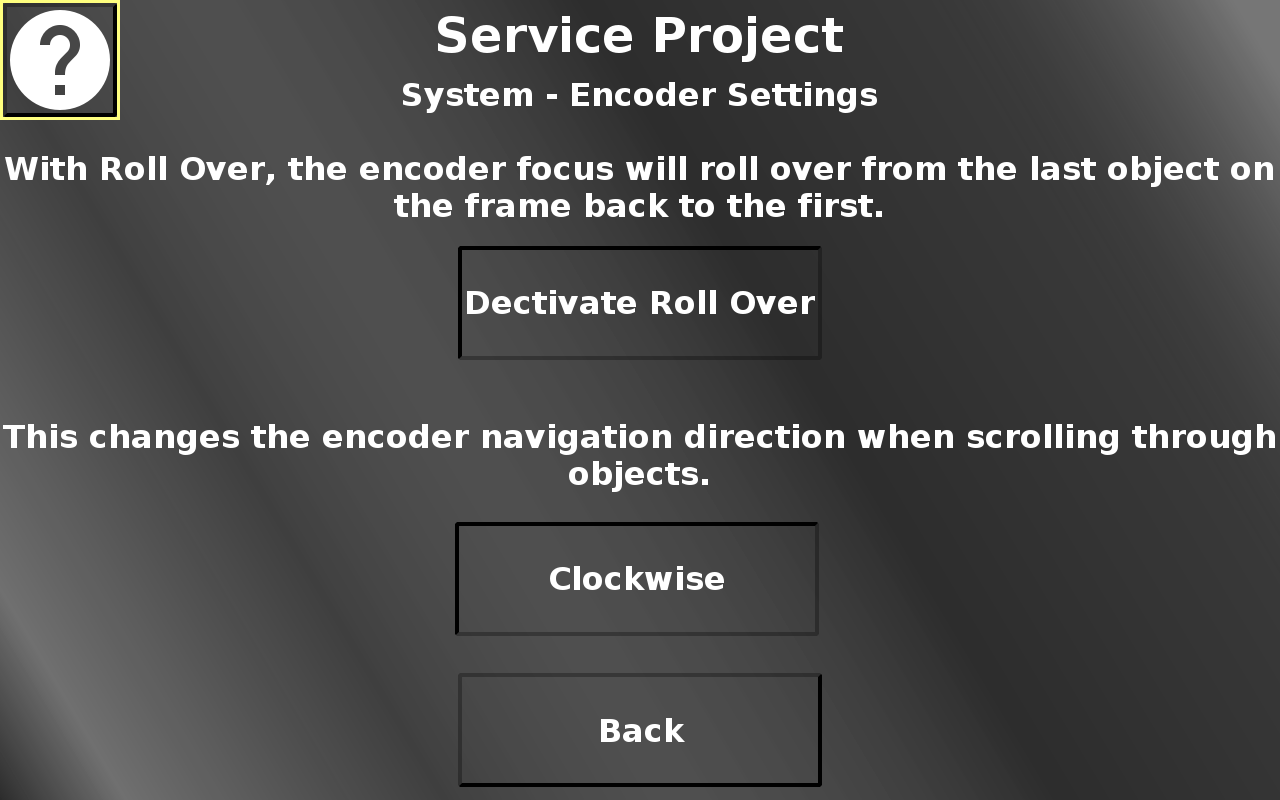
In this screen two encoder settings can be made.
Roll over means that the yellow selection rectangle will not stop at the last object, but it will roll over to the first object again.
Additionally, the navigation direction for the encoder can be switched between clockwise and anti-clockwise.
Back returns to the system menu.
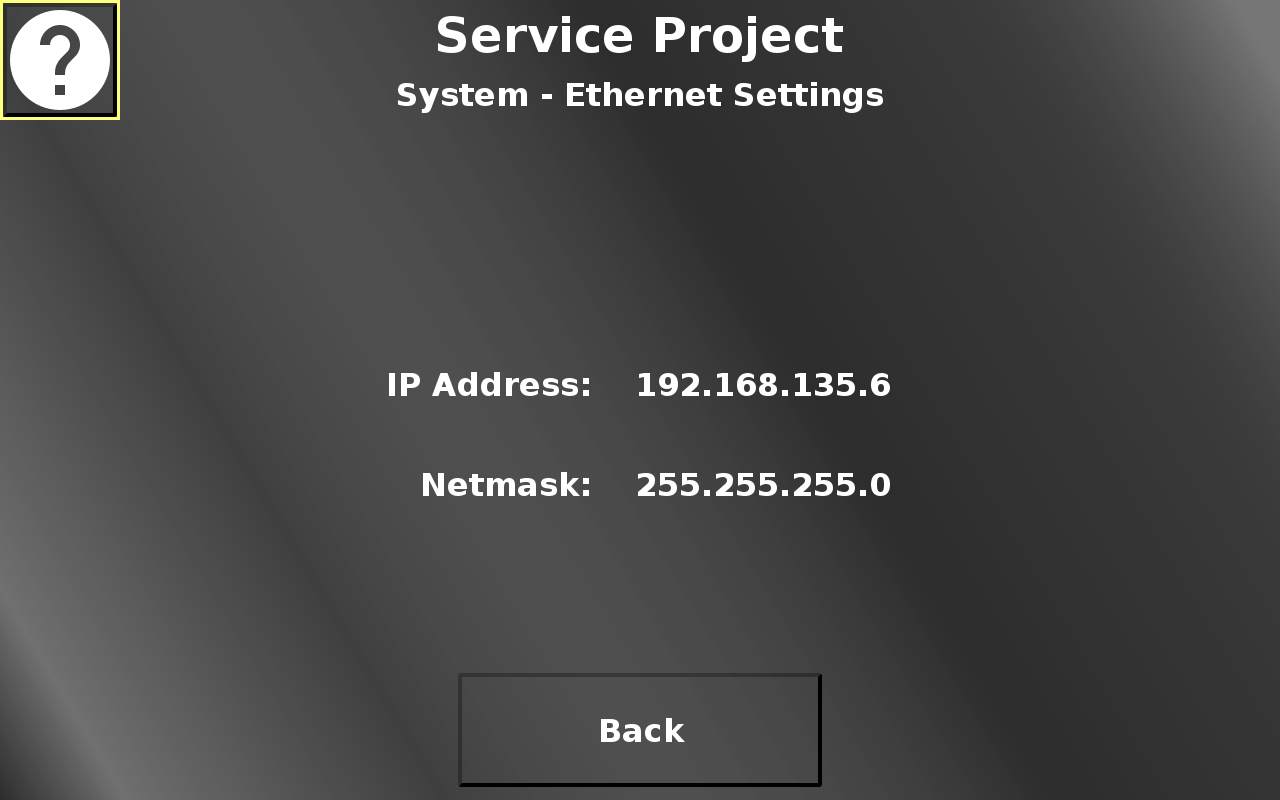
In this screen, the IP address and Netmask can be set, similarly to the updater screen described above. Back returns to the system menu.
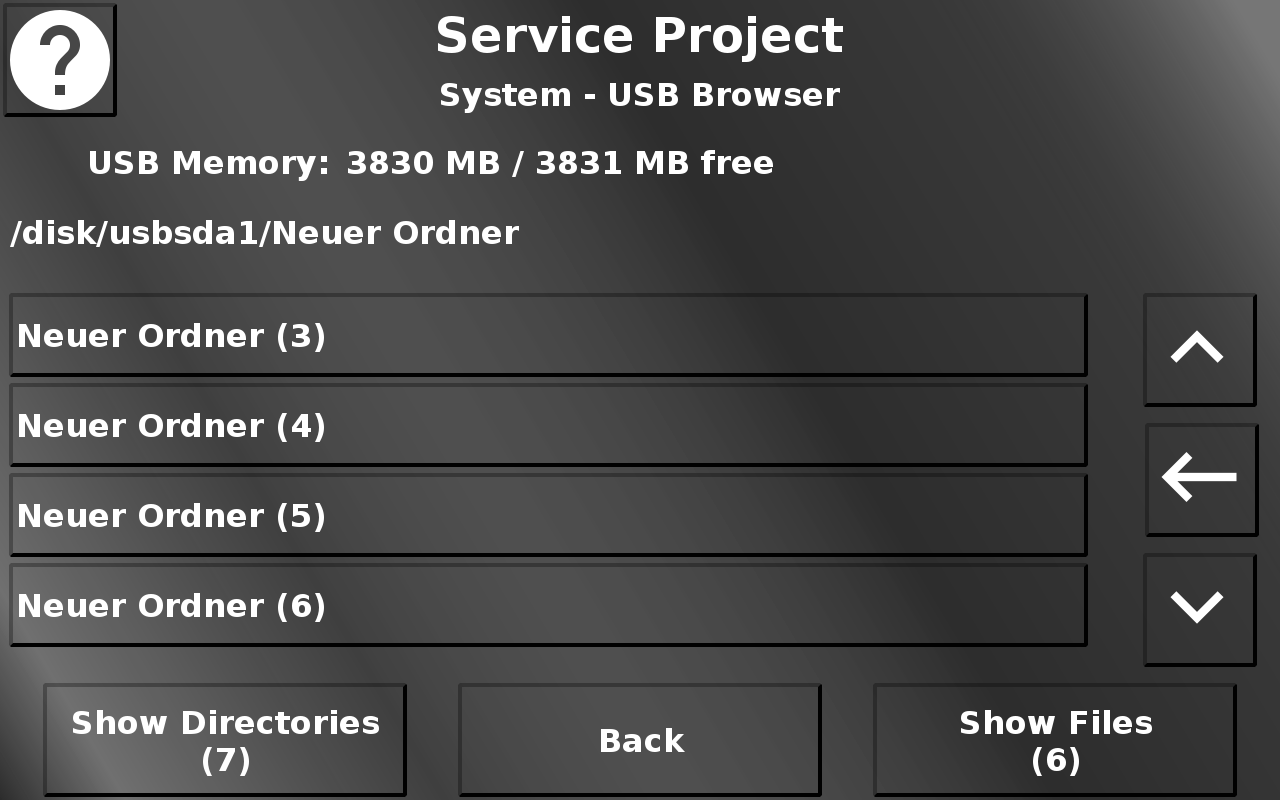
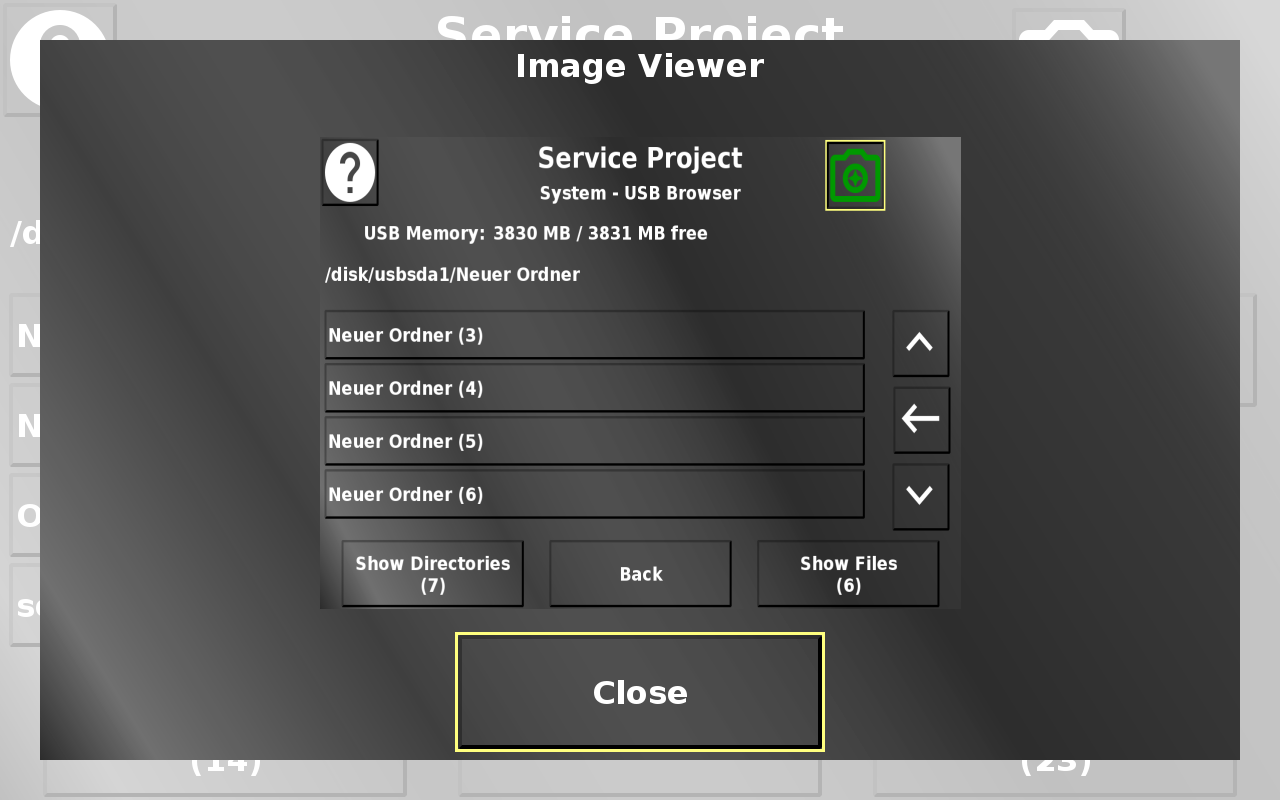
In this screen a rudimentary file browser for the USB stick is implemented. Folders or Files are shown on the screeen.
The Show Directories / Show Files button switches the view. The folders can be accessed by tapping them / selecting them with the encoder and pressing it. With the arrow up and down buttons the folders / files can be scrolled. The arrow left button switches to the parent folder.
Files can be viewed by tapping them.
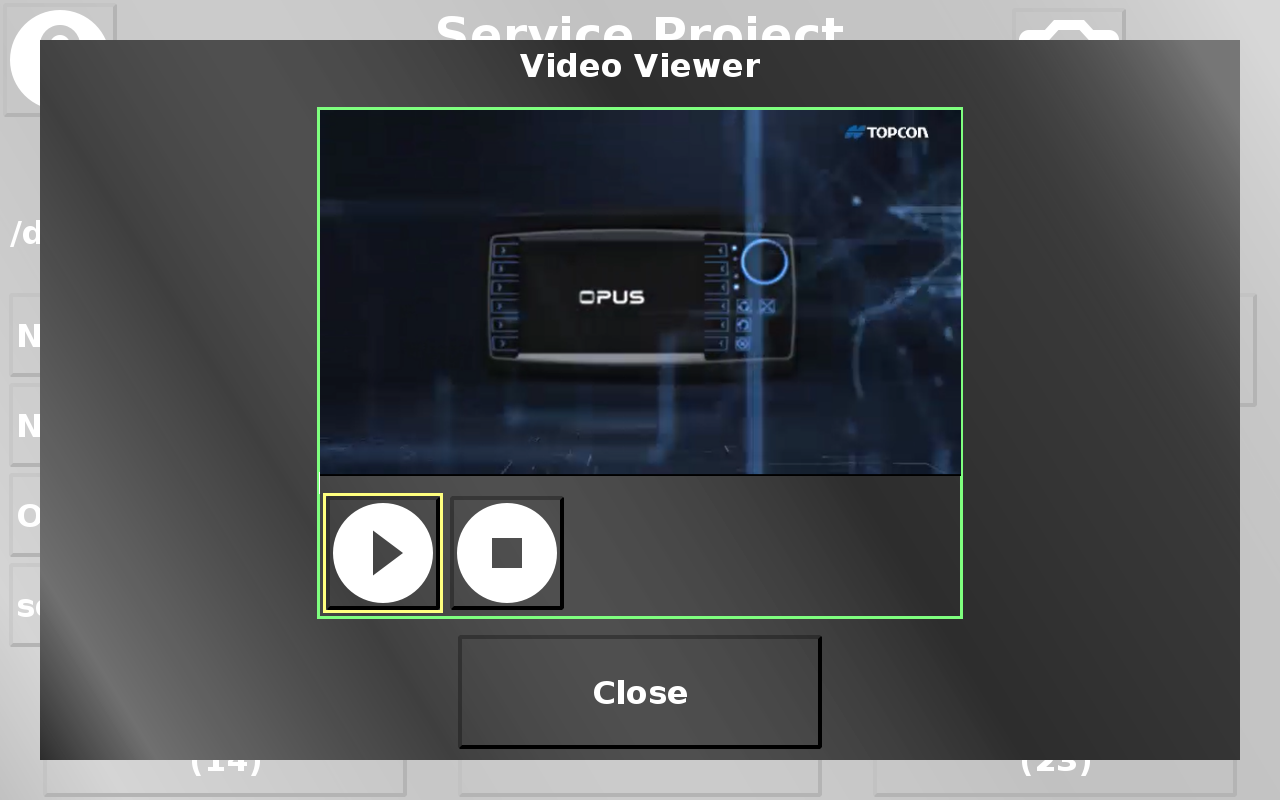
Compatible audio / video files will be opened with the Multimedia Player.The Video Viewer can be closed by pressing the Close button.
Compatible image files will be shown. The Image Viewer can be closed by pressing the Close button.
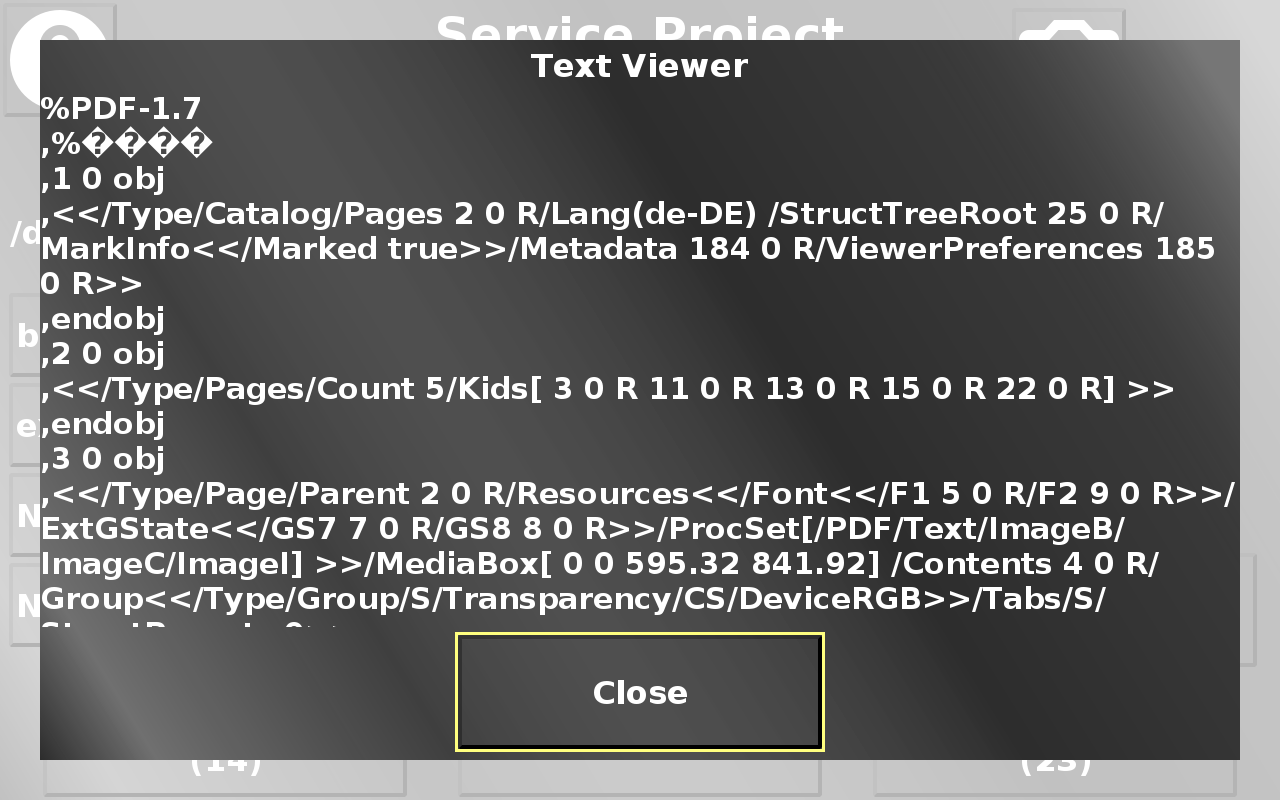
All other files will be treated as text files and the (beginning of the) content will be shown. The Text Viewer can be closed by pressing the Close button.
Back returns to the system menu.
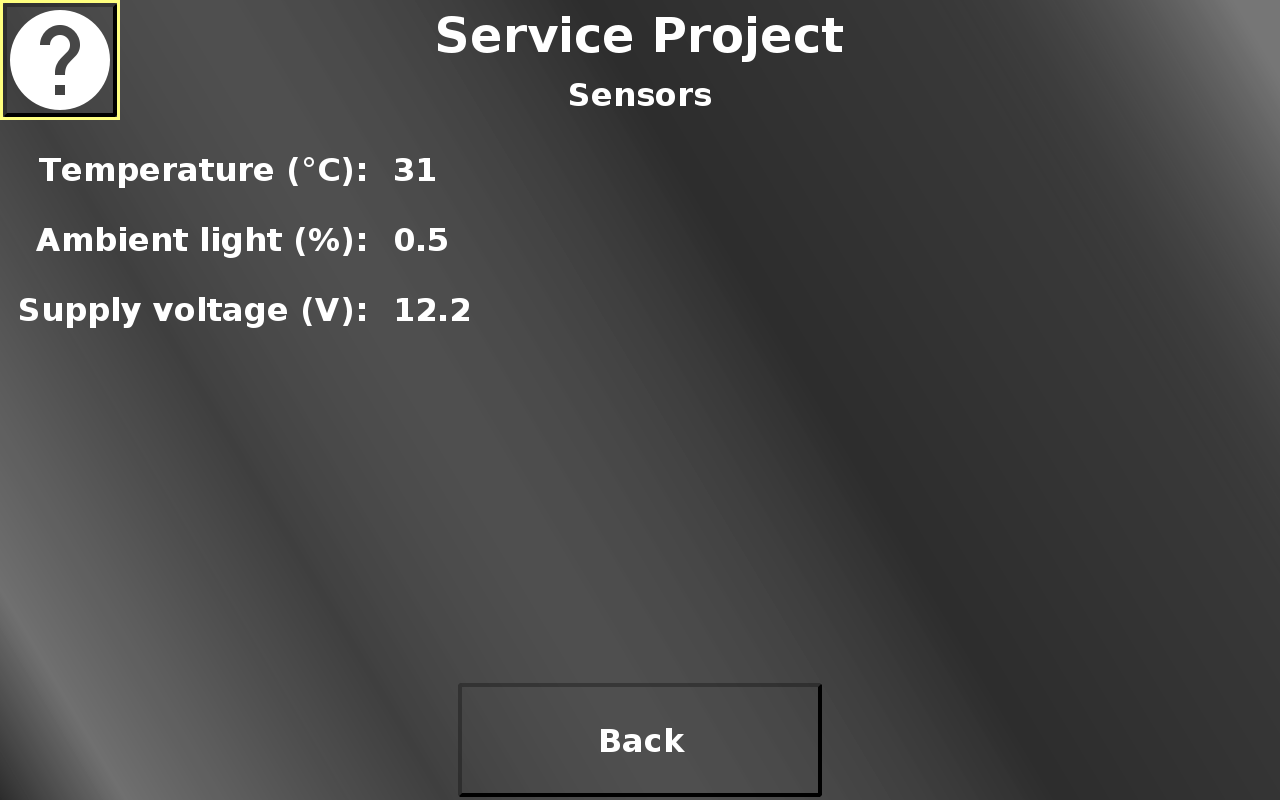
In this screen, the available hardware sensor values can be viewed. Back returns to the main menu.
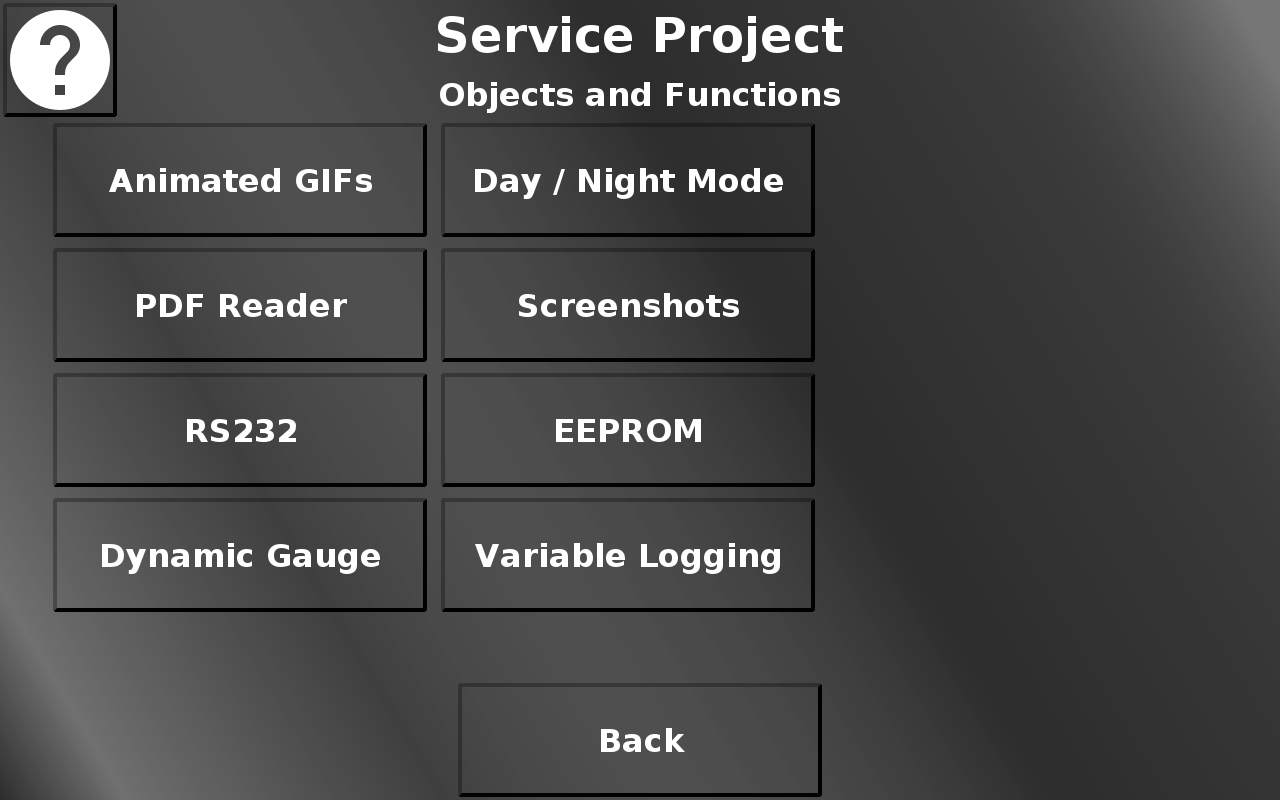
In this screen some functionalities of the OPUS Projektor and the PClient can be tested.
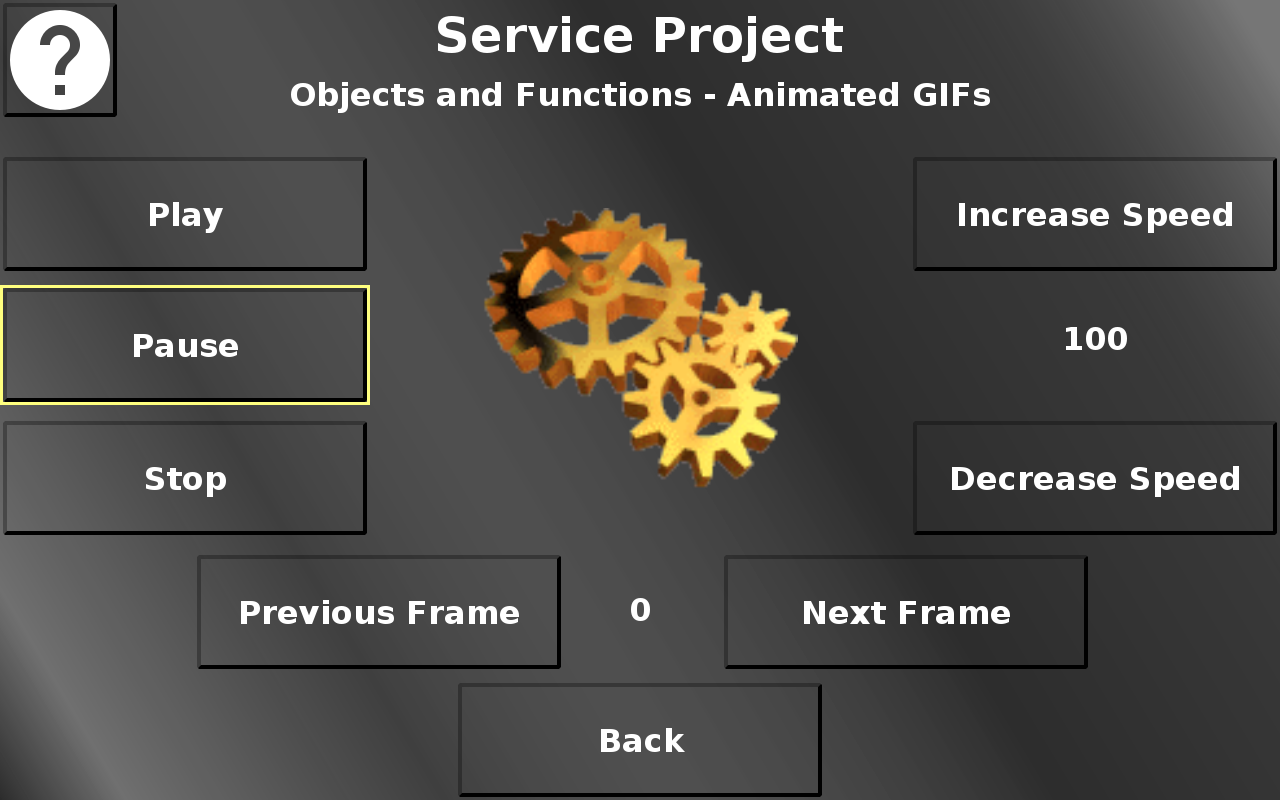
In this screen, an exemplary animated GIF can be controlled.
Play starts the animation.
Pause pauses the animation (but stays at the current frame).
Stop stops the animation (and resets it to the first frame).
Increase speed increases the playing speed.
Decrease speed decreases the playing speed.
Back returns to the Objects and Functions menu.
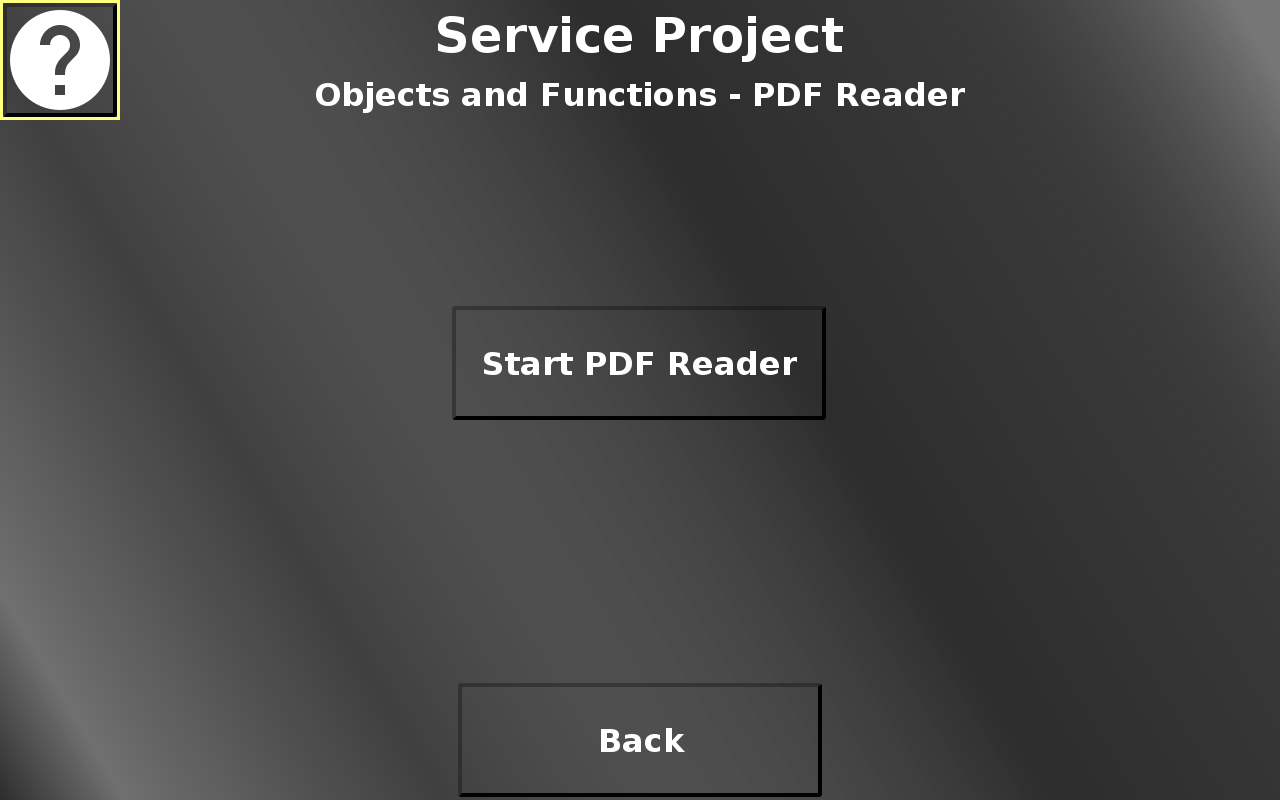
In this screen the PDF reader can be started with an exemplary PDF file.
Please note that it might take a while for the PDF reader to be started. Please be patient.
Please note that the PDF reader opens as a separate full screen application.
Back returns to the Objects and Functions menu.
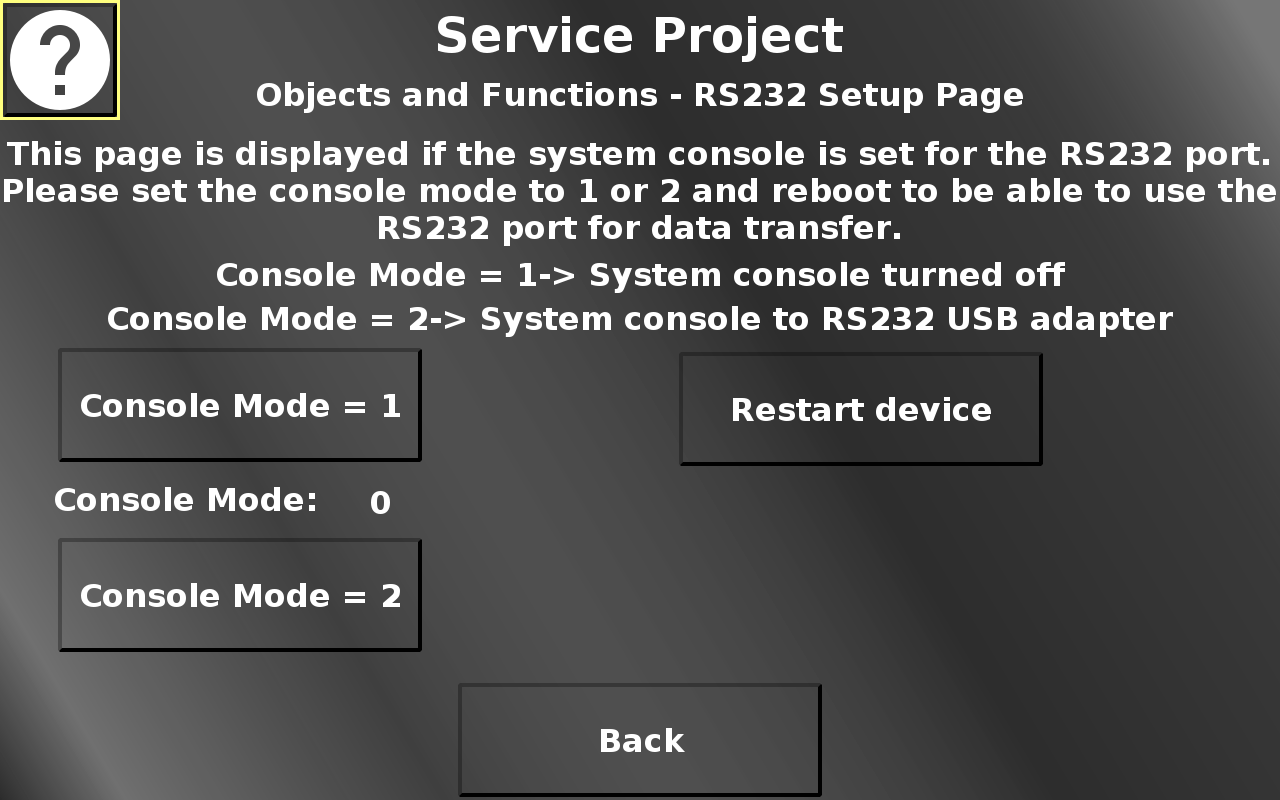
In this screen necessary settings to use the RS232 port for data communication can be made. By default, the RS232 port will be used by the device operating system console. To be able to use the RS232 port for data communication, the console mode needs to be set to 1 (system console off) or 2 (system console goes to the first USB-RS232 adapter (with USB side plugged into the device).
Please note that this screen is only displayed if the console mode is 0.
The device needs to be restarted for this setting to be activated.
The current console mode is displayed between the two console mode buttons.
Restart device opens a confirmation dialog.
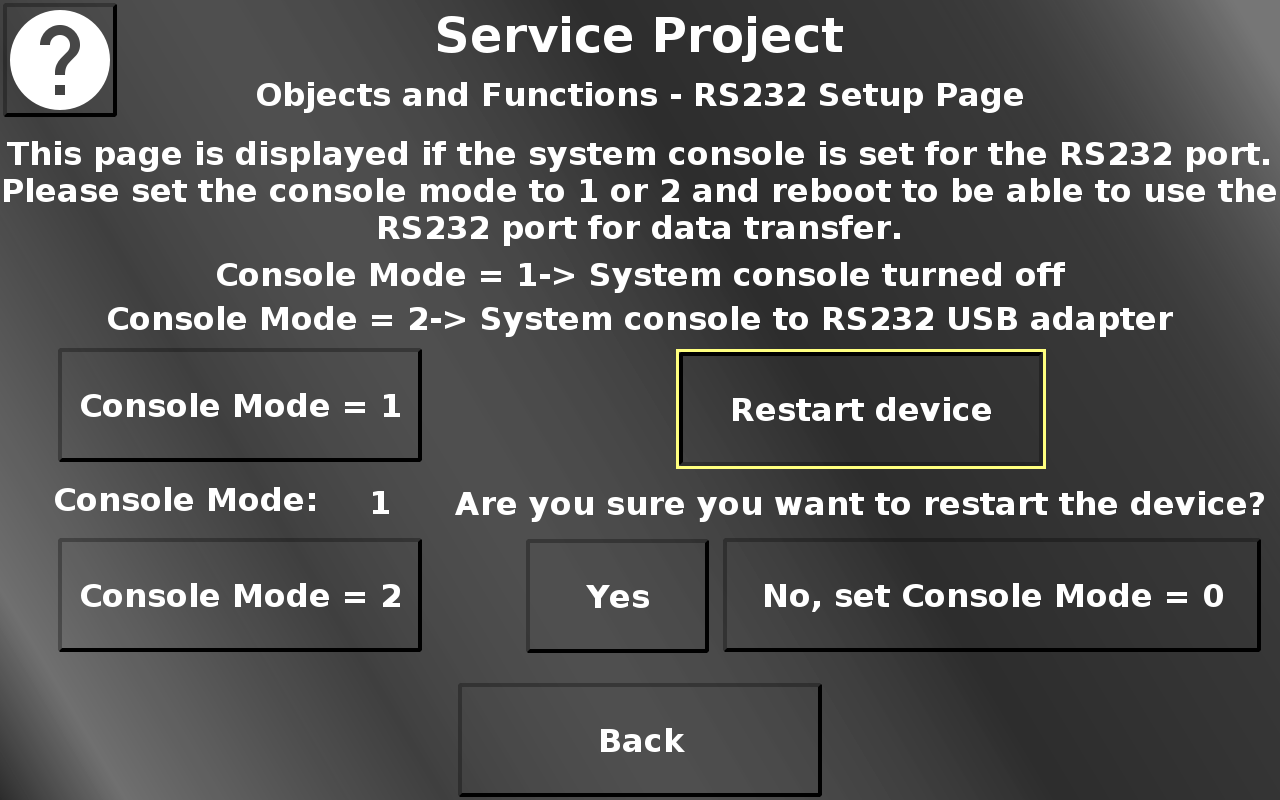
Yes restarts the device with the chosen console mode setting. No closes the dialog and resets the console mode back to 0. Back returns to the Objects and Functions menu.
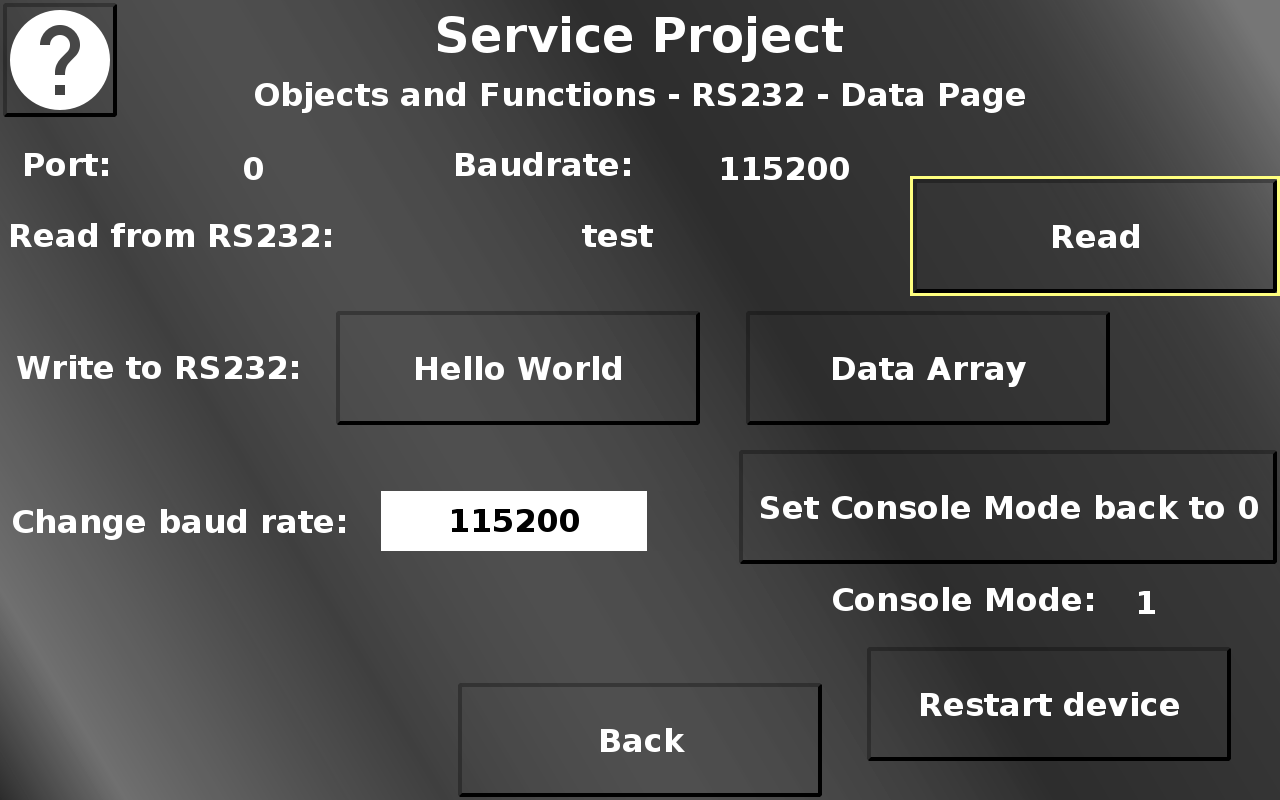
In this screen, RS232 data communication can be tested.
Please note that this screen is only shown if the console mode is 1 or 2.
Read reads the RS232 buffer and displays the result (if it is text).
Hello World writes a "Hello World" to the RS232 port to be received by the other end.
Write Arrays writes a data array to the RS232 port to be received by the other end.
Set Console Mode back to 0 sets the console mode back to 0.
Restart device opens a confirmation dialog.
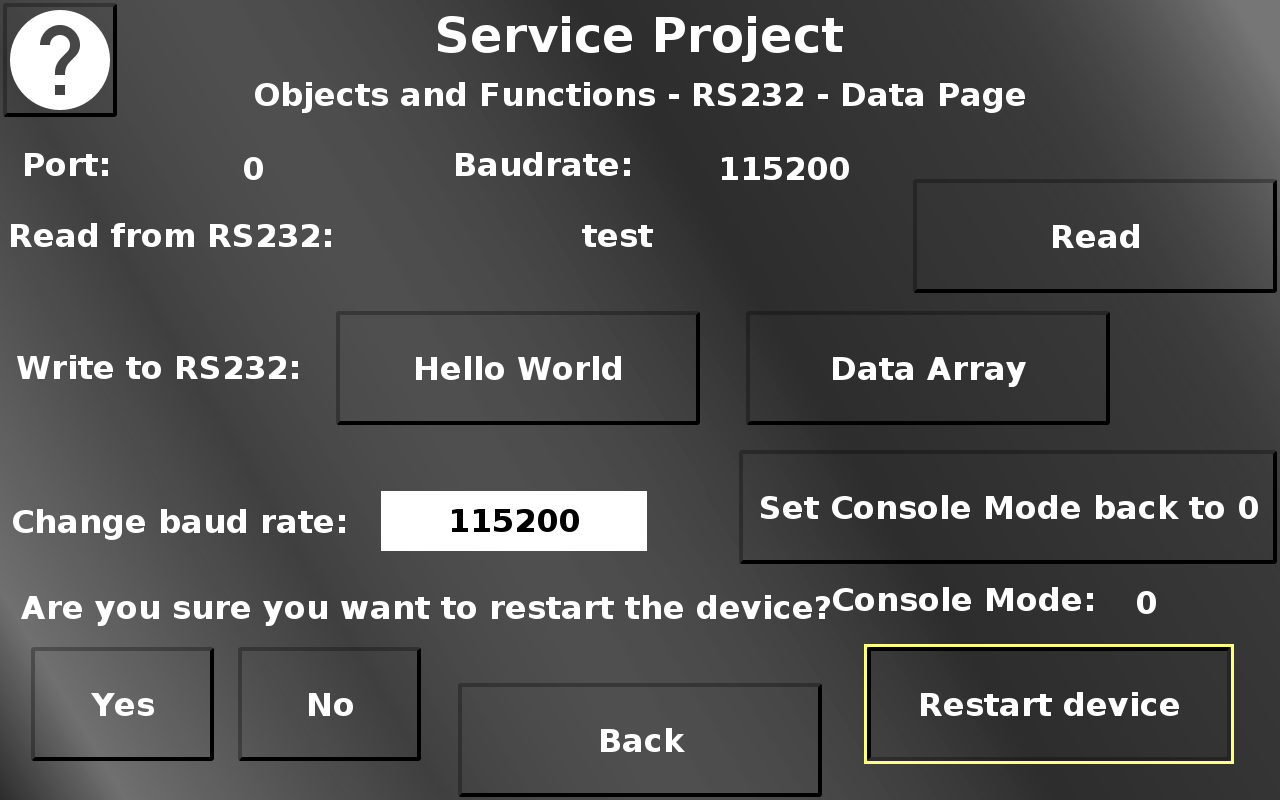
Yes restarts the device with the current console mode setting.
No closes the dialog and reverts the changed console mode setting.
Back returns to the Objects and Functions menu.
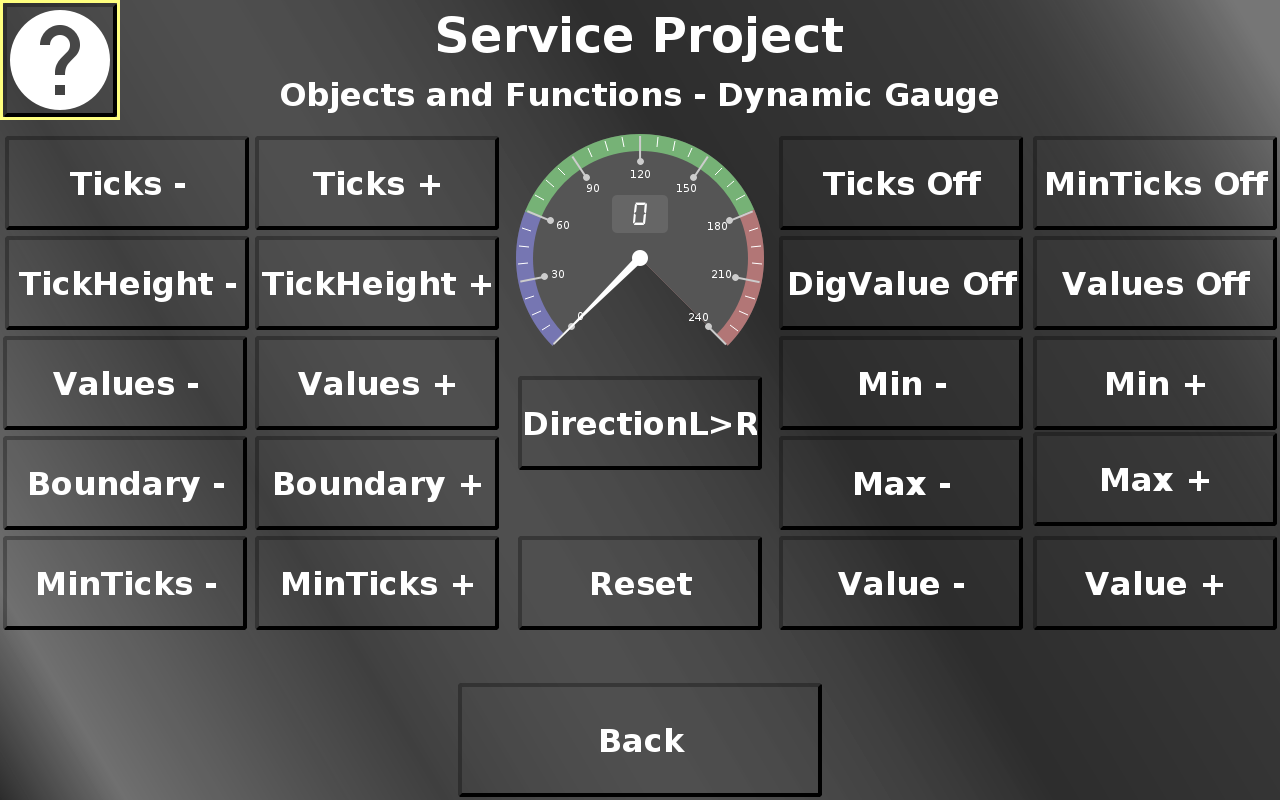
In this screen the dynamic possibilities of the Gauge object can be tested. The different button change the object at runtime.
Reset resets the object to the default setup.
Back returns to the Objects and Functions menu.
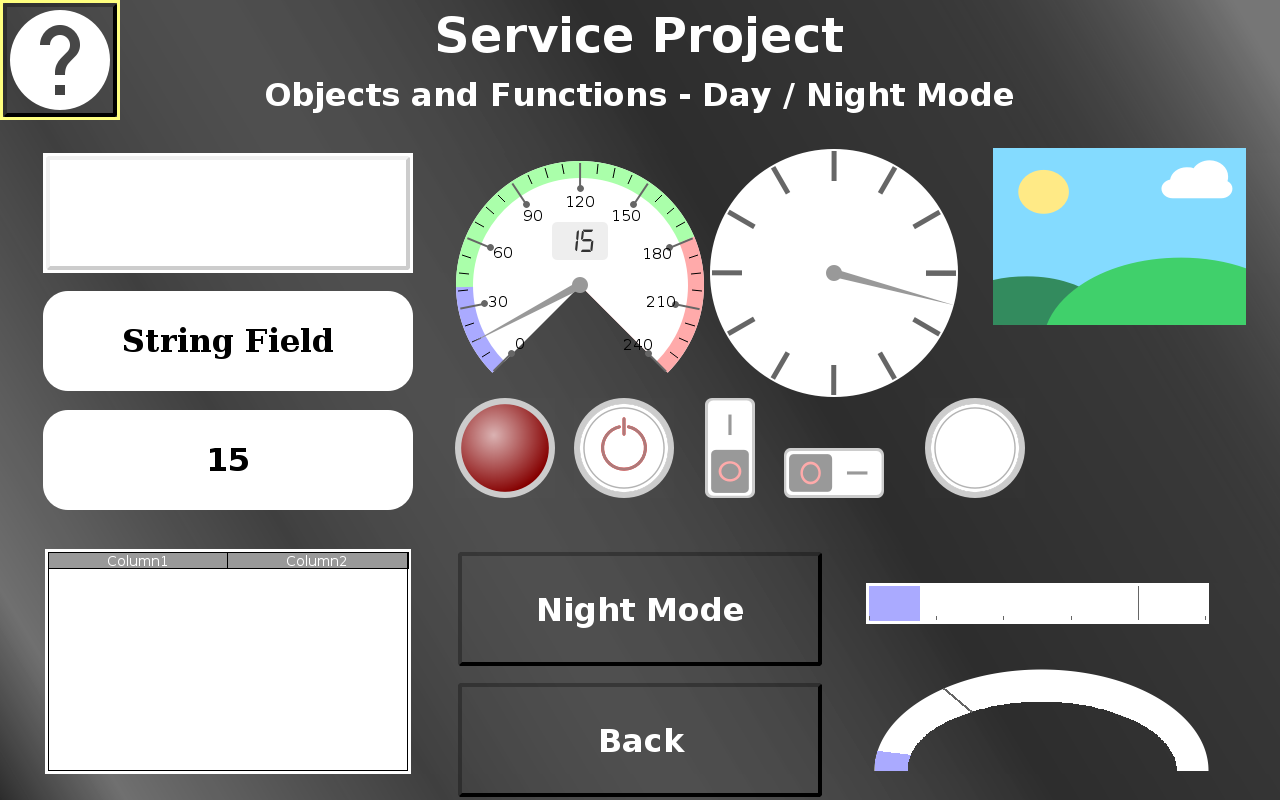
In this screen the day / night mode can be tested.
The Night Mode / Day Mode button switches all objects between their day mode / night mode theme.
Back returns to the Objects and Functions menu.
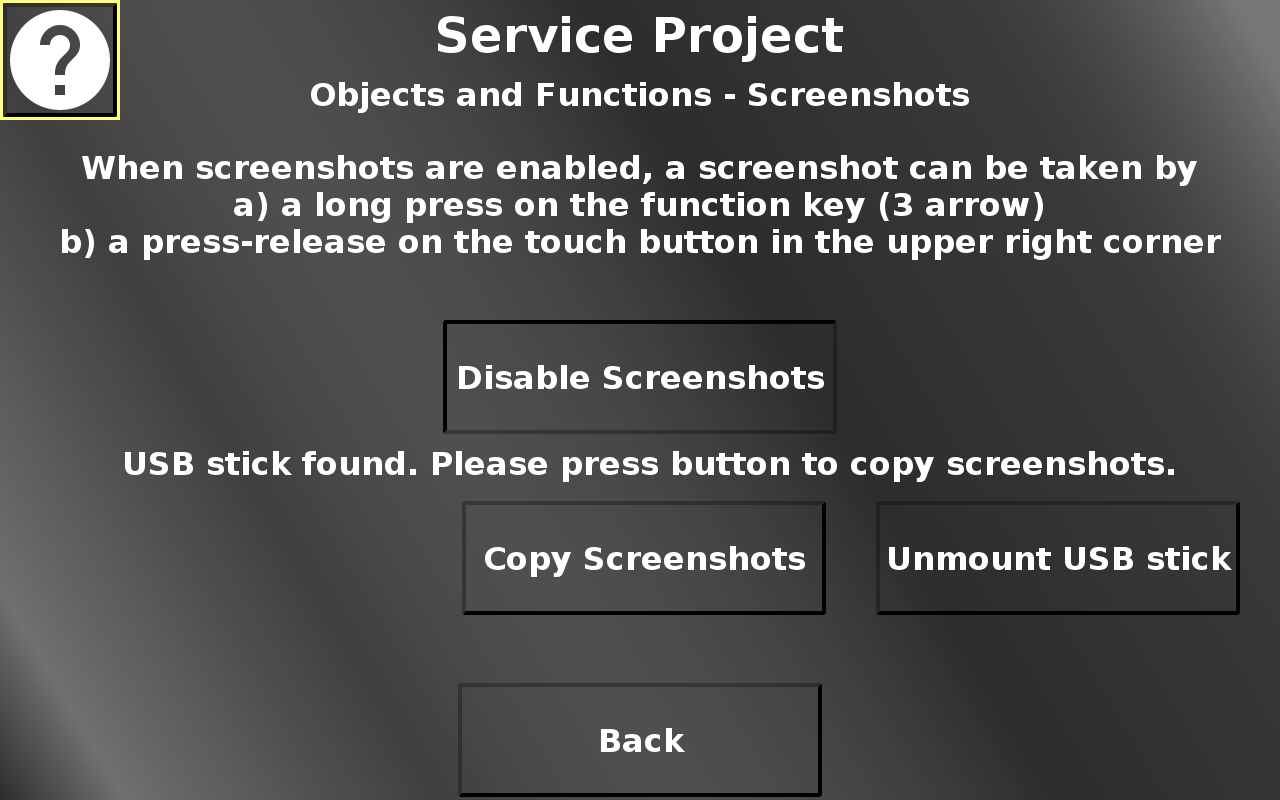
In this screen, screenshots can be enabled by pressing "Enable Screenshots". When screenshots are enabled, a screenshot can be taken on every page by either pressing the camera button in the upper right, or by long-pressing the 3 arrow key on the device. Screenshots will be stored on the file system. If a USB stick is plugged in and mounted, the screenshots can be copied to the USB stick by pressing "Copy Screenshots". The USB stick can be unmounted by pressing "Unmount USB stick". Back returns to the Objects and Functions menu.
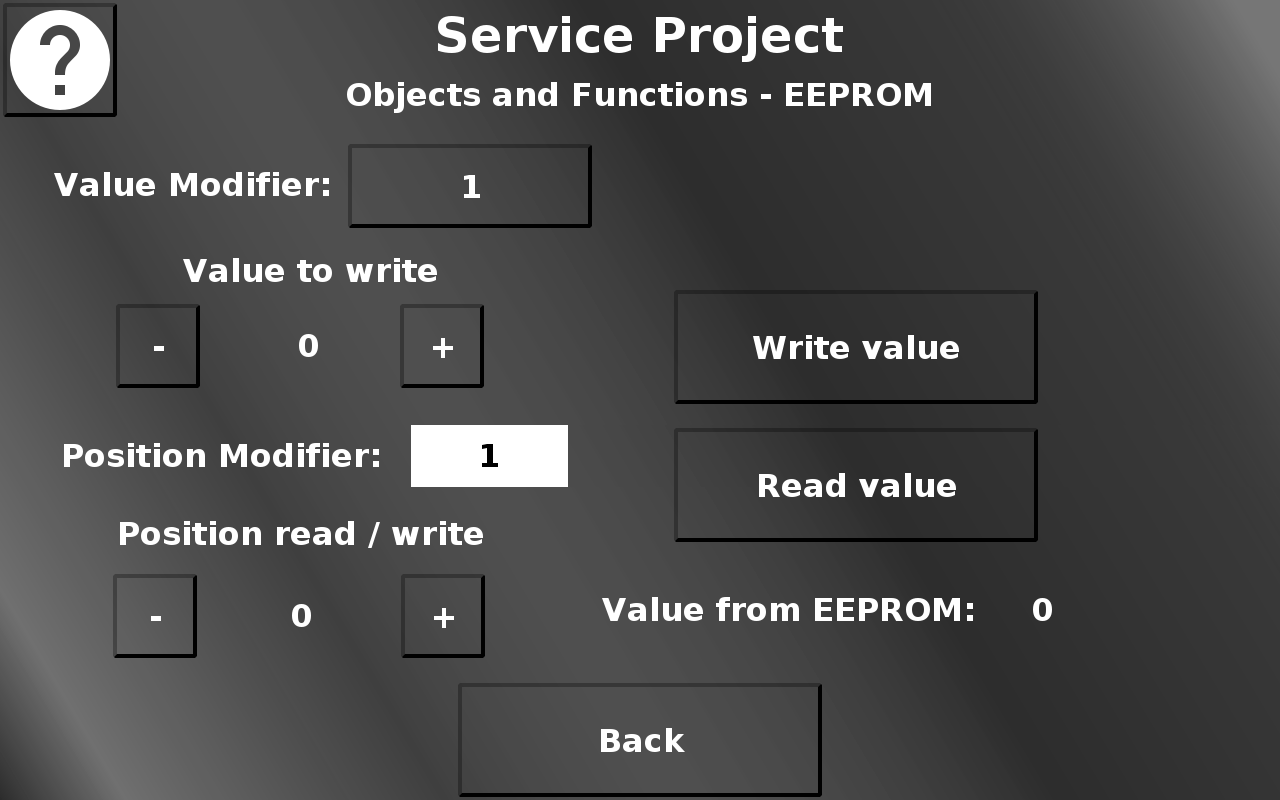
In this screen, available from version 2020.4.2, the EEPROM can be tested by writing to it and reading from it. The value that should be written into an EEPROM position can be set between 0 and 255 with the + and - buttons. They will increment and decrement either by 1 or 10, depending on the value modifier setting. Write value will write the currently set value to the currently set position. The position can be set between 0 and the maximum for the device with the + and - buttons. They will increment and decrement by the value chosen in the position modifier dropdown. Read value will read the value from the currently set position and display it. Back returns to the Objects and Functions menu.
Please note that EEPROMs have limited write cycles, so avoid writing into the same position too many times without reason to do so.
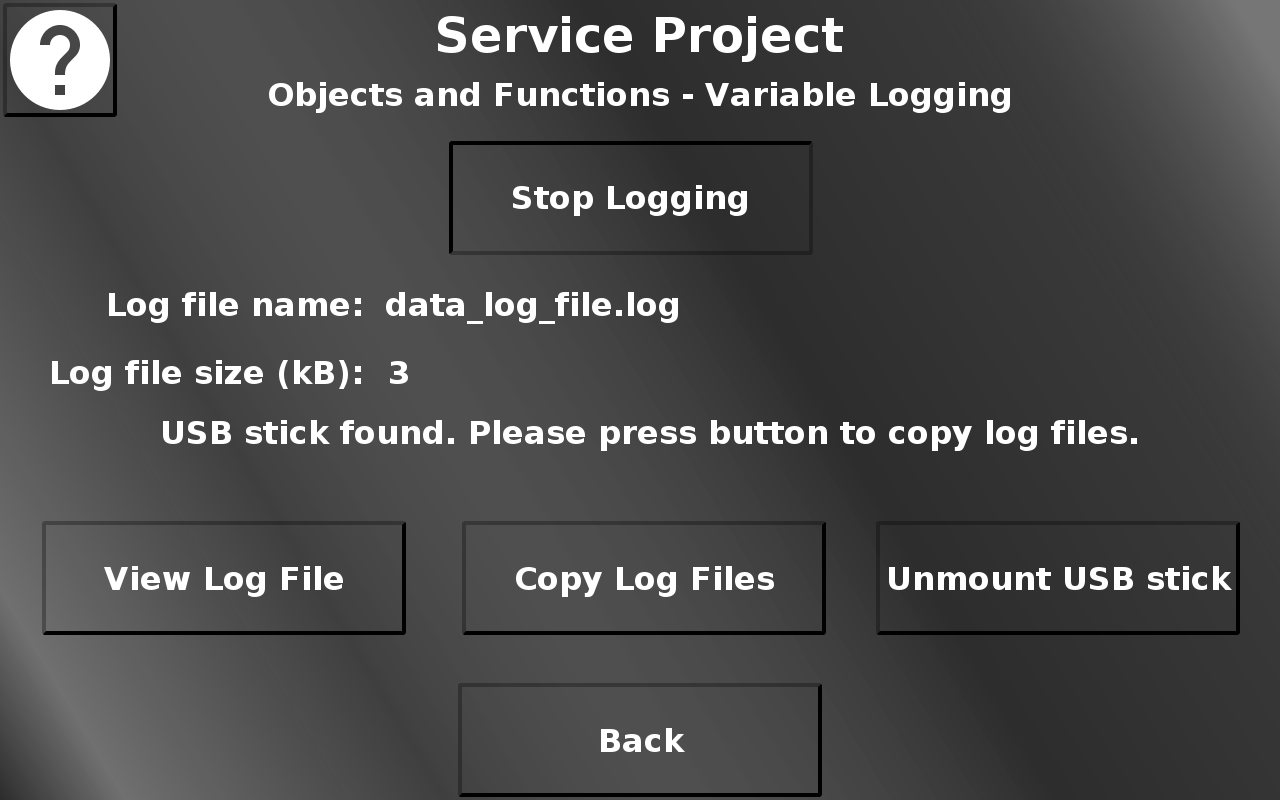
In this screen the variable logging functionality can be tested. Press Start Logging to start the variable logging. The logged variable is the RTC seconds variable, so there will be one event each second. The file can be viewed by pressing View Log File. This opens up an alarm showing the content of the file. Close the alarm by pressing Close. The Log File(s) can be copied to a connected USB stick by pressing Copy Log Files. Press Unmount USB stick to unmount the USB stick. Back returns to the Objects and Functions menu.
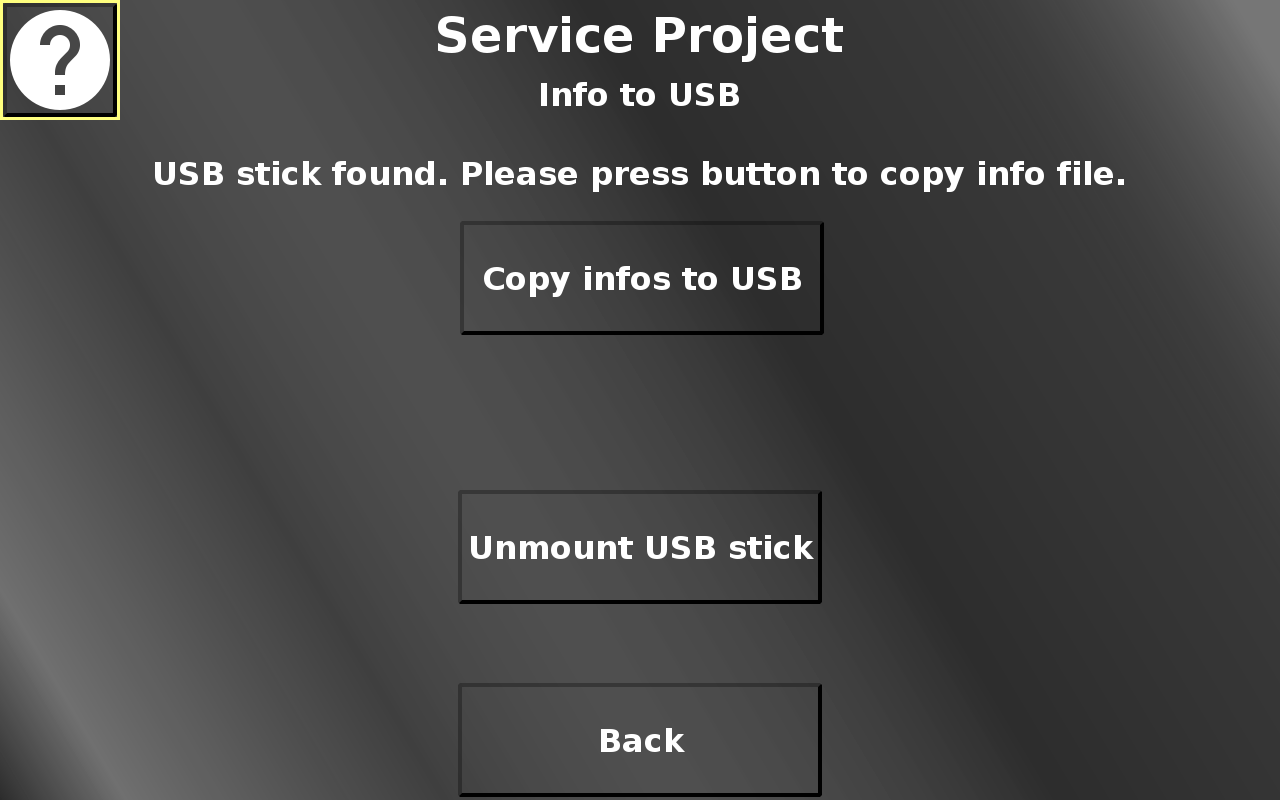
In this screen a file with information about the device can be written to a connected USB stick for analysis or to be sent to technical support.
Copy infos to USB creates the info file and puts it on the USB stick. Please note that this button is only shown if a valid USB stick is connected.
This is an exemplary content of an info file:
Device Info
Article number: OPUSA8SN1CANB000
Serial number: 1611001AA
Device type: 12.1" Standard Basic
OS version: 4.1.15-egspro-2.3.2-1
PClient version: 2020.4.0.2
Project version: 0.1
Operating time: 2 d, 7 h, 12 m
System Uptime: 0 h, 6 m, 28 s
Date / Time: 2020/2/28 - 14/16/18
System memory: 1192.784 MB / 1312.900 MB
Device temperature: 41.2 °C
Device voltage: 24.4 V
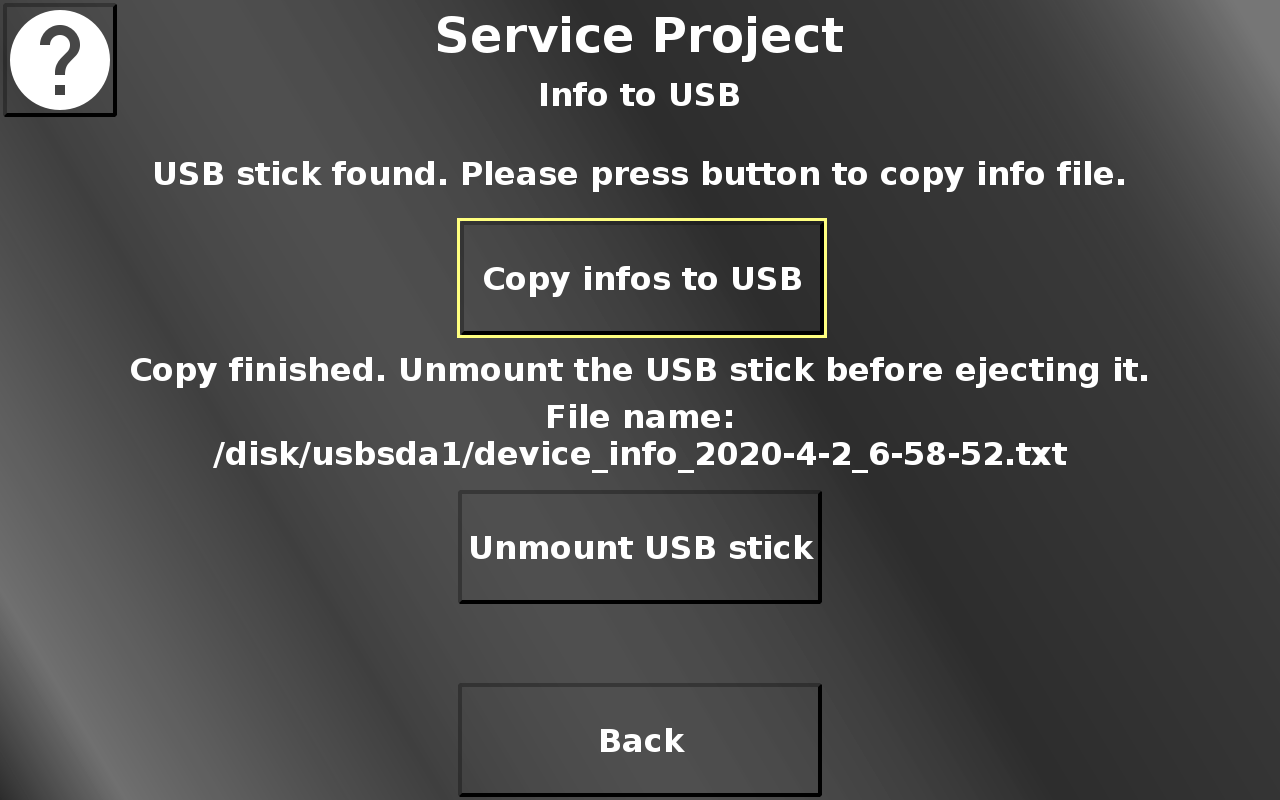
After copying, the file name of the created file will be shown.
Unmount USB stick unmounts the USB stick so it can be ejected from the device.
Please note that until the USB stick is mounted, the file might not be finalized on the USB stick. Ejecting the USB stick before unmounting means a probable loss of the info file.
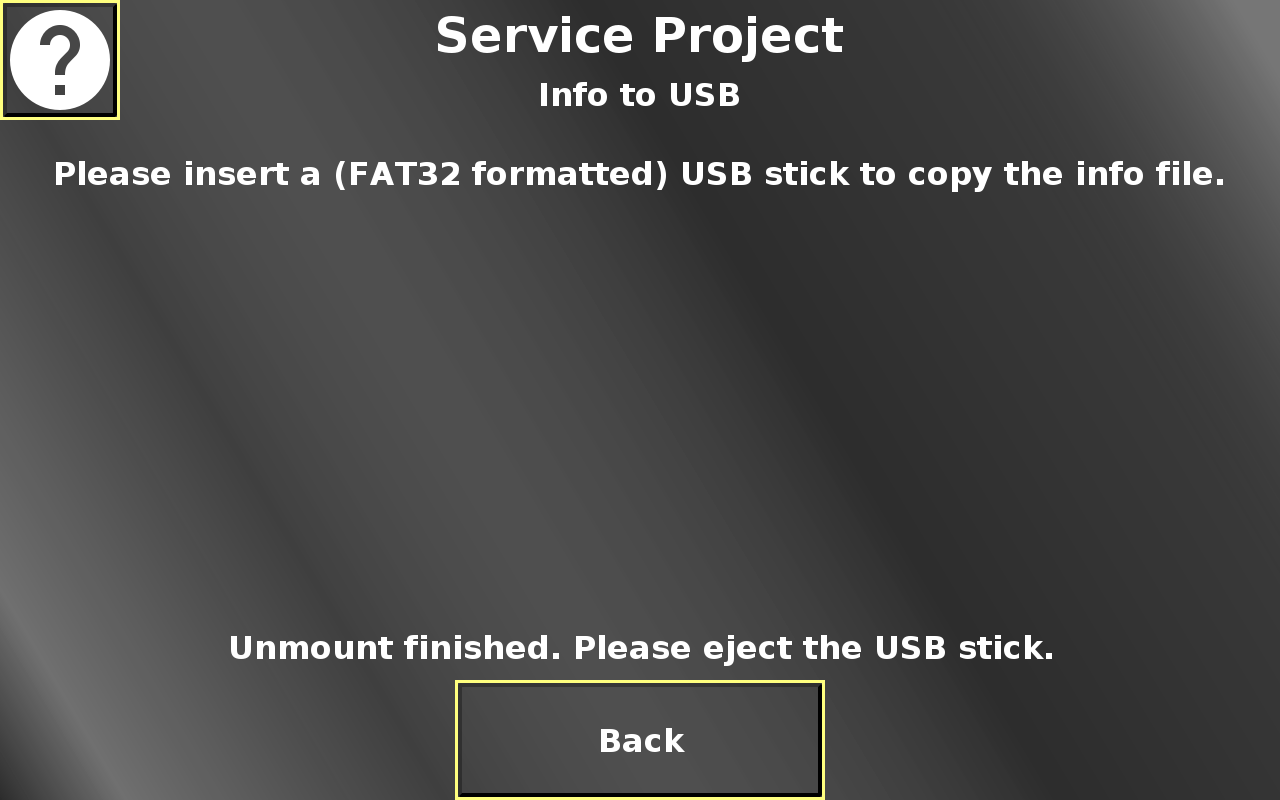
When the USB stick is successfully unmounted, an information will be displayed on the screen that the stick can be ejected.
Back returns to the main menu.
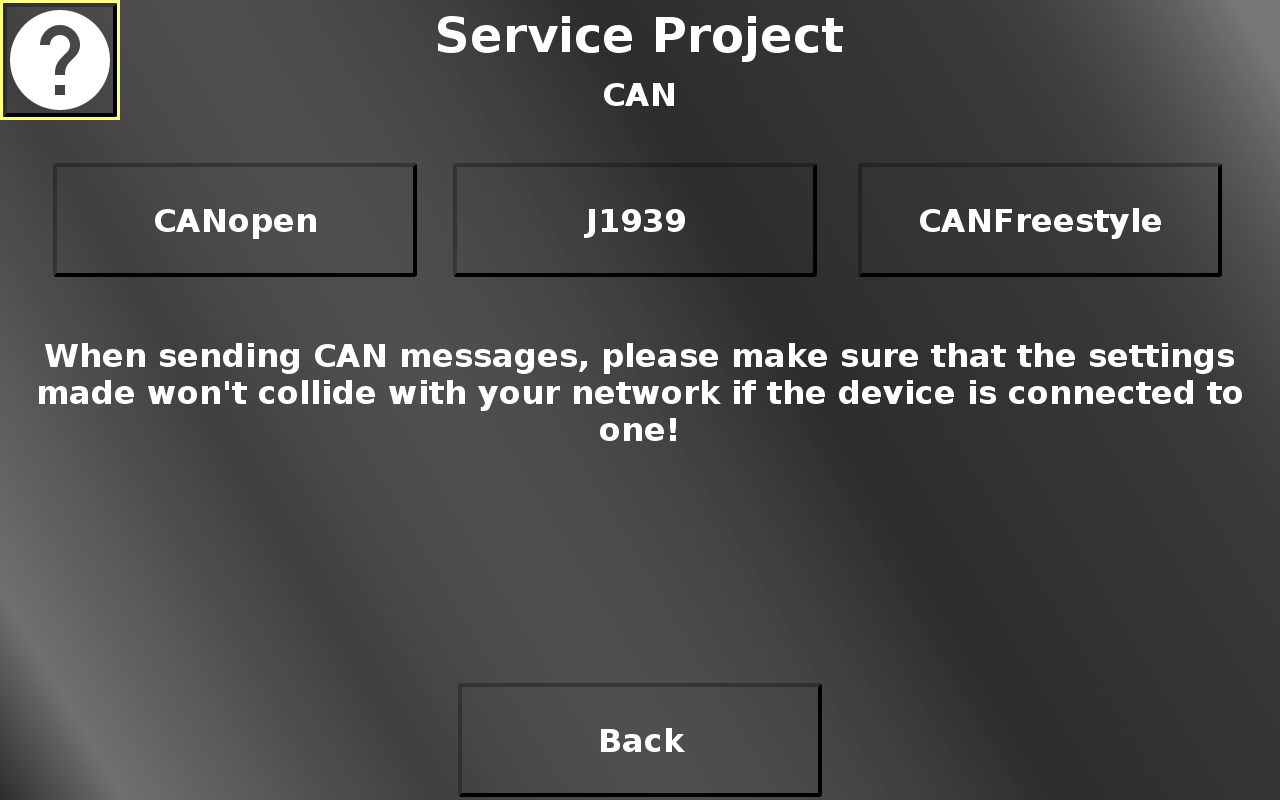
In this screen the different CAN protocols can be selected for some tests.
Please note that if the device is connected to a CAN network, it is your responsibility that the messages created in these tests don't collide with the CAN network.
Back returns to the main menu.
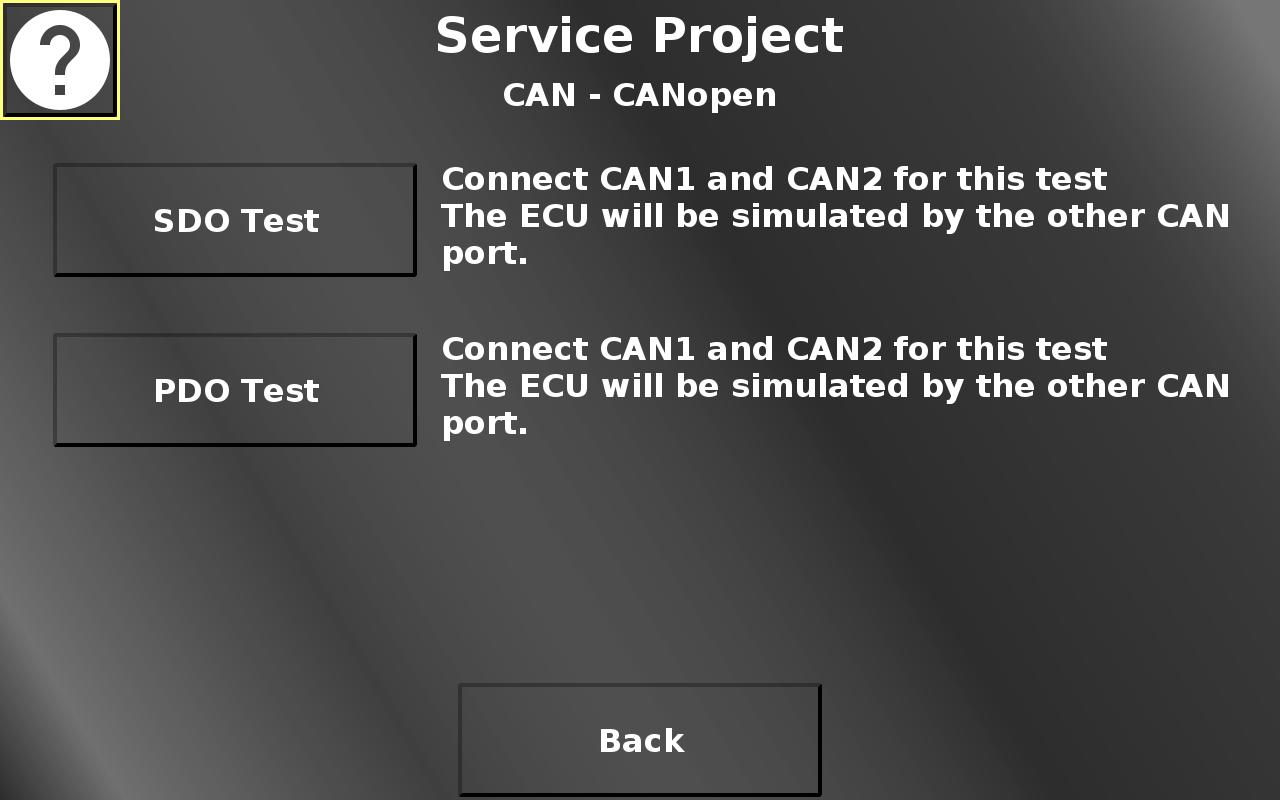
In this screen the SDO and the PDO Test can be selected. Please note that for these tests to work, the device ports CAN 1 and CAN 2 need to be connected.
Back returns to the CAN menu.
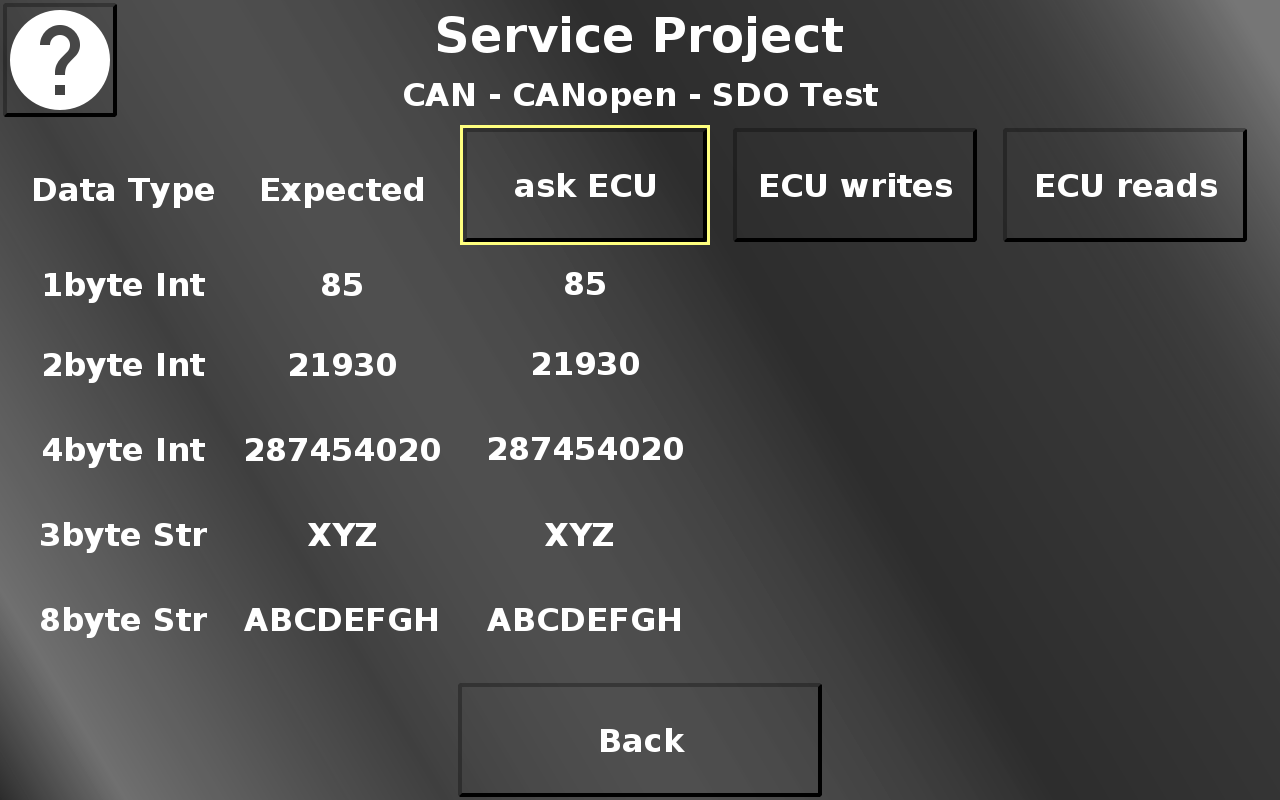
In this screen different SDO functionalities can be tested.
ask ECU means that the OPUS device will ask the ECU (aka CAN port 2) for some data values. If the communication is successful, the values in the Expected column should be the same as in the ask ECU column. Create a CAN trace to see the communication process.
ECU writes means that the ECU (aka CAN port 2) writes some variables in the OPUS device. If the communication is successful, the values in the Expected column should be the same as in the ask ECU column. Create a CAN trace to see the communication process.
ECU reads means that the ECU (aka CAN port 2) reads some variables from the OPUS device. If the communication is successful, the values in the Expected column should be the same as in the ask ECU column. Create a CAN trace to see the communication process.
Back returns to the CANopen menu.
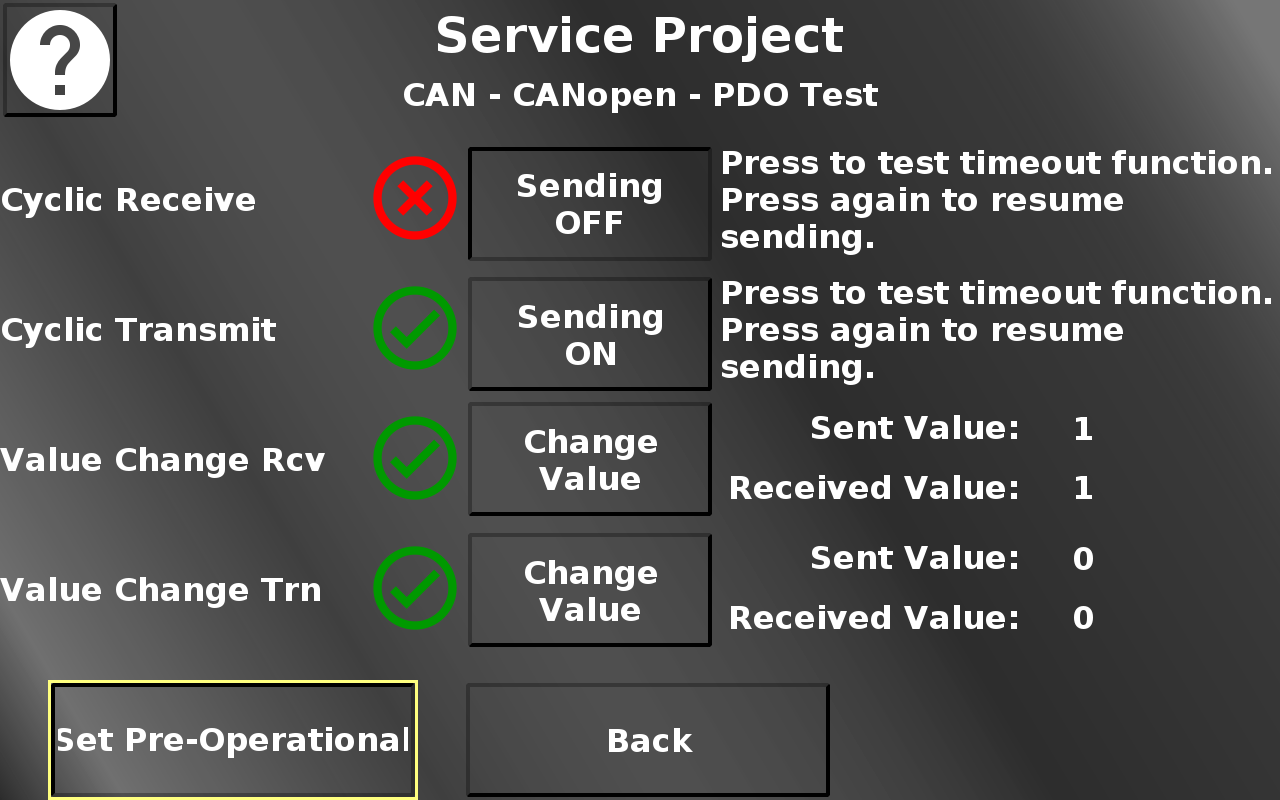
In this screen some PDO functionalities can be tested. For the PDO communcation to start, the device first needs to be set into operational mode with the button in the bottom left.
The first two indicators show a green check mark if the cyclic receive and transmit communication work correctly. You can disable the sending of the appropriate message with the according button. This should make the red X appear. Note that the ECU is simulated with CANFreestyle mappings on CAN port 2.
The second two indicators show a green check mark if the sent value and the received value of a CANopen Receive(Rcv) and Transmit (Trn) mapping are identical.
Press the buttons to change the sent value. The received value should change to the same almost instantly. Only very quick taps on these buttons should make the red X appear.
Initially, the received values are set to invalid, so the red X will appear for both values. Once this communication was established, the green check mark will be displayed as long as the values are the same, even if the device is set to pre-operational (i.e. it cannot send or receive messages). Press the buttons to change the sent value and the red X should appear.
Also note that once the device is back to operational, only the Transmit (Trn) value might automatically update. This is a property of the CANopen standard, when a device first goes into operational mode, it will once send all transmit mappings with their current values. The Receive (Rcv) value is being sent by a CANFreestyle mapping on CAN port 2 which does not have such a feature. Press the Change Value button, then the received value should also update and the green check mark appears.
Back returns to the CANopen menu.
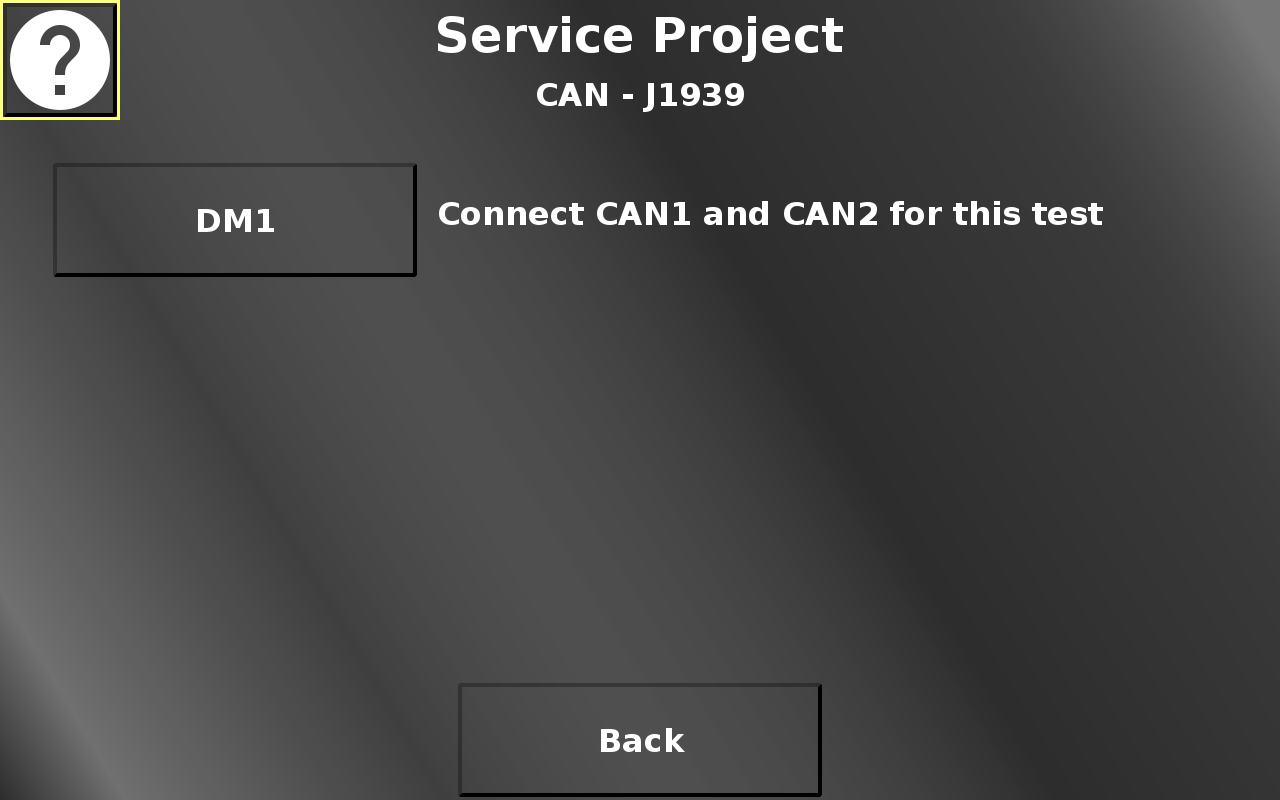
In this screen the DM1 test page can be opened. Please note that for this test to work, the device ports CAN 1 and CAN 2 need to be connected.
Back returns to the CAN menu.
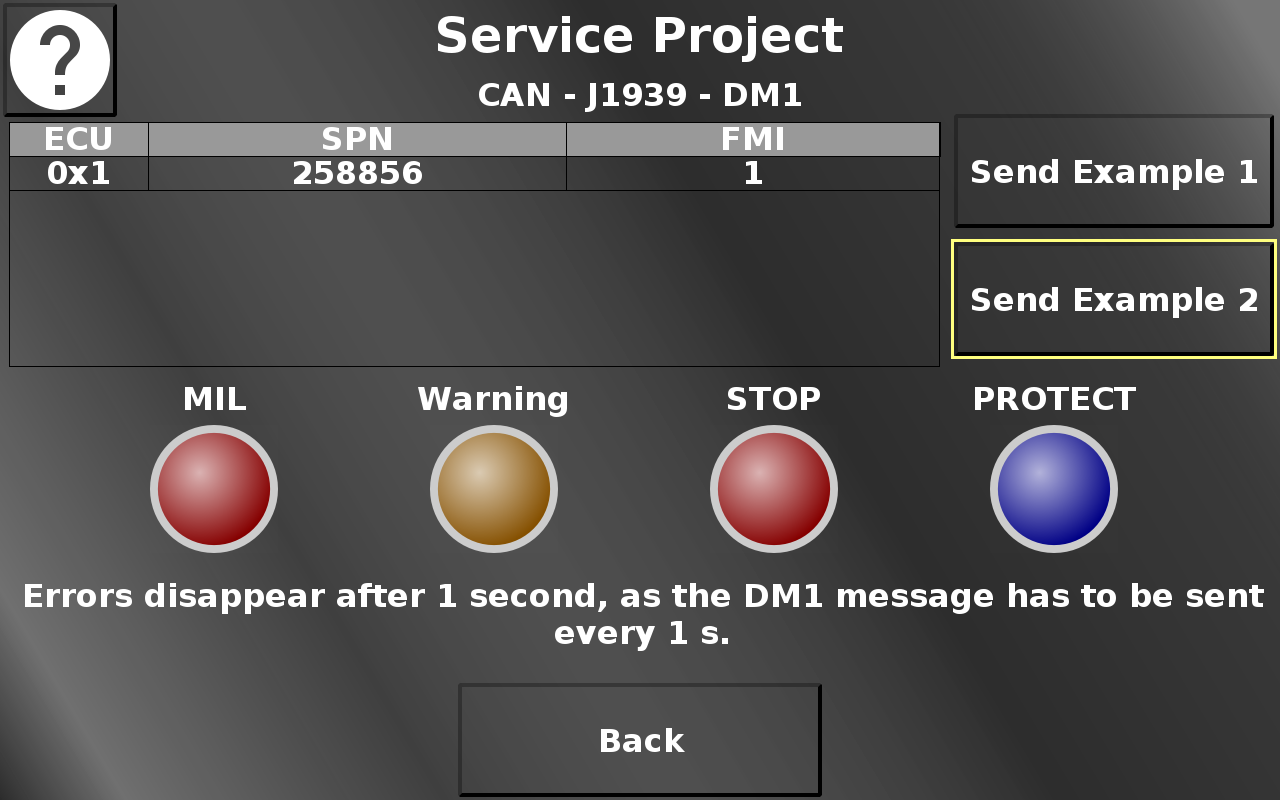
In this screen two DM1 tests can be performed.
Send Example 1 will send an error to the OPUS device and let one lamp blink slowly.
Send Example 2 will send a different error to the OPUS device and let all lamps blink fast.
Please note that the errors will disappear after 1 second. DM1 messages have to be sent every 1 s which is why the buffer is automatically cleared after 1 second.
Back returns to the J1939 menu.

In this screen a custom CAN message can be set up which will be sent to the chosen CAN bus.
Please note that creating the "wrong" message can be dangerous for the system the device is connected to.
The CAN 1 / CAN 2 button chooses over which CAN bus the message should be sent.
In the Bitrate dropdown the bitrate can be chosen with which the message should be sent.
In the DLC drowpdown the length of the message can be chosen. Values from 0 to 8 are possible.
The CAN ID - (minus) and + (plus) buttons change the value of the CAN ID of the message.
The Modifier dropdown chooses the modifier by which the CAN ID will be changed. In the displayed setup, a press of the + button will change the CAN ID from 0x1A0 to 0x1B0.
The + and - buttons of the data bytes change the data value of each byte.
The segments for the data bytes will be made invisible depending on the DLC selection.
The modifier button in the bottom switches between 0x1 and 0x10. The - / + buttons for the data bytes modify the value by the selected modifer.
Send Message sends the CAN message with the chosen settings.
Back returns to the CAN menu.
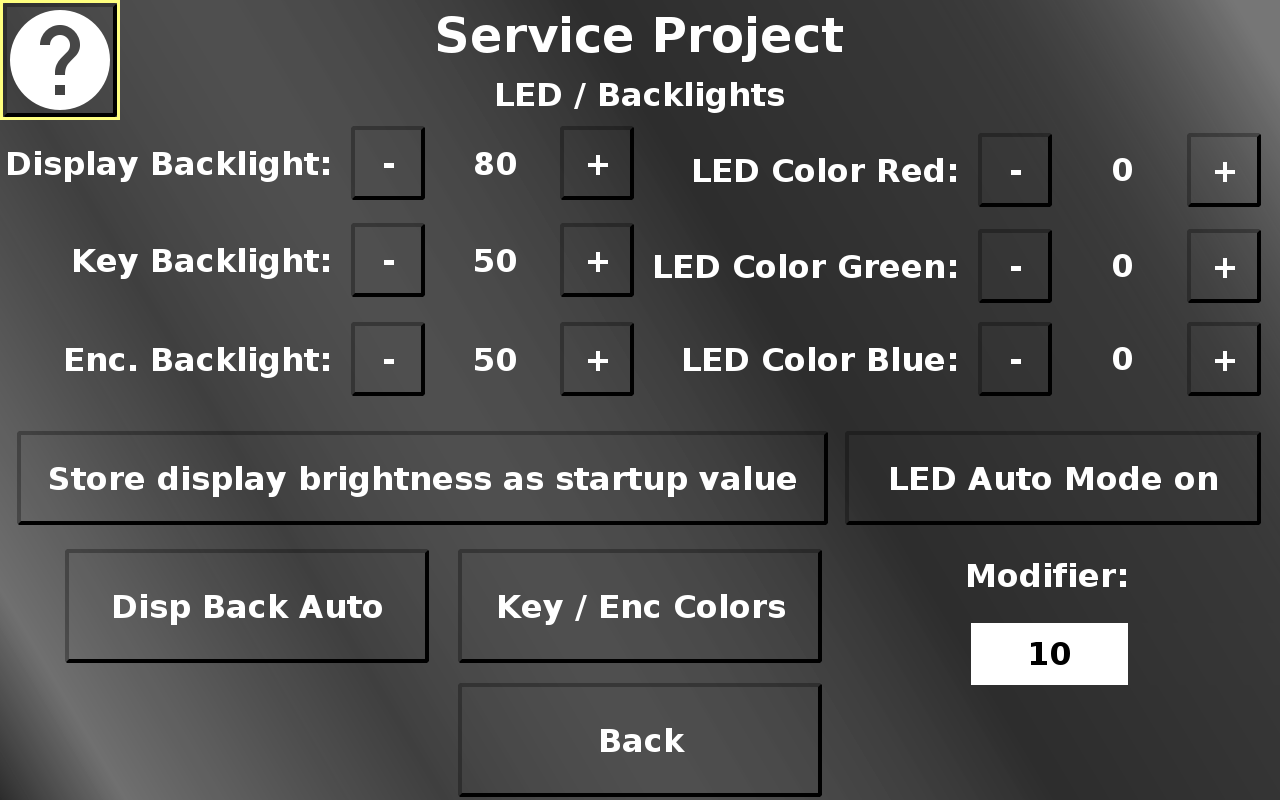
The LED / Backlights screen allows changing the values for display, key, encoder backlight and the multicolor LED.
The - (minus) and + (plus) buttons change the according value. The amount that the current value is modified by, can be chosen with the Modifer dropdown.
Store display brightness as startup value changes the startup display brightness (i.e. the screen brightness when the device is powered on until the application setting sets in).
LED Auto Mode on starts gradual color changes for the multi color led.
Disp Back Auto opens the automatic backlight setup screen.
Key / Enc Colors opens the screen for key and encoder backlight colors.
Back returns to the main menu.

In this screen the automatic backlight control can be activated / deactivated.
Additionally, the backlight curve for the different brightness sensor values can be adjusted.
The first bar sets the brightness of the screen for an ambient brightness of 0 to 10 %.
The second bar sets the brightness of the screen for an ambient brightness of 10 to 20 %, and so on.
The - (minus) and + (plus) sections decrease / increase the brightness value for the according ambient brightness.
Back returns to the LED / Backlight menu.
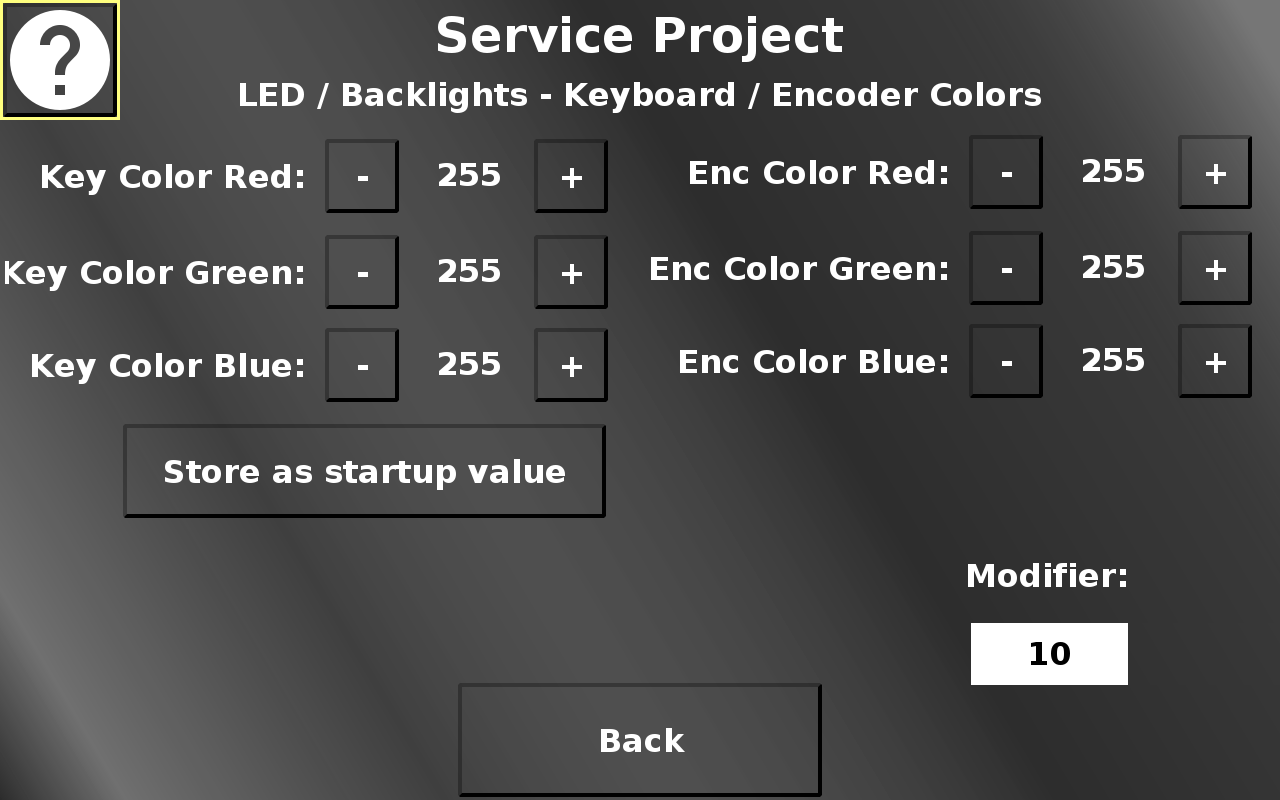
In this screen the colors for the key backlight and the encoder backlight can be adjusted (only available on certain devices).
The - (minus) and + (plus) buttons change the according value. The amount that the current value is modified by, can be chosen with the Modifer dropdown.
Store as startup value will set the backlight color that keys and encoder will have at startup until the application setting sets in.
Back returns to the LED / Backlight menu.
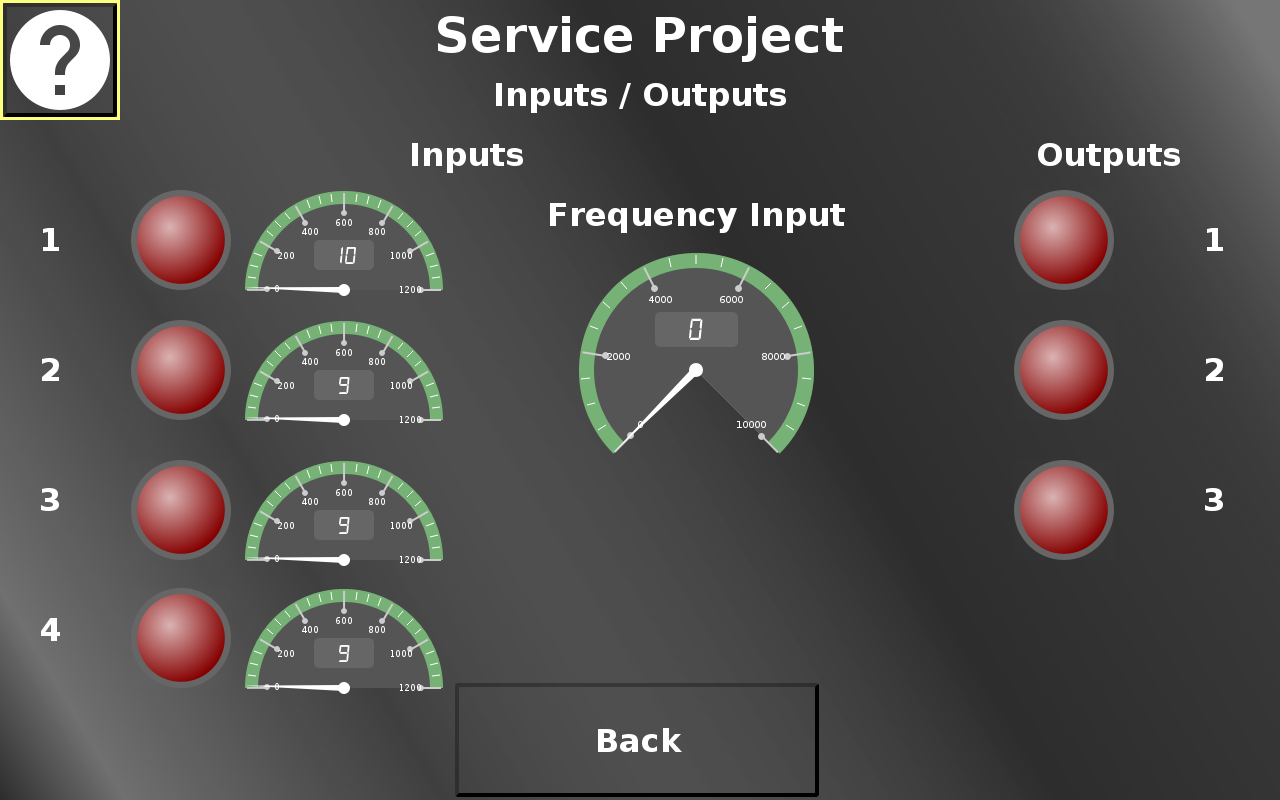
In this screen the analog / digital / frequency inputs can be viewed and the digital outputs can be set.
The lamps for outputs 1 to 3 are inputs and can be activated / deactivated. This activates the according output.
Please refer to the how-to on digital outputs.
Back returns to the main menu.

In this screen different camera screens can be chosen. Please note that only the available screens should be opened.
Back returns to the main menu.

The parameter dropdown in the single camera view screens chooses between the available camera image manipulations (brightness, contrast, saturation, hue, height, width, rotation, mirror, x-position, y-position).
The - (minus) and + (plus) buttons change the according value.
Rotate rotates the image in steps of 90 degrees. This will set a combination of rotation and mirror values.
Back returns to the camera main menu.
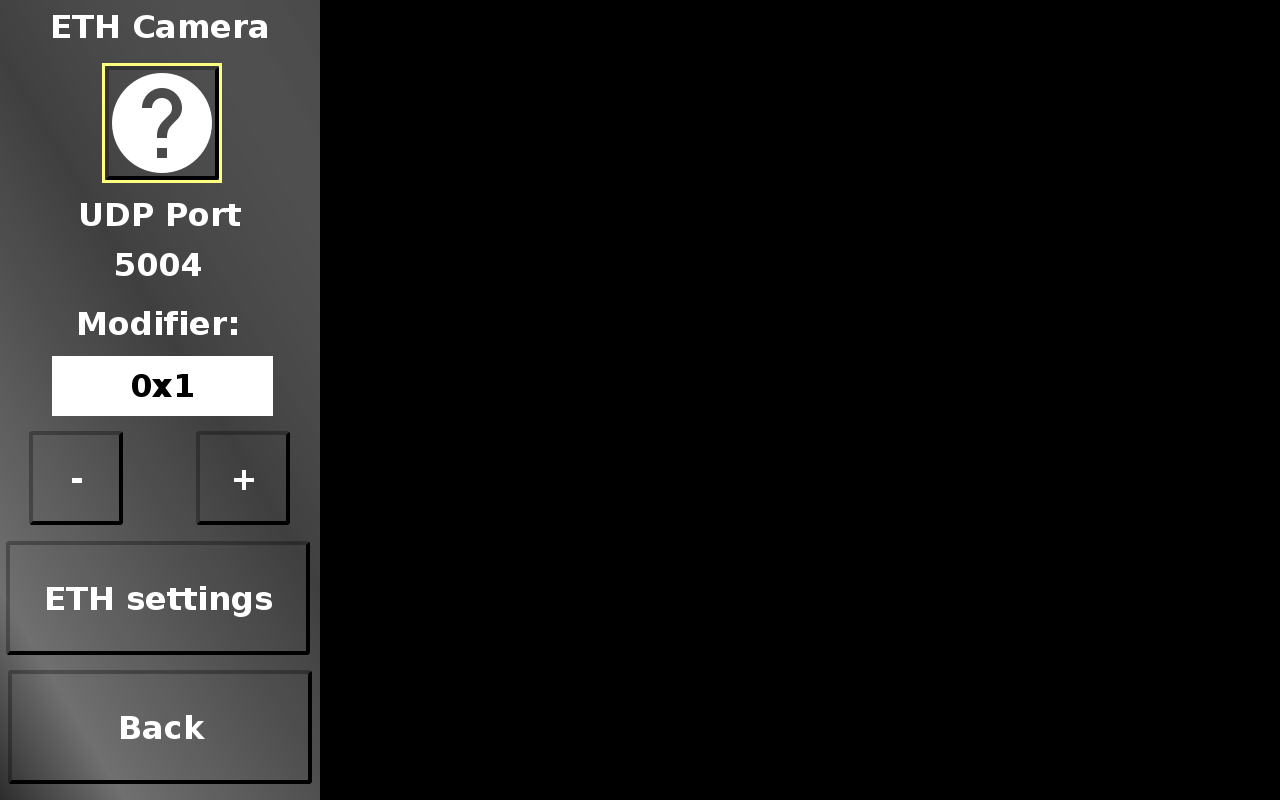
In this screen an Ethernet camera stream can be viewed. Note that only RTP over UDP is supported in this screen.
The UDP port can be set with the - (minus) and + (plus) buttons. The Modifier dropdown chooses the modify value.
ETH settings jumps to the Ethernet settings to set an IP address.
Back returns to the camera main menu.

In this screen an Ethernet camera stream can be viewed. Note that only RSTP is supported in this screen.
The RTSP URL can be set by changing the preset URL (select the String Field and press the Encoder). This opens a keyboard where the new address can be set.
ETH settings jumps to the Ethernet settings to set an IP address.
Back returns to the camera main menu.
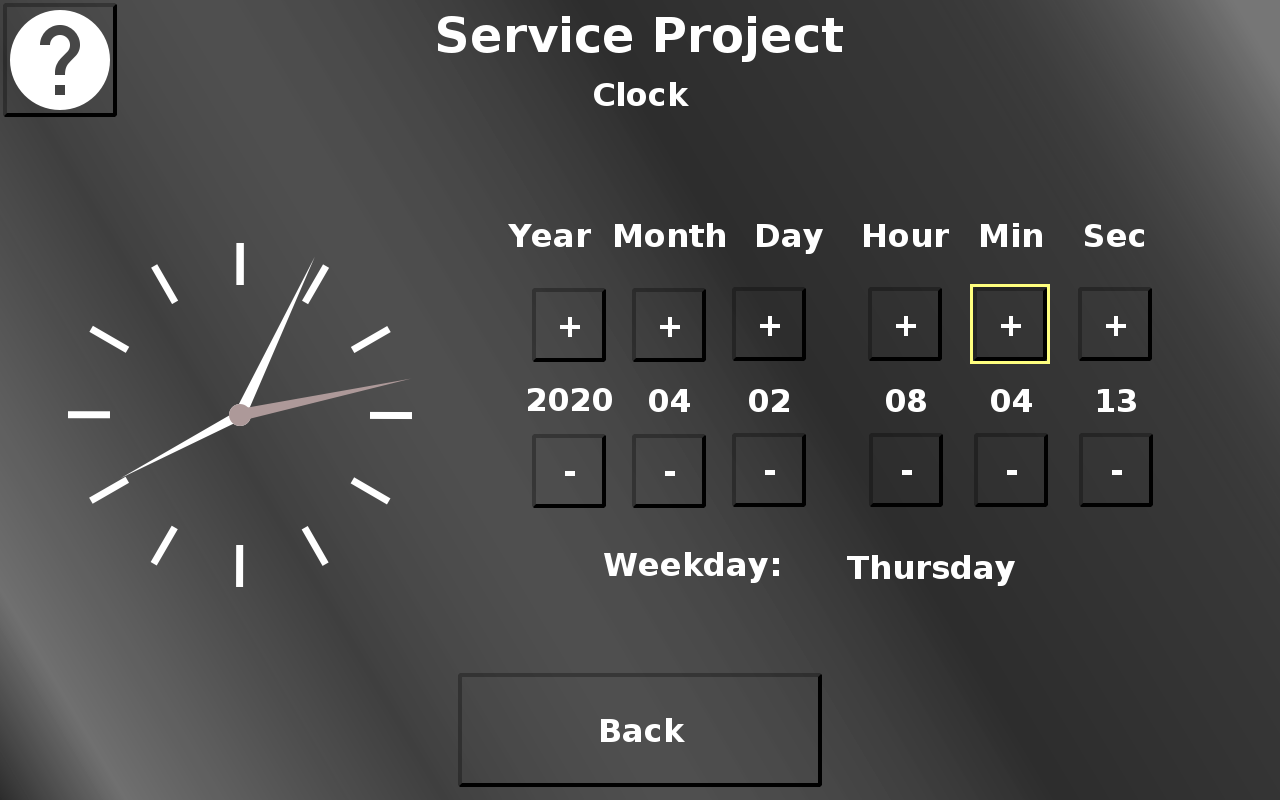
In this screen the date and time can be set. The - (minus) and + (plus) buttons change the according value.
The week day will be calculated automatically.
Back returns to the main menu.
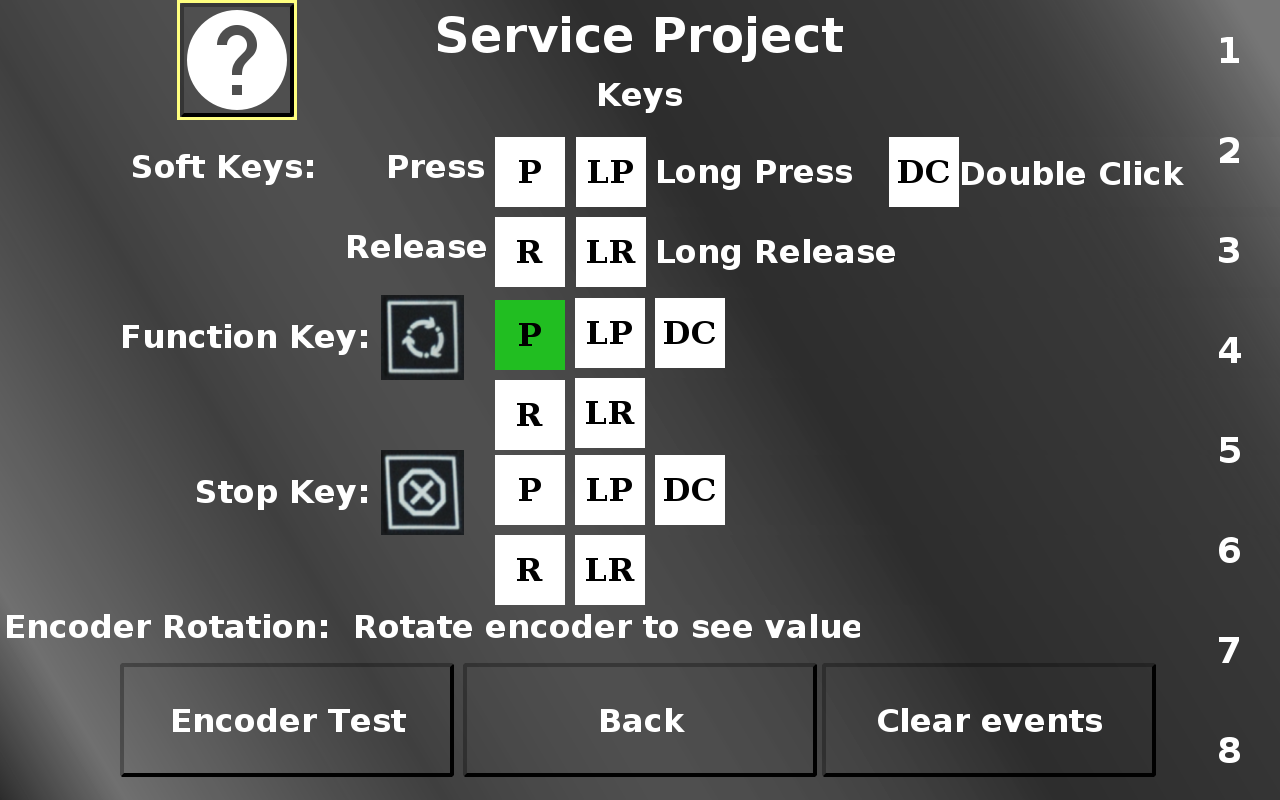
In this screen the soft- and hard keys as well as the encoder can be tested.
For the soft keys, both the actual physical key and the according touch region can be used to test.
For each event, the according field will be colored green (P - press, R - release, LP - long press, LR - long release, DC - double click).
The rotation of the Encoder is displayed in the Numeric Field. The Encoder Test button does nothing, it can be used to test the press and release events of the encoder without executing any unwanted action.
Clear events clears all event fields.
Back returns to the main menu.
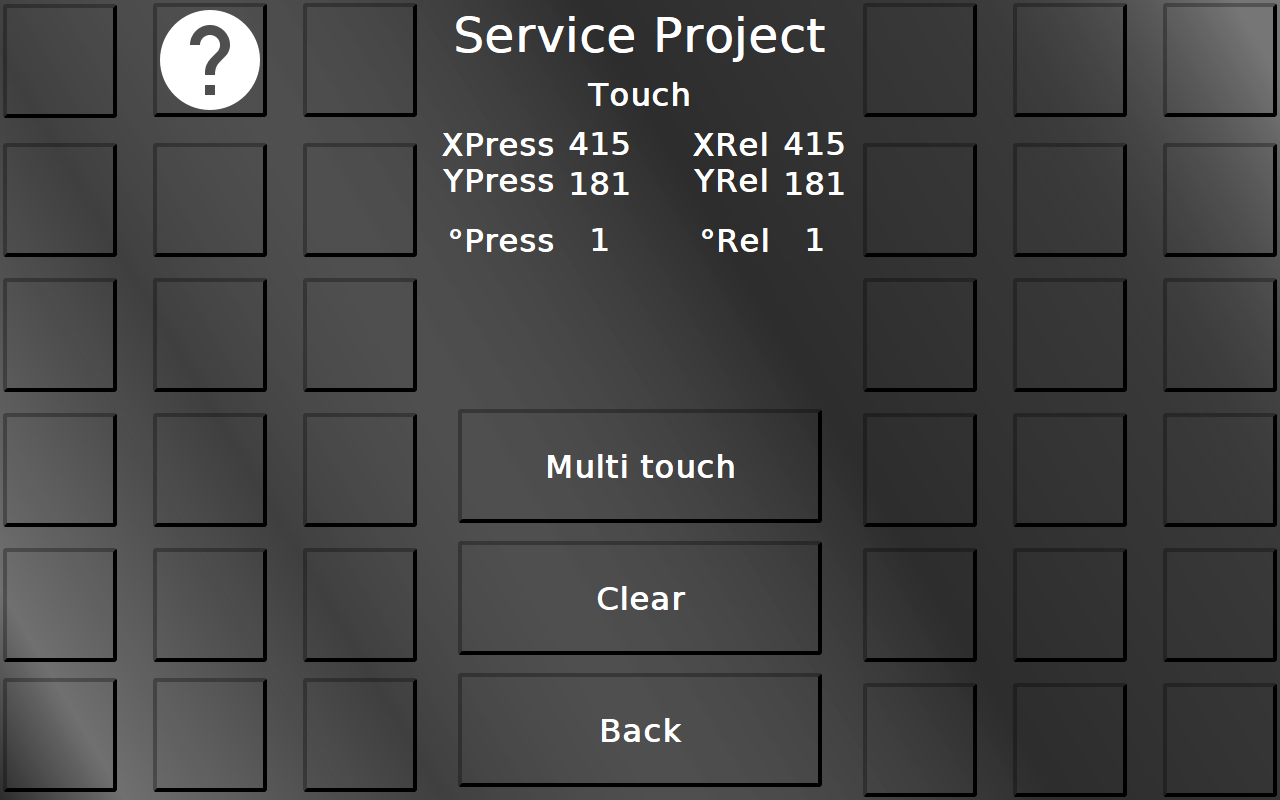
In this screen the touch input can be tested. Each squared button will be colored green if it has been touched, so a well-working screen should be able to color all buttons, and a button should only be colored green if it actually has been touched.
Additionally, the touch coordinates for X and Y both for pressing and releasing are displayed, as well as a counter number for the presses and releases of the touch.
With the button Touch calibration the touch screen calibration can be started. 5 cross hairs will appear one after another (top left, top right, bottom right, bottom left, center). Press the cross hairs to calibrate the screen.
Please note that the PClient stays on during this operation, so the cross hairs will be painted over this screen.
Please note that the calibration button is available only for resistive touch screens. Devices with capacitive touch screens do not need a calibration.
The button Multi touch leads to the multi touch test page. Please note that the multi touch functionality is not available on OPUS A3 and OPUS A6 G1.
Back returns to the main menu.
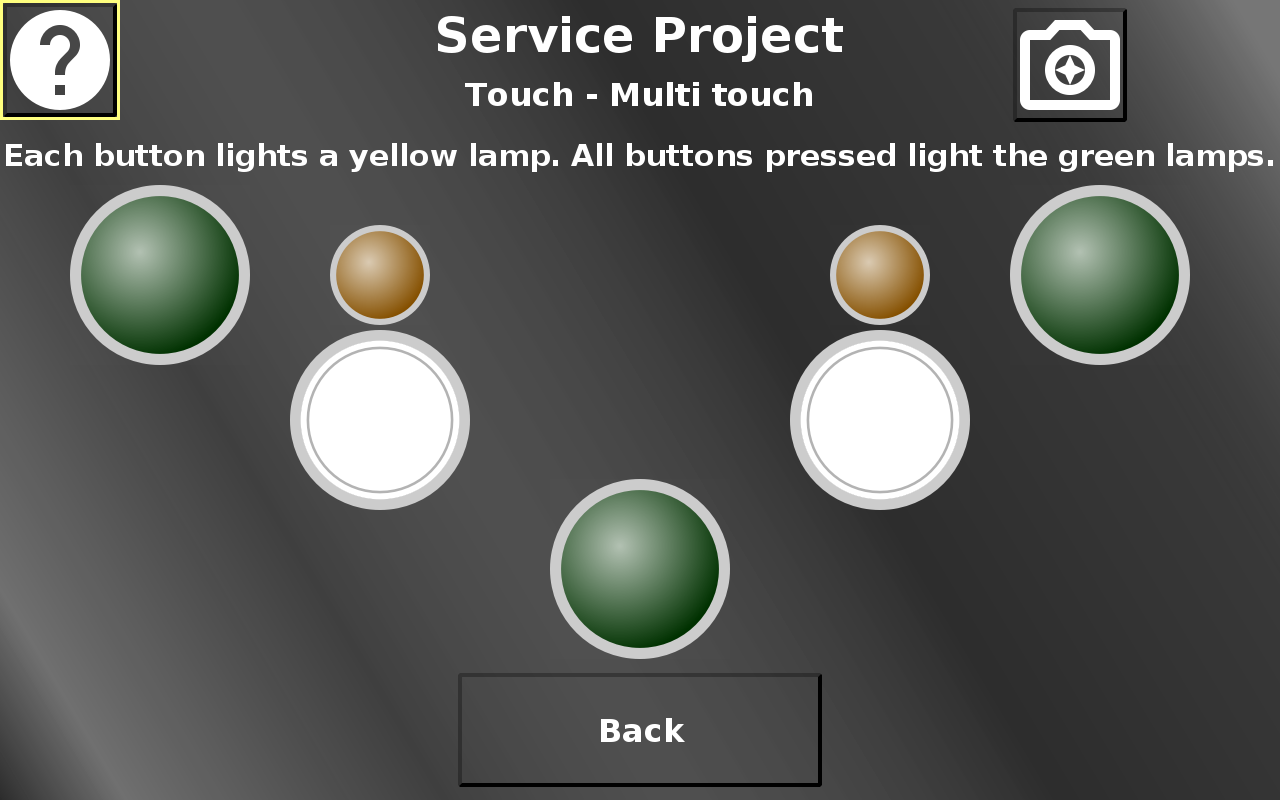
In this page the multi touch functionality can be tested. Depending on the capabilities of the hardware, 2 or 5 buttons, each with a lamp, will be displayed.
Each button lights up the according lamp. If all buttons are pressed at the same time, the green lamp lights up.
Please note that the multi touch functionality is not available on OPUS A3 and OPUS A6 G1.
Back returns to the main menu.
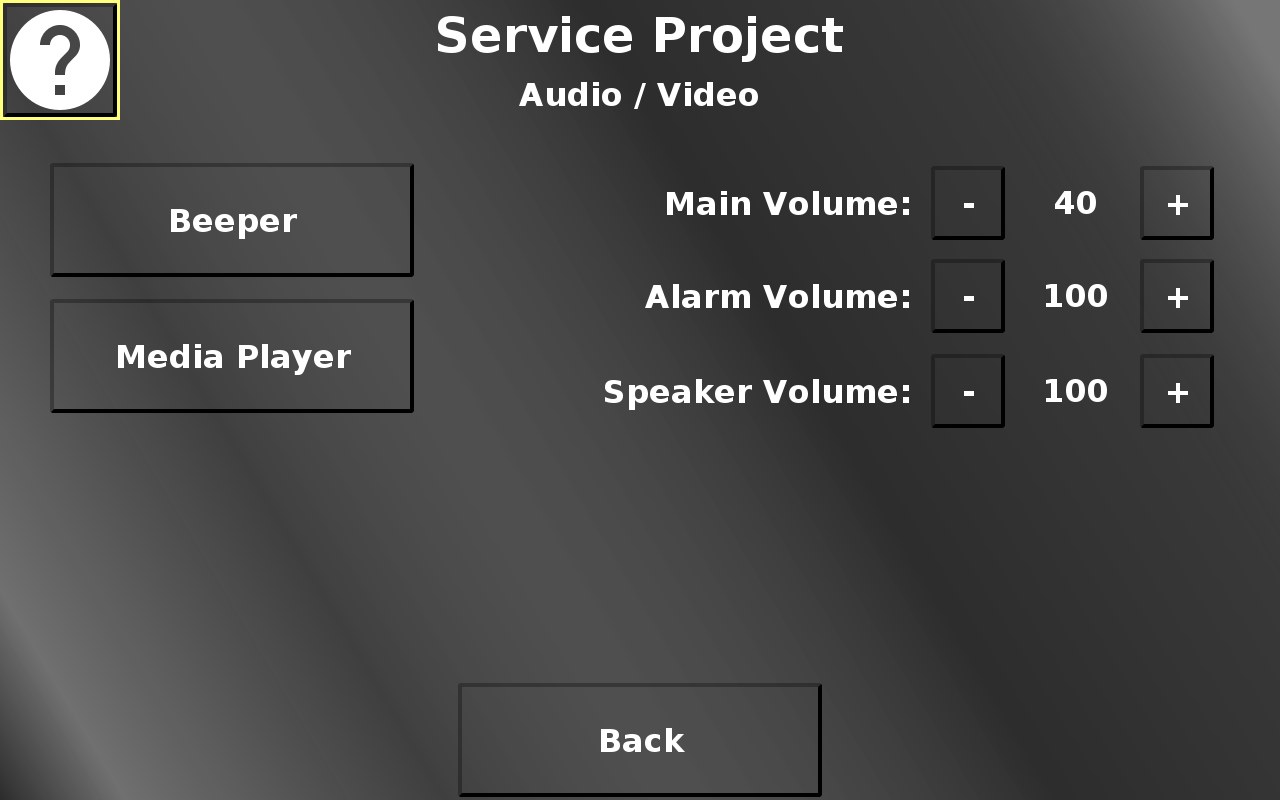
In this screen some volumes for speaker / beeper can be set and different audio / video screens can be reached.
Back returns to the main menu.
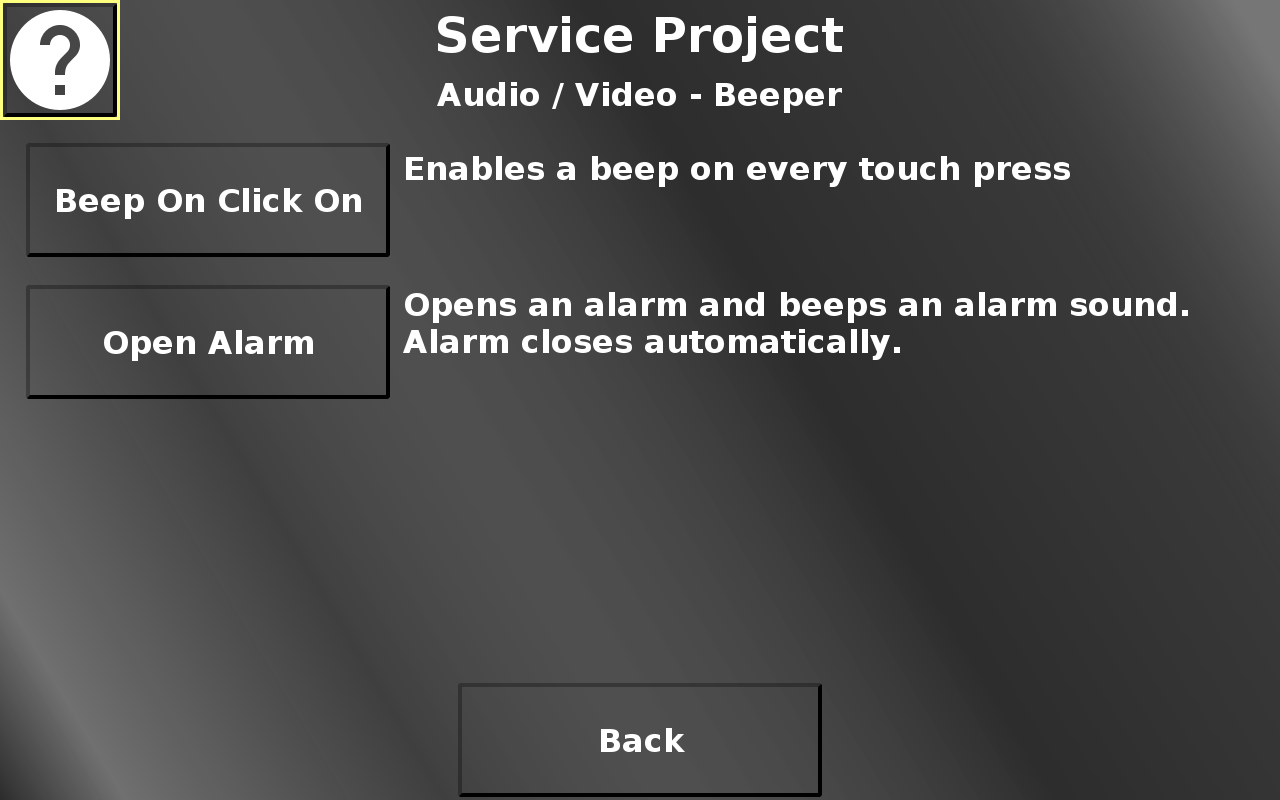
In this screen the beep on click function can be enabled / disabled. With this enabled, the device will beep whenever the touch screen has been pressed.
Additionally, an alarm can be opened which also triggers a beep. The alarm will close itself after 2 seconds.
Back returns to the Audio / Video menu.
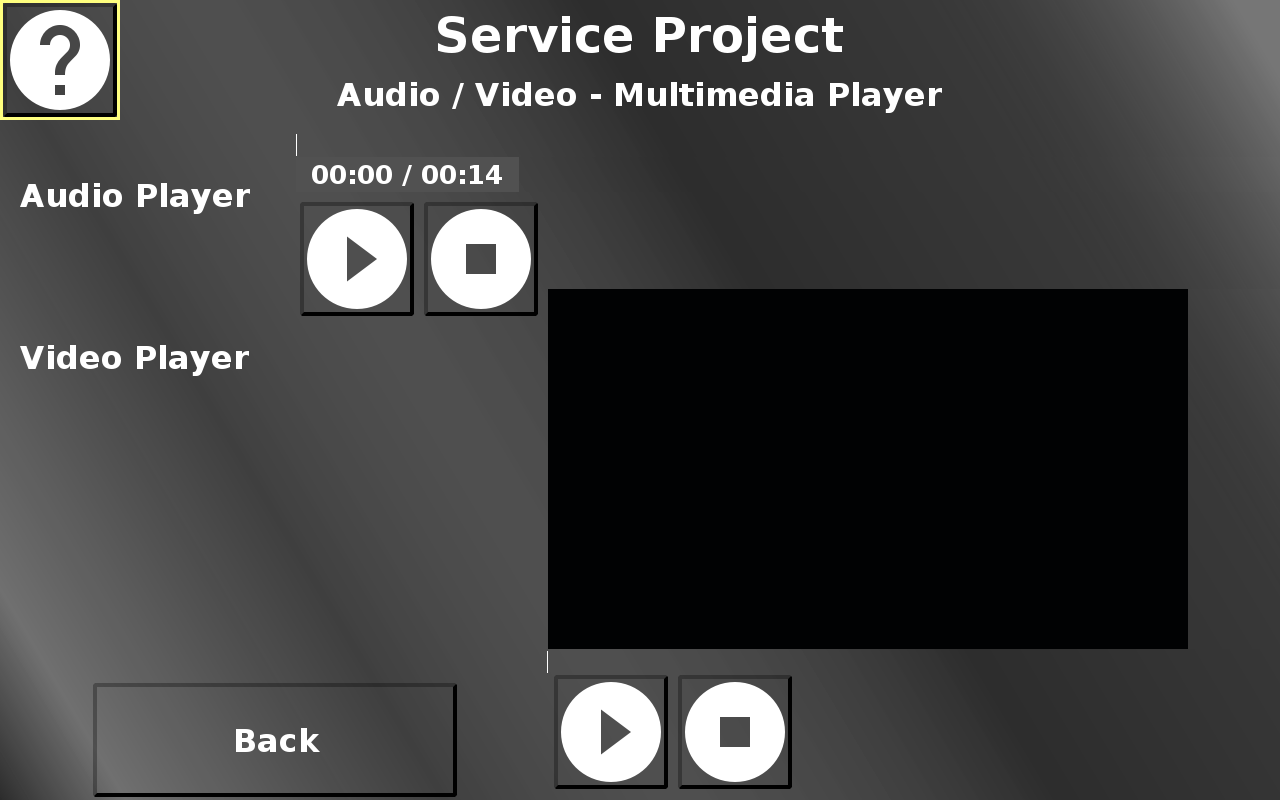
In this screen an exemplary audio and video file can be played.
Both players have a play / pause button and a stop button to control the playback.
Back returns to the Audio / Video menu.