For a description of the alarm settings in project properties and for how to create an alarm see here.
Alarms share some properties with other objects. For a description of the common properties see here.
Alarm NumberThis property shows the alarm number of the alarm as defined when creating the alarm. This number can be changed but needs to stay unique. Default value: Alarm number specified when creating the alarm Possible values: 1 ... 32767 (but needs to be a unique alarm number) Alarm Type NameThe type of the alarm is defined when creating it. It can not be changed after the alarm was created. Default value: Alarm type chosen when creating the alarm Possible values: Not editable Connect All Softkey FramesWhen changing Softkey levels it is possible to switch a level of each Softkey Frame separately or to connect all Softkey Frames. When the Softkey Frames are connected, changing the level of one Softkey Frame will also change the level of the other. Default value: Enabled Possible values: Enabled or Disabled Note: This property is only available for Page alarms. Frame alarms do not support softkeys. TimeoutThe timeout of the alarm as configured in project properties for the alarm type. This property can not be changed after the alarm was created. Sound PatternWhen an alarm is created, the sound pattern as defined in the project properties is set for the alarm. This sound pattern can be changed for each alarm individually. For a detailed description of the sound pattern, refer to Alarms Audio OutputWhen an alarm is created, the audio output options as defined in the project properties is set for the alarm. This audio output configuration can be changed for each alarm individually. For a detailed description of the audio output configuration, refer to Events and Actions Min Display TimeThe minimal display time is the time that the alarm that the alarm is at least visible on the screen. Only after this time the alarm can be acknowledged. The value for the Min Display Time can only be set in the project properties for each alarm type and can not be changed for each alarm. Log this AlarmWhen the alarm log is enabled in project properties, this property can be used to choose if this particular alarm shall be logged or not. Default value: Enabled Possible values: Enabled or disabled. If this property is enabled, it only has an effect if the alarm log is also enabled in project properties. Alarm Log DelayWith this property it can be configured if this alarm shall be logged directly when the alarm is engaged or only after a certain amount of time. This can be helpful if an alarm shall only be logged if it was engaged for a longer time. Default value: 0 seconds (log this alarm directly without delay) Possible values: 0 seconds to 2147483647 seconds The value of this property only has an effect if Log this Alarm is enabled and the alarm log is enabled in project properties. Alarm Log TextFor this property a text can be entered that is used in the alarm log. This text can not be automatically translated (it is not language dependent). Default value: no value Possible value: any string |
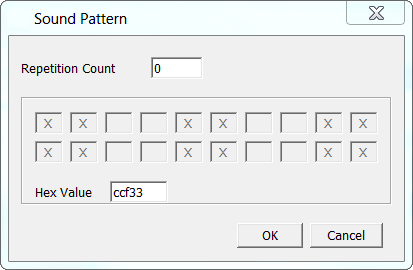
The LED properties allow to configure the behavior of the multi color LED when entering the selected page. LED OptionsThis property defines the behavior of the LED when entering the page. Default value: LED off Possible values: •LED off (LED is off when entering page) •Always On (LED is always on on that page) •Blinking (LED is blinking) Notes: •The LED behavior can also be controlled via the variables in the LEDs variable group. This provides more customization possibilities. •The settings made in this property will be overwritten by the values set to the variables in LEDs variable group. Led ColorDefine the color that the multi color LED emits when on or blinking. Default value: Yellow (255, 255, 0) Possible values: Any 24Bit RGB color Blink PatternIf the LED Options property is set to Blinking, a blink pattern can be configured. A blink pattern consists of the number of of repetitions and a bit coded pattern of on/off states. In the dialog that pops up when changing this property, the pattern can be defined by clicking on the boxes. Each box represents 100ms of LED on or off.
In the screenshot above the blink pattern 0xccf33 was defined. In binary this is 11001100111100110011 •100ms ON •100ms ON •100ms OFF •100ms OFF •100ms ON •100ms ON •100ms OFF •100ms OFF •100ms ON •100ms ON •100ms OFF •100ms OFF •100ms ON •100ms ON •100ms OFF •100ms OFF •100ms ON •100ms ON •100ms OFF •100ms OFF
Internal VariablesIf Connected to LED internal variable, this property is enabled and any variable can be selected that then controls the on/off state of the LED. This property is not supported at runtime on all devices. It is recommended to use the predefined internal variables in the LEDs variable group to control the LED via variables (e.g. in a PageInit script). |
