This chapter describes the concept of alarms.
Alarms are popup pages or frames that can be shown to indicate certain events.
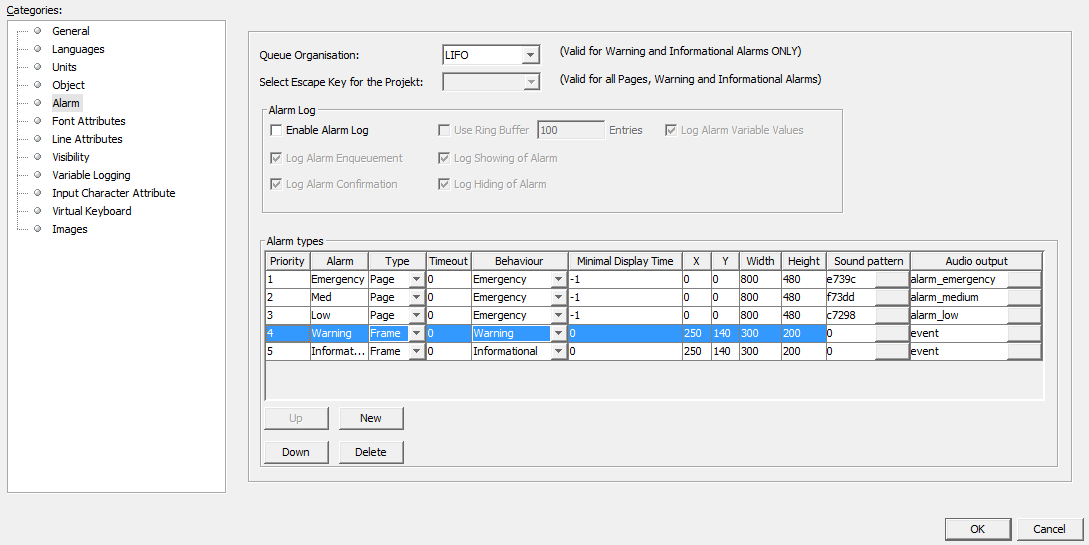
Alarm templates can be defined in the project properties.

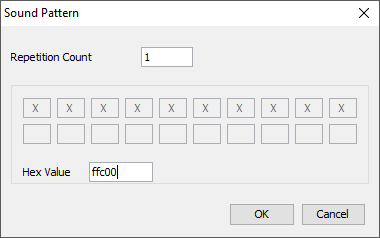
Alarms are characterized through the following properties: •Priority: This property decides which alarm is shown in front if several alarms with different priorities are shown •Alarm: A name for the alarm template. There are 3 pre-configured alarm templates, Emergency, Med and Low •Type: Alarms can be shown in a full screen or as a popup above the currently displayed page •Timeout: Enter a time in milliseconds after which an alarm of the selected type will disappear by itself. 0 means the alarm does not disappear by itself. Cannot be set for the alarm behaviors Emergency and Warning •Behaviour: Emergency alarms can only be cleared by setting the @AlarmShow variable. Warning alarms can be cleared by setting the @AlarmShow variable and also by pressing the "Escape" key. Informational alarms can be cleared by setting the @AlarmShow variable, by pressing the "Escape" key and by a timeout (see above) •Minimal Display Time: An alarm can only be cleared (by pressing the "Escape" key) after this time (in milliseconds) •X,Y: Coordinates for the position of the alarm on the display. Fixed to 0,0 if the type of the alarm is set to full page •Width, Height: Width and height of the alarm on the display. Fixed to the resolution of the display if the type of the alarm is set to full page •Sound pattern: Here you can define a pattern that will be played when the alarm is shown (only if the target device is equipped with a beeper only and has no audio output). This sound pattern will then be played back with the beeper each time the event occurs. The volume of the beeps is dependent on what event happened (event or alarm) and the value of the beeper volume variables. A sound pattern consists of the number of of repetitions and a bit coded pattern of on/off states. In the dialog that pops up when changing this property, the pattern can be defined by clicking on the boxes. •Audio Output: Here you can configure an audio file that will be played when the alarm is shown (only if the target device is equipped with an internal sound card (internal speaker and/or line-out)). For a detailed description of the Audio Output configuration see Events and Actions You can define a new alarm template by clicking the "New" button. A new alarm template with a pre-set name will be created. You can change all the above properties for that alarm.
You can change the priorities of alarm templates. If several alarms are active at the same time, alarms with a higher priority are shown in front. For alarms with the same priority showing at the same time, you can set at "Queue Organisation" whether the older or the newer alarms are shown in front. You can also define which key shall be used as the "Escape" key. |
The device can log alarms. To enable alarm logging, click on "Enable Alarm Log". You can then set which events you want to log. You can also set whether you want to log all alarms or us a ring buffer. If you use a ring buffer, you can set the number of alarm events that you want to log. Note: Alarm logging is only enabled when the variable @LogLevel is set to a value > 0. Note: Logging for each alarm instance can be enabled or disabled. Simply enable or disable the property "Log this Alarm" in the properties of the alarm. The following options are available for alarm logging: •Enable Alarm Log: Enable or diasable logging of alarms. •Use Ring Buffer: Enable this to log alarms into a binary ring buffer and select how much entries the ring buffer shall use. If the ring buffer is full, the oldest entries are overwritten. The ring buffer can be read and cleared with the JavaScript functions getAlarmLogRingBufferContent and deleteAlarmLogRingBufferContent. If this is disabled, the alarms will be logged into a text file located in the path stored in @LogPath •Log Alarm Variable Values: If this is enabled, the values of the variables @AlarmShow, @AlarmCurrent and @AlarmCurrentPriority are written into the log with each entry. •Log Alarm Enqueuement: If this is enabled a log entry is done when the alarm is put into the alarm queue. •Log Showing of Alarm: If this is enabled a log entry is done when the alarm is shown on the screen. •Log Alarm Confirmation: If this is enabled a log entry is done when the alarm is confirmed (e.g. user pressed escape key). •Log Hiding of Alarm: If this is enabled a log entry is done when the alarm is closed and not shown anymore. |
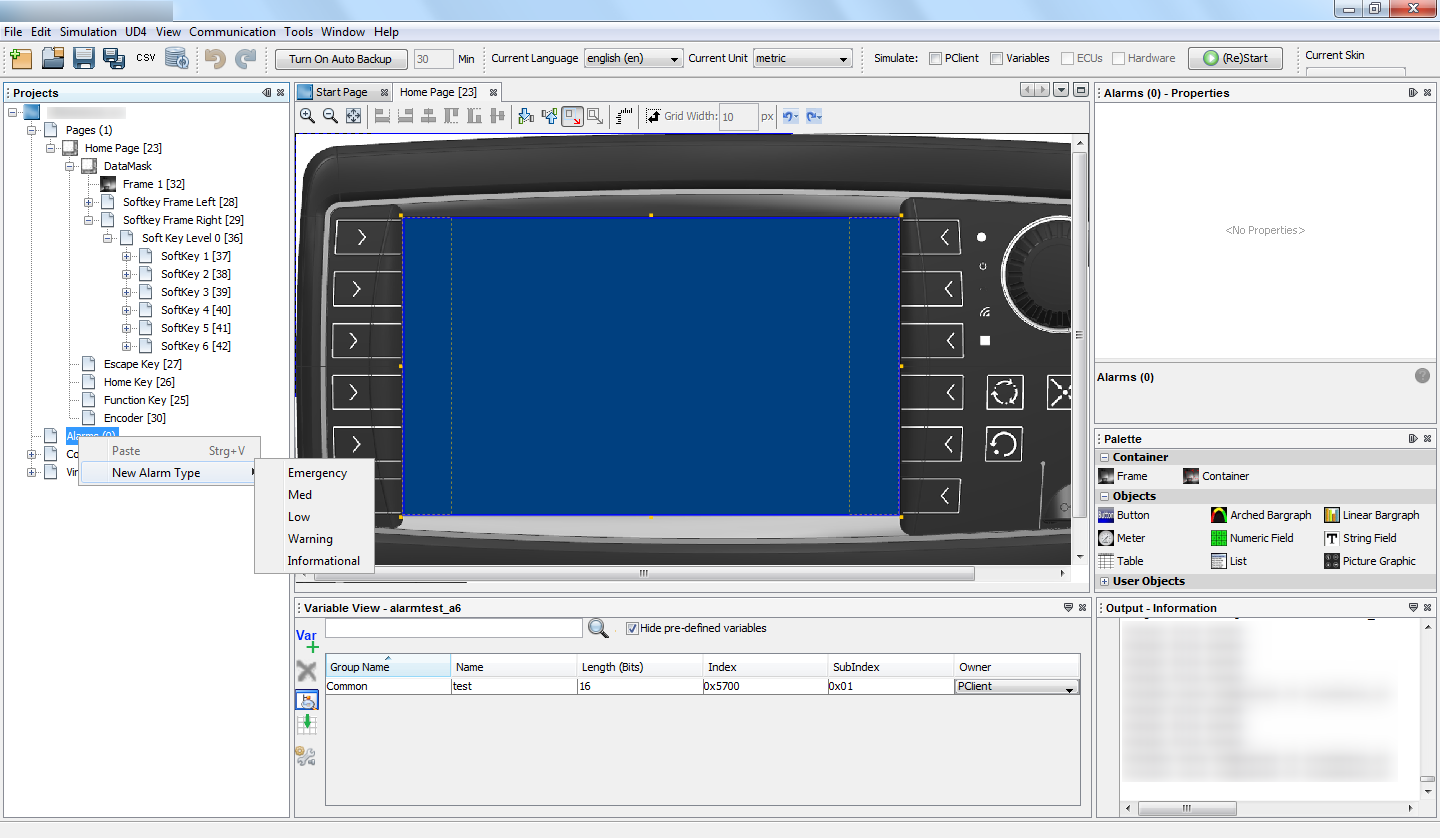
After you have created or configured alarm templates, you can add an alarm to your project. To do this, right-click on "Alarms()" in the project tree, go to "New Alarm Type" and choose the desired alarm template.
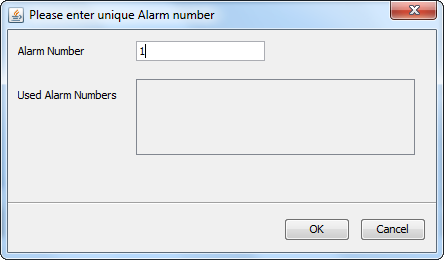
Then a dialog window appears where you have to enter a unique number (in decimal form) for that alarm. Numbers that were already used are displayed in the lower part of that dialog.
Press OK to create the alarm. The alarm will be listed in the project tree under "Alarms()". To edit it, double click on the alarm in the project tree. A tab will be opened where you can create a layout for the alarm similar to a page layout. |
Alarms can be activated by setting the variable @AlarmShow. To activate an alarm, the variable value has to be set with 0x8000 OR alarm number. In other words, you have to use an inclusive logical disjunction. The alarm number has to be used in hexadecimal form here. Example: To set an alarm with the number 15, you have to set the variable @AlarmShow to 0x8000 OR 0x000F = 0x800F To clear an alarm, simply set the variable @AlarmShow to the number of the alarm. Example: To clear an alarm with the number 45, you have to set the variable @AlarmShow to 0x002D Activating and clearing alarms can be done over the CAN bus by including the variable @AlarmShow in a receive mapping, by calculations in a Javascript or by pressing a button and using the SetValue action. Additionally, Warning and Informational alarms can also be cleared by pressing the ESC key. Informational alarms can also be configured to close automatically after a certain time.
Active alarms will stay hidden behind other applications such as PDF reader on i.MX 6 based devices. |


