The main approach followed in the program is to create pages and the navigation between them which is a more static definition.
The dynamics come in with variables changing their values. Other tools use the term "signal" instead of "variable" to describe the same thing. A CANopen "object" also describes what we call a "variable" here. The same is true for J1939 "Suspect Parameter Numbers (SPNs)".
This page provides an overview of the general concept behind the variables.
There are follow-up pages explaining the menus and dialogs to create and manage variables owners and variables.
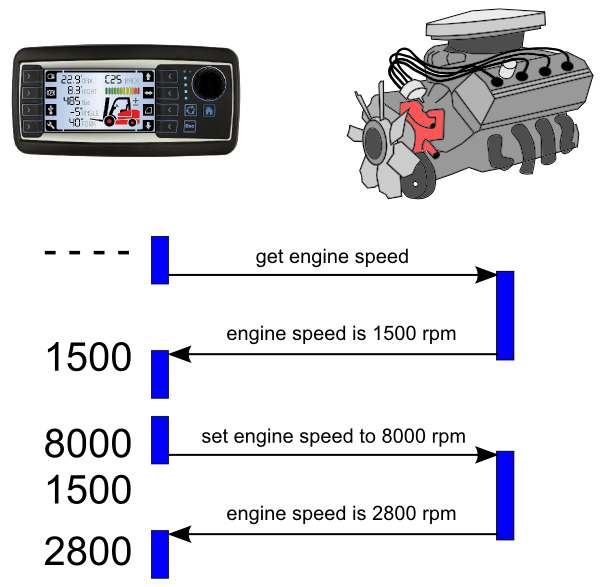
Every variable in the GUI designer has to have an owner assigned. The owner is the only one controlling the value of the variable. If somebody else tries to write the value of the variable this is considered a write request which is forwarded to the owner of the variable. Only if the owner confirms the new value by providing an update of the variable it is considered changed. If the variable is expected to be frequently updated by the owner e.g. via CAN bus message then they can also be considered invalid if the update does not arrive in time.
|
Remanent variables keep their values over power cycles. They get re-initialized whenever a new PClient is installed on the display. Remanent variables are intended for operator settings and other values which will change but whose last value should be remembered when PClient is started again. |
On the display there is a variety of predefined variables you can directly use in your GUI. They provide e.g. hardware states such as I/O values for digital and analog ports or CAN bus status as well as display specific properties e.g. the part number and serial number. Predefined variables are also used to e.g. configure camera interfaces, display backlight or beeper activity and obtain and set current time as provided by real time clock (RTC). Other predefined variables provide information specific to your GUI, e.g. dealing with virtual keyboards and alarms and visibility. There are also variables showing the recent pages visited and the time a page was active. |
There is a range of indices reserved for ISO-VT. These variables are not existing by default but you can create them as they are defined in the variable table. This approach allows to save the resources if you don't use ISO-VT on your display while still providing the information in a standardized manner not interfering with your user defined variables. |
Every variable has to have a type. By default character strings and numeric types are supported. Numeric types are either signed or unsigned and have a length in bits. In order to support the minimum requirements of CANopen there are a few predefined data types which can not be deleted or modified. Additionally both two bit types are provided which are used for some predefined variables representing booleans with an additional "undefined / unknown / don't care" state required e.g. for J1939 protocol. Note: String variables are intended to carry readable strings. Therefore their value is considered to end where a "\0" character occurs. Note: If string values should be shown on display they are interpreted as UTF-8 format which is the same as ASCII for the first 127 characters only. |
The program provides two separate means of variable organization: •Variable groups are supposed to support the designer in keeping variables where he will find them again. These groups are not relevant for the device. •Index and subindex are used to identify a variable even on display side. This concept was mainly introduced for CANopen support but is used for all variables.
|
It is possible to import variables from another project or via a .csv file with parameters for variables. This way large amounts of variables can be created quickly. The .csv file has to look like this: Variable;Index;Sub-Index;Owner;Group;Property_Description;Data-Type;Length;Access Type;Min Val;Max Value;Default Value;Initialize Value As Invalid;Remanant;Force writing test1;0x3011;0x01;;;;INTEGER;8;;;;;TRUE;FALSE;FALSE test2;0x3011;0x02;;;;INTEGER;16;;;;;TRUE;FALSE;FALSE test3;0x3011;0x03;;;;INTEGER;8;;;;;TRUE;FALSE;FALSE test4;0x3011;0x04;;;;INTEGER;16;;;;;TRUE;FALSE;FALSE To import variables, click in the menu Communication -> Import Export Variables -> Import Variables
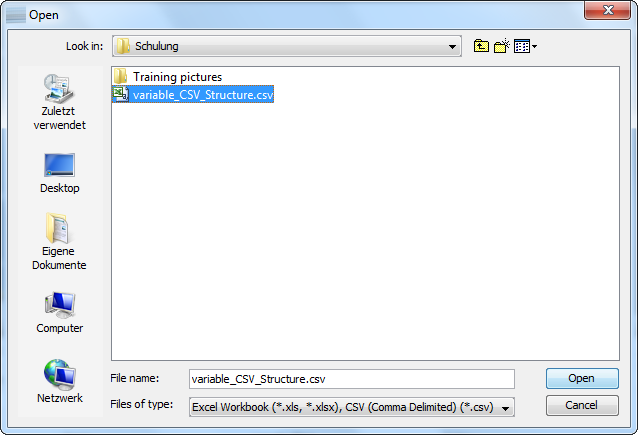
In the file dialog, choose the according file type (project xml or CSV) and the file from which you want to import the variables and click Open.
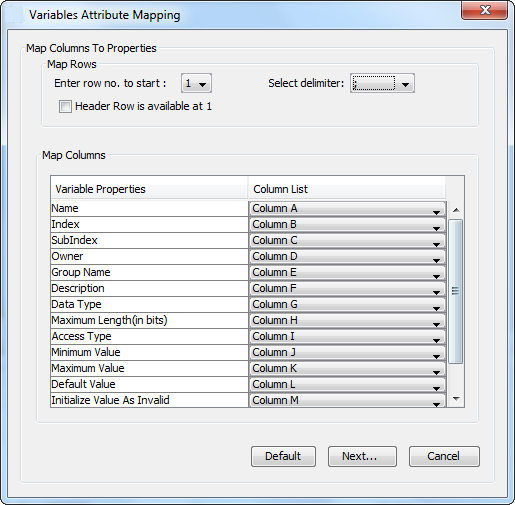
In this dialog you can choose the appropriate delimiter, the row where the program should start reading the variable data, and a table where you can tell the program which column contains which property for the variables. If you have used the format shown above you can use the default values and click Next... If you haven't given all properties for all variables, the program will show dialoges and suggest default values for these properties. After confirming these a last dialog will be shown where you can choose which variables you actually want to import.
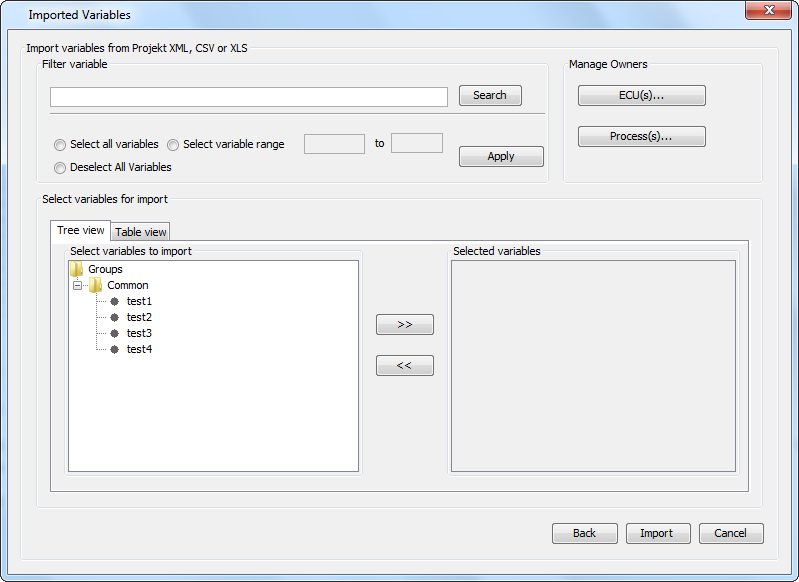
You can select single variables or all variables. Click on the button >> to choose variables for import. Click import to create all the chosen variables in your project. |


