Important note: If you have selected variables inside the variable logging dialog and delete them outside (e.g. variable list), the variables are not automatically updated. If you have deleted variables for example with the variable list, please go one time inside the variable logging dialog and save the project afterwards. Now the lists are up to date. Do not worry if any variable which is not available at runtime is still in the list, this is anyway handled at runtime of the device.
Please note: To start the logging on the device, the variable @LogLevel has to be set to a value > 0.
Variable Logging provides the possibility to capture valuable process and sensor data, giving the insight into past process upsets and events. To configure the Variable Logging use the main menu tab File | Project Properties and select the Variable Logging category.

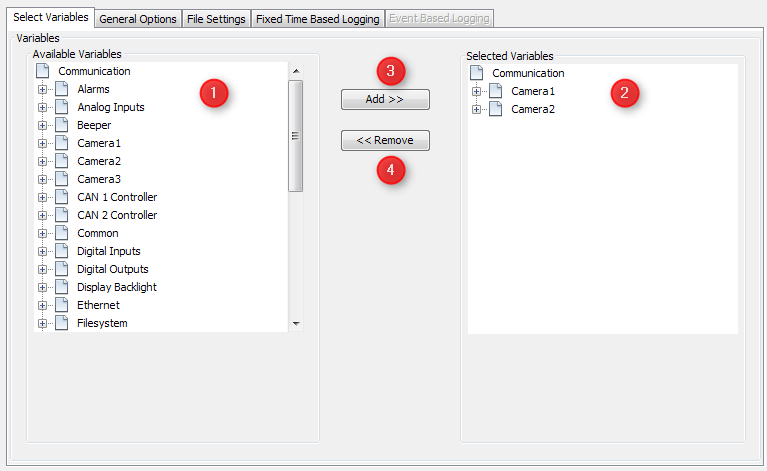
The tab provides you an overview of the current available variables (1). Now you can add (3) and remove (4) the variables which you like to log with the according labelled buttons. All selected variables you will find in the right tree view (2). Variables are written to a file. How the variables are written is defined by the method of logging. You basically have two choices "fixed time based logging" and "event based logging".
Changes to older versions: Log path and Copy/Move path can be set during runtime with the variables @LogPath and @LogCopyPath. The defaults are mentioned below.
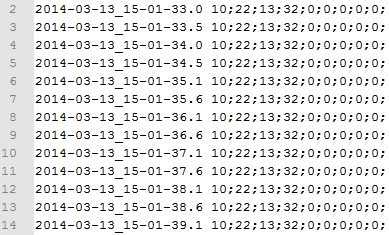
Configure the Log File Options The option "Log File Name" (1) is disabled. The file name is chosen by the system and can not be changed. Show Log File Example (3) This shows an example of how a log file could look like. Note: This is not a run time preview so the shown example will not change based on the changes you made to the settings. Define Log Header File (4) When clicking the button Define Log Header File, a new dialog opens to insert the text that will be later printed in the log file at every start of the variable logger. The appearing dialog only consists of a text input field and an OK and Cancel button. The following example text is set by default: Log File of Project Version
The following variables will be logged: <LIST_OF_LOGGED_VARIABLES>
After finishing the input, use the OK button to store the log file header or the Cancel button to discard all changes. To see all tag options go to Allowed tags for file header. Define Line Prefix (2)
Right besides the label Define Line Prefix (2), enter a string with which every line of the log file will begin. On the right side of the line edit field a button Reset Line Prefix is lo-cated. Clicking this button will set the following default text to the line edit field: <YYYY>-<MM>-<DD>_<hh>-<mm>-<ss>.<s/10> Define Delimiter Character (6)
On the right side of the label Delimiter Character, enter one character that will be inserted between each variable value (time based) or between variable name, event and value (event based). It is possible to enter only one character. "Fixed Time Based Logging" or "Event Based Logging" (7) You can choose the option which is right for you. The time based option writes all selected variables in one line. This makes it easy to transfer the data into a spreadsheet. The variable entries are sorted in the order you defined inside the time based logging tab.
The event based option writes one line per variable per event. By default it includes the variable name and the event when the variable is written. If you like to have shorter entries please refer to the chapter Event based logging.
|
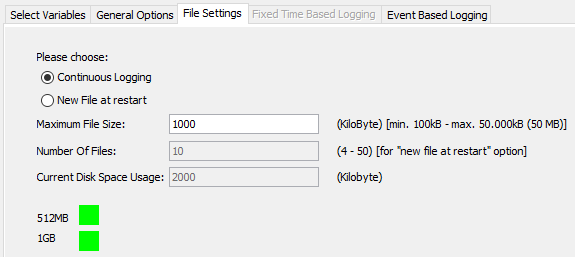
It is possible to select between two options that will effect the creation of new log files: •Continuous Logging •New File at Restart The user can select one of the options by clicking one of the radio buttons with the respective labeling. When selecting continues logging only two files are created. You can see this at the log file name it changed to
To define the maximum file size of one logging file, enter the size in kilobytes right besides the label Maximum File Size . A Size of 0 will stop logging when no more disk space is available. Default value is set to 1000 kilobyte. During runtime it is possible to adjust the maximum file size with the variable @LogMaximumLogFileSize. Please note that this variable is also checked at runtime. You can only set the file size between the range of 100 kilobyte up to 50000 kilobyte. Please also note that this variable is remanent. That means that the value on the device always overwrites the value coming from the project. To reinitialize all variables please re-install the runtime on the device.
"Continuous Logging" and "New File at restart" . Both options have main impact on the file based ringbuffer of the logging mechanism. For both options you can set the maximum filesize . If you do that the maximum filesize on the device is calculated . The image above shows the second option. With "Continuous Logging" you have a maximum of two files of the file size in the memory, which you can see above. The number of files field is not changed accordingly, it is only changed by the "new file at restart" option. "New file at restart" opens new options (as seen in the screenshot). Now the option "Number of files" is enabled and you can set the number of files in the ringbuffer. Please note that this is a file based ringbuffer not a variable based one. As you can see here the maximum filesize is calculated with Number of files + 1. The reason is because we open a new file and delete afterwards. For variable logging you can use half of the available mass storage of your device. The usage is indicated by two fields. One is the current disk usage and the two color coded fields with the 512MB and 1GB label . These are in first place indicators. At runtime the real available space is checked. If the space is not sufficent older data is overwritten. This is shown by the error variable @LogCopyError (codes 20 and 25). |
Here is only one option for the time based logging. It is a timer value (1) that can be defined in the line edit field besides the Logging Interval label. The lowest number, the user can enter shall be 500. You can sort the variables by drag and drop. The shown order will be the order in the log file. The header columns can not be used for sorting. |
Timer settings (1) When doing event based logging, the user can select three timers. He can enter the timers in milliseconds besides each label (Timer X:). A variable can be assigned to one of these timers (then it will be logged each time the timer expires). To shorten the log lines you can use option (3) and (4). Per default everything will be logged. Sorting the table You can sort the table by clicking on column headers. Please note: Event based logged variables are logged when an event occurs! They can not be logged in an user specific order even if you changed the sorting of the table. Log Level must be switched at runtime between the 0 (no logging), and 1 to 9 (logging the variable up to the defined level only) with the internal variable @LogLevel. The default value of the @LogLevel is set to 0 on the terminal, so it shall be changed to activate the logging. To change the log level variable you can use a numeric field or set the variable via Java Script. The other columns define the triggers for logging the selected variable. By clicking the editable cells they are marked as selected (like a check box). Multi select is possible. |
| Starting and Stopping the logging at runtime |
The logging on the device is controlled by the variable @LogLevel. By default, this variable has the value 0 (logging off). To start the logging in either mode, set the variable to a value >0. |
The copy/move is started with the variable @LogCopyNow.
Please note: When you start a copy / move process and the variable logging is already started, the variable logging is stopped. When copy / move are finished the variable logging is resumed. The best way to start a copy / move is to use a Java Script and bind it to an “onRelease” action of a button or softkey. The copy / move path could be also changed to runtime setting the internal variable @LogCopyPath. Please note that @LogCopyPath information (USB Stick / SD Card) is depending on the display you are currently operating. In some cases it could be that the path information will not met the actual pathes on the device. In such a case it is recommended to change the @LogCopyPath information at runtime to the right path. Please contact the support if you need further information.
Please note: If @LogCopyPath do not exist, the copy / move feature is not creating a folder.
Please note: The runtime is running on a full featured Linux system. In some cases the mount point of the external devices (SD, USB, etc.) are different from the default. In those cases it is needed to change the @LogCopyPath. The @LogCopyPath is not updated automatically when plug in an USB stick. If you plug a USB after the device is powered on you have to set the @LogCopyPath accordingly.
Use the @LogCopyProgress to show the overall progress when copy / move the log files to an external memory. Connect this variable to a linear bargraph and you have a nice pro-gress bar.
To copy and move files, we are using a sync write to avoid data loss, when the user un-plug an external storage. This is more secure than a usual write, but is slower, too. The reason why using sync write is simple: If the progress bar shows 100% you can be sure that the write progress is nearly finished. Please wait for 2 seconds before unplugging the external memory.
For a better usage we introduced two new variables: @LogCopyFinished and @LogCopyError. The first variable goes to 1 when the internal copy / move process is finally finished. You will see on the device that the progress bar shows 100% and the finish variable will update somewhat later (< 1 second).
The second variable shows an error code. If everything is ok the Error Code is 0. The error code table show the detailed codes.
Everything OK:
Something went wrong:
Please note: After the copy process is finished the external device is not unmounted from the file system, but you can unplug without an explicit unmount or eject. Please wait for 2 seconds after the copy/move finished. To make sure the USB stick is mounted correctly, you can use a Java Script like this for your copy/move event: var usb_mounted = getVariableValue("@USBMemStatus"); //check if a USB stick is mounted
if (usb_mounted == 1)
{ var usb_path = getVariableValue("@USBMountPath"); //get path of mounted usb stick setVariableValue("@LogCopyPath",usb_path); // Set the path of the USB stick setVariableValue("@LogCopyAllNow",1); // Copy LogData to the selected path (move is 2 instead of 1) } |
|
If you have an older version it is necessary that you load the project with the new version and save it once. Only new data is added all other settings stay as they are. There is one major change when you previously used "New file at restart". With this option the maximum number of files is set to 10. That means if you have more than 10 files on your system and you update the GUI, the oldest file will be deleted and a new one is created. |
|


