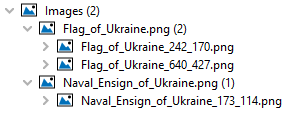
The project tree now shows a new node called Images. This node shows all Original Images of the project as well as all Scaled Images of an Original Image.
The new Images Node is shown on the first hierarchy level below the JavaScripts Node.
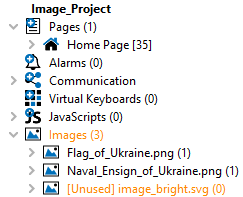
It also shows the number of images in the Image Pool in brackets (3 in the image above).
For each original image in the Image Pool, it shows the scaled images as they are used in the project as its children.
Unused Images
As you can see in the image above, the Image Pool also shows unused images. The image in the example was automatically included when a picture graphic object was added to the project, but when the image was set for the object, the default image was not used anymore.
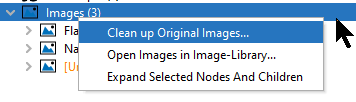
Unused images can be deleted by right-clicking the Images (n) node and selecting Clean up Original Images...
A dialog will appear asking if the following images should really be deleted.
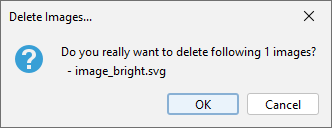
Up to 10 images will be listed in the dialog. If more than 10 images are to be cleaned, a ... indicates that there are more of them.
Press OK to remove the unused images. Press Cancel to cancel the process.
Updating Image Pool
The image pool and all its children will be updated immediately by every image change in the project.
Note that external file name changes are not tracked in the program.
The corresponding node will not work fully as expected, i.e. it cannot be used to put the image on another Picture Graphic object.
When the project is closed and opened again, the original image is reinstated and the manually renamed image will be ignored, i.e. it does not appear in the image pool.
If an image in the image pool should be renamed, it should be renamed within the program.
Renaming images
To rename an image in the program, right-click it and select Rename...
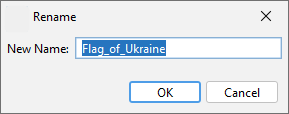
Type the new desired image in the dialog and press OK to confirm. Press Cancel to cancel the process.
All scaled images in the project will be updated.
Note that the image names are case insensitive, i.e. IMAGE.jpg and image.jpg (and Image and iMage and so on) will be treated as the same name and the renaming will not work.
Note that only alphanumerical characters A-Z (a-z), 0-9 and _ and - are allowed as image file names.
Note that only the image name itself can be changed, not the file type suffix.
Note that if the image name is used in JavaScripts, the references are not updated, this has to be done manually.
Updating and Replacing Images
If an original image should be replaced by a different one, i.e. all instances of the original image get the new image, there are three ways to do that.
1) Drag & drop from Windows Explorer
A dialog will be opened asking for confirmation.
OK confirms the choice, Cancel cancels the process.
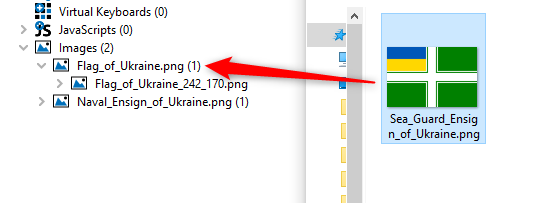
2) Drag & drop from the Image Library
A dialog will be opened asking for confirmation.
OK confirms the choice, Cancel cancels the process.
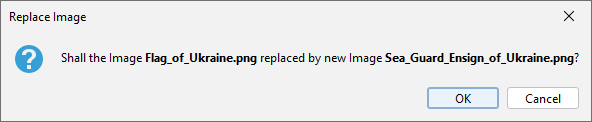
3) Context menu
Right-click on the original image and select Replace Image...
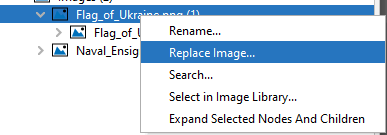
Then select a new image in the file browsing dialog.
Undo / Redo
All operations in the Image Pool can be undone and redone.
Tips & Tricks
If a double click is done on the Images (n) node, or a right-click with the selection Open Images in Image Library..., the original_images folder from the project will be added to the Image Library (which will be opened).
If a double click is done on an original image, or a right-click with the selection Select in Image Library..., the image will be selected in the Image Library.
If a double click is done on a scaled image, or a right-click with the selection Search..., the search is started for this scaled image, so each object that references this scaled image will be listed.
Note that a right-click selection Search... is also possible for an original image. Here the search is started for this original image, so each object that references one of the scaled image of this original image will be listed.
FAQ
What is the difference between the Image Pool and the Image Library?
The Image Library can show the image content from folders on the computer. Images can be dragged & dropped from the Image Library onto objects to use them quickly.
The Image Pool only shows images that are or were already used in the project. It does not show images that are not or were not part of the project.
So an image from the Image Library, that is included in the project one way or another, will put the image into the Image Pool.
If I open the original_images folder in the Image Library, isn't that basically the same as the Image Pool?
No! The original_images folder can still contain images that are not part of the project. Those will be displayed in the original_images tab in the Image Library, but not in the Image Pool.
What can I actually do with the Image Pool?
You can use it as an easy overview of the images in your project. It not only shows you all images you are actually using, but also points to images you are not using.
And it shows you the exact usage of each image, i.e. where it is used in the project and at which resolution(s).
Can I just leave the Image Pool be and not use it at all?
Sure. You will probably never have the necessity to use the Image Pool in any way. It is a tool for convenience, but you can build projects and do everything you need without using it. We hope, you will use it, though.
I have the same image with two different file names - why do I only see one?
The Image Pool calculates a check sum of the image. It will find that the two images are identical and it will only show the image that was first in the Image Pool.
On the other hand, since the images are the same anyway, it wouldn't make sense to have two of them in the project.