This page is a follow-up of the general introduction into J1939.
Here the general setup required to use J1939 is described.
There are two more pages describing setup of J1939 ECU and variable definitions and J1939 PGN mappings.
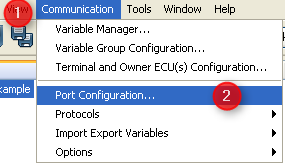
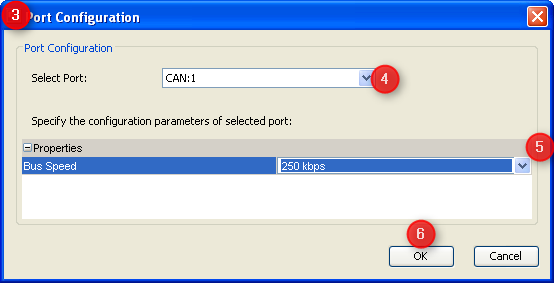
Before one can use J1939 protocol it has to be activated. A good starting point is to configure the hardware interface to be used to 250 kBit/s:
1.Open "Communication" menu 2.Choose "Port Configuration ..." 3.The "Port Configuration" dialog will appear 4.Select the CAN port you want to use for J1939 5.Set the bus speed (the standard baudrate for J1939 is 250 kBit/s) 6.Press "OK" to confirm the setting
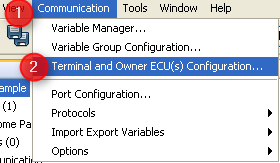
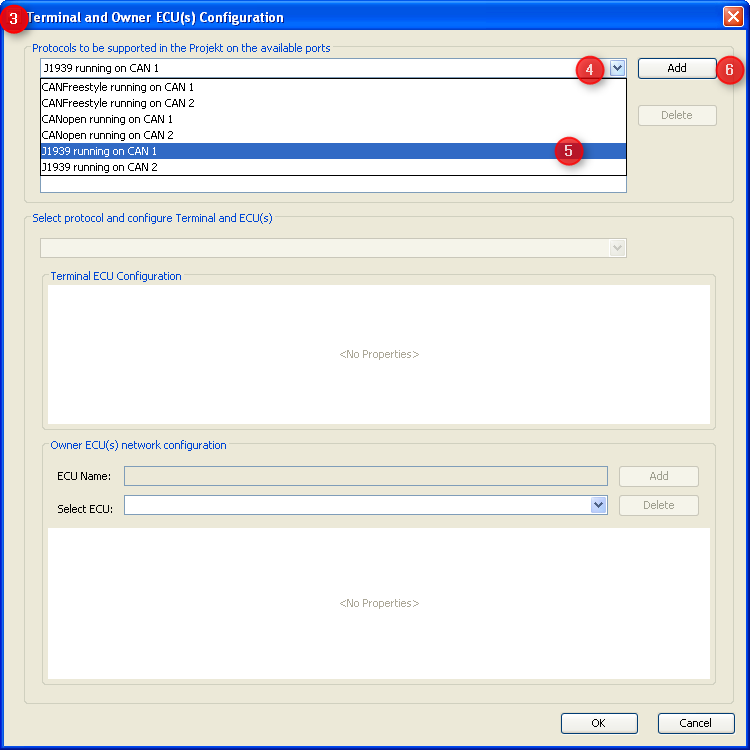
Once the port is configured the protocol itself has to be assigned to it:
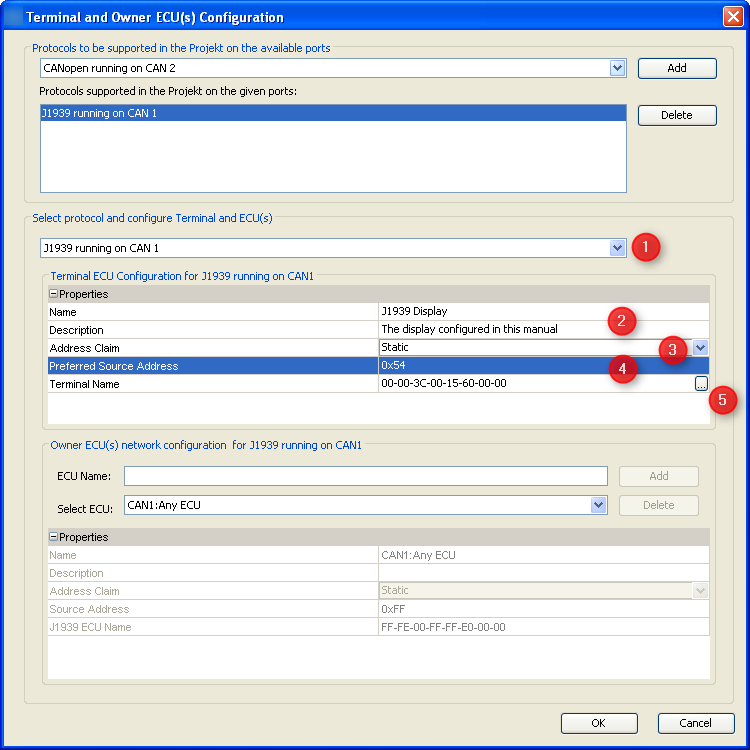
1.Open "Communication" menu 2.Choose "Terminal and Owner ECU(s) Configuration ..." 3.The "Terminal and Owner ECU(s) Configuration" dialog will appear 4.Press on the arrow to see the protocols available 5.Select J1939 protocol for the CAN port you want it to run on 6.Press "Add" to use this protocol with your GUI on the display |
Knowing that every ECU on the bus has to claim an address we now have to configure the display's own address in the same dialog:
1.Select J1939 on the CAN port configured before - in our example we configured it for CAN 1. 2.Type a valid name and description - these are mainly for your convenience and may help others to understand the GUI configuration in future. 3.Choose "static" if you know all ECUs on your network in advance and want the display to always claim the preferred address (or none if another ECU with a higher priority claims the same address). Choose "dynamic" if the display should only start with the preferred address but is allowed to use another address. 4.Select a "preferred source address". For static address claiming this will be the display's address. For dynamic address claim the display will try to claim this address but use another one if forced to do so by an ECU with higher priority. The default 0x54 == 84 is reserved for "Cab Display #2" in the main J1939 document. 5.Configure the display's J1939 name after pressing the button with the three dots. |
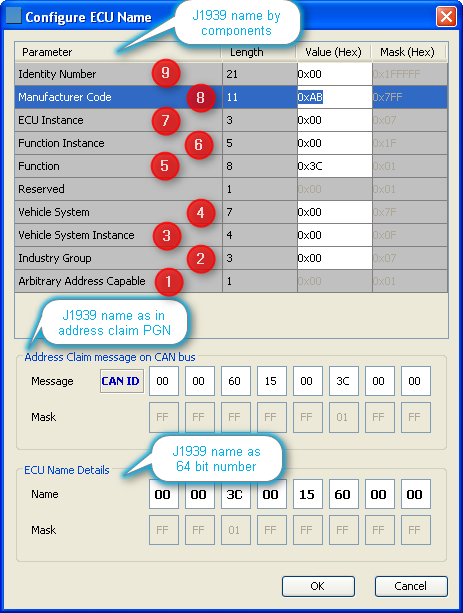
The display claims a J1939 name at startup and whenever asked for it. To do so it needs a J1939 name independent of whether address claim is configured as "static" or "dynamic". Pressing the button with the three dots in the above dialog opens the following dialog where the name can be configured:
This dialog is divided into three sections all showing the same J1939 in different formats: •On top one can edit the sections of the name as defined in J1939-81. This sections allows entering values in decimal (displayed in tooltip) and hexadecimal format (displayed). •The second section shows the bytes as they will appear in the display's address claim message on CAN bus. This section can only be edited in hexadecimal format. •The lower section shows the resulting J1939 as 64 bit number. Like the section above this one can only be edited in hexadecimal format. In the following we describe the J1939 name configuration based on the fields as shown in the upper section. If desired it could also be done in the other sections and all three will always be synchronized.
1.The "Arbitrary Address Capable" bit is automatically set according to your selection of "static" or "dynamic" address claim in the dialog before. 2."Industry Group" 0 is applicable to all industries. More specific groups can be found in table B1 of the main J1939 document. 3."Vehicle System Instance" is defined in J1939-81 as "Vehicle System Instance is a 4-bit field that is used to identify a particular occurrence of a particular Vehicle System within a connected network." and 0 refers to the first instance. 4."Vehicle System" could e.g. identify "tractor" or "trailer"; 0 refers to "Non-specific System" according to main J1939 document. 5."Function" 0x3c == 60 refers to "Cab Display". Other options can be found in table B11 and B12 of the main J1939 document. 6."Function Instance" differentiates ECUs implementing the same function. 0 refers to the first instance. 7."ECU Instance" allows separating different ECUs belonging to the same function and function instance. 0 refers to the first ECU instance. 8."Manufacturer Code" has a default value. Other codes can be found in table B10 of the main J1939 document. 9."Identity Number" should allow differentiating two similar devices connected to the same network. One can keep this as "0x00" since the display will automatically fill it with a 21 bit number calculated from device part number and serial number. Finally press "OK" to confirm the setting and close the dialog. |
