From version 2025 of the OPUS Projektor we offer the possibility to animate certain objects on the screen.
First a disclaimer:
The OPUS Projektor is not a movie studio now! Animations use resources on the device and should be used carefully and only to increase the user experience.
Currently it is NOT possible to combine animations, i.e. an object can only run one animation at the same time, not several.
Types of animations

After opening or creating a project you will see the animations section, disabled, if you don't have an appropriate object selected, enabled if you have.
The following animations are available.
 - Fly In - Moves an object from outside the scene to the current position
 - Fade In - Makes the object appear on the scene
 - Fly Out - Moves an object from inside the scene to outside
 - Fade Out - Makes the object disappears on the scene
 - Rotate - Rotates the object on the scene
 - Move - Moves an object on the scene from one position to another
Which objects can be animated
Animations can be configured for almost all objects, except
- Softkeys (Softkey Frames are allowed)
- Children of other objects (e.g. elements of list objects, children of buttons)
How can animations be added to objects
Animations can be added simply by selecting an object and clicking on the animation that should be added.
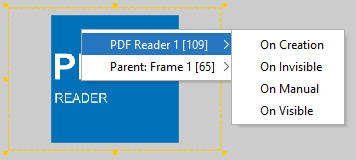
Alternatively it is also possible to drag & drop an animation on an object. In that case a context menu will be shown to select the event that should trigger the animation.
When can object animations be triggered
There are five events to trigger animations:
- On Creation - when the object is created, i.e. when a page is entered or an alarm is opened and the objects in them are created. For this event it probably doesn't make sense to use Fly Out or Fade Out.
- On Invisible - when an object is set to be invisible, i.e. when its visibility variable or bit is set to 0. Instead of just disappearing suddenly, the selected animation will be played instead. With that in mind it probably only makes sense to use Fly Out or Fade Out for this trigger.
- On Manual - the manual triggering of the animation through a JavaScript with the JavaScript command pclient.triggerAnimation.
- On Visible - when an object becomes visible after it has been invisible (i.e. not when it is first made visible through its creation).
Note that all triggers can, additionally to their intended usage, be executed through the JavaScript command pclient.triggerAnimation.
Animations in the project tree
Once an animation has been added to an object, the animation will be displayed in the project tree.
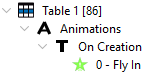
A new node called Animations is created under the object. Under that node the configured trigger(s) are listed. Under each trigger the animation(s) for said trigger are listed.
An object can have several triggers.
A trigger can have several animations. But only one animation is played at the same time always.
The animations under a trigger are executed one after another in the order they are listed in the project tree.
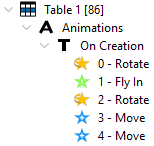
In this example the object will be first rotated (0), then flown in (1), then again rotated (2) and then moved twice (3 & 4). The order can be changed by dragging and dropping the animation node up and down in the list.
Animation properties
An animation has the following properties.
Property Name |
Description |
Effect |
Which animation is it. Possible Values: Fly In, Fade In, Fly Out, Fade Out, Rotate, Move. Read-only |
Property |
Which object property is modified. The value depends on the animation effect. For rotation it is fixed to "Rotation Angle". For Fade In and Fade Out it's "Opacity". For Fly In / Out and Move it's X or Y Location. The property is read-only for rotation, Fade In / Out and Fly In / Out (for the latter, the value changes depending on the Fly Direction |
Trigger |
Possible values: On Creation, On Invisible, On Manual, On Visible. Note that a change of this property leads to moving the animation to the selected trigger category (to the end of the animations list) |
Order |
The order number of the animation for the current trigger, starting with 0. The order number is also shown in the project tree, see above image (0 to 4) |
Fly Direction |
Only available for Fly In / Out. This property changes the property "Property", depending on the setting (left / right -> X Location vs. top / bottom -> Y Location) |
Duration |
Time in ms. How long it takes for the animation to complete. Minimum value: 100, Maximum value: 2147483647. Default value: 1000 |
Delay |
Time in ms. How long the animation waits before starting. Note that this is relative to the end of the previous animation for the trigger. Minimum value: 0, Maximum value: 2147483647, Default value: 0 |
Start Value |
The initial value of the property that is changed. Default value for angles: 0.0 (degree). Default value for Fade In / Out: 0.0 / 1.0. Default value for move: Current x/y position - 100. Note that the starting point is not changed when the object itself is moved in the scene after the animation was added. Default value for Fly In: Appropriate edge coordinate - object width / height. For Fly In / Out the value is read-only, as the starting point is always the invisible outer edge of the screen / the current position of the object (depending on the fly direction). |
End Value |
The end value of the property that is changed. Default value for angles: 360.0 (degree). Default value for Fade In / Out: 1.0 / 0.0. Default value for move: Current x/y position. Note that the end point is not changed when the object itself is moved in the scene after the animation was added. Default value for Fly In: Current Y/Y Location. For Fly In / Out the value is read-only, as the end point is always the current position of the object / the invisible outer edge of the screen (depending on the fly direction). |
Loop Count |
How often the animation should be played. Default value: 1. Max. value 999999999. For an endless animation, set it to -1 |
Easing Curve |
This parameter specifies the rate of change of the property over the configured duration. Choose from a selection of 41 easing curves. The curves are described here. Alternatively, you can see some of the curves with an animation here to understand their behavior, or you can check out the animations page in the Welcome Project. |
Animation previews
When an animation is added to an object, a preview of the animation is displayed in the OPUS Projektor. Note that the easing curves are not applied in the preview.
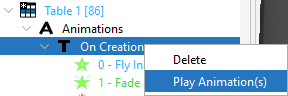
A single animation can be played by right-clicking it in the project tree and selecting Play Animation(s).

Similarly, all animations for a trigger can be played by right-clicking on the trigger in the project tree and selecting Play Animation(s).
If an animation is started while another animation is still running, that running animation will be stopped.
Note that in the PClient simulation, objects that are out of the visible range of the device because of an animation will still be displayed there. Clipping the objects would slow down the PClient on the device, where that problem obviously isn't existing.
Animation Options
In the menu Tools -> Options -> Scene -> Animations certain general behaviors of the OPUS Projektor regarding animations can be configured.
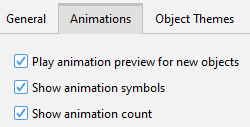
Play animation preview for new objects - when this is checked, an animation will be preview-played when it is added for an object.
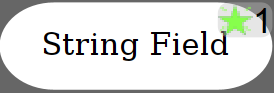
Show animation symbols - the first animation of the object is displayed in the upper right corner of the object in the page editor.
Show animation count - the number of animations for this object is displayed in the upper right corner in the page editor.