The variable view is meant for an overview of all variables in a project, quickly adding a variable to the variable list and assigning a variable via drag and drop to a user interface object.

1 |
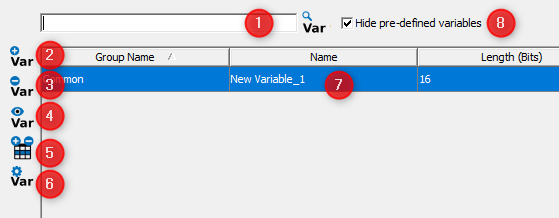
Full live search field. You can search for "Group Name", "Name", "Index" and "SubIndex". Results will be filtered live as you type |
|---|---|
2 |
Add a variable quickly. If you press this button a variable is added with a default name with increasing name index and the default owner is "PClient" |
3 |
Delete a variable. First you have to choose a variable or more variables and than delete them. Pre-defined (system) variables can not be deleted. |
4 |
Find usage. Select a variable and press this button. The search opens and shows the connected GUI elements and CAN message mappings. |
5 |
Additional columns. Here you can choose to show more than the default columns. |
6 |
Variable View Config. |
7 |
Main list. If you click on the header of the columns you set the order of the entries. Please note that you can only sort by one column. |
8 |
Hide / Show pre-defined variables. |
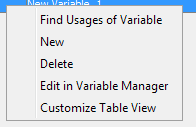
If you have selected a variable within the list and click right you will get the following context menu.

New |
The same like you press the add variable icon |
|---|---|
Delete |
The same like the delete icon |
Edit in Variable Manager |
Here is the quick jump to the variable manager where you can do more detailed settings for the variable |
Find Usages of Variable |
Select a variable and search for the connected GUI Elements and CAN Mappings. |
Customize Table View |
Here you can choose to show more than the default columns. |
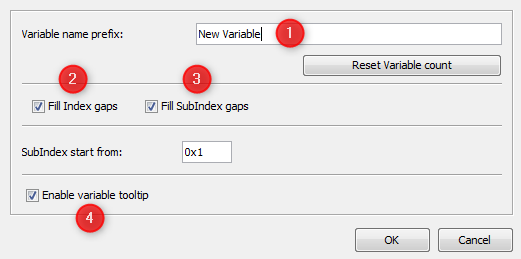
The variable view configuration is mainly for setting up the quick adding of variables. You can define a prefix (1) which is filled up with a number. This is causing names like "New Variable1", "New Variable2" and so on. The number count can be reset by pressing the button "Reset Variable Count". This reset has nothing to do with the variable id or other indexes. Within the next section you can define how to deal with the index. Fill Index gaps (2) enables the creation of variables with free indices between already existing indices. Fill SubIndex gaps (3) enables the creation of variables with free sub indices between already existing sub indices. for a given index. SubIndex start from: sets the starting sub index when a variable with a new index is created. Please note that the index and subindex is needed by the OPUS Projektor and the runtime on the display, but with these default settings you do not really need to take care about this. (4) With this check box it is possible to enable/disable the tooltip of the variables in the Variable View. |
All variables can be selected and dragged and dropped onto the designer area and appropriate objects in the project tree. Drag and drop of multiple variables is not supported. Read more about Drag and Drop in the chapter Drag and Drop. |
