Besides the processes described below, both in Codesys and OPUS Toolchain the boot logo can be changed within the project. |
To use your own boot logo image you need to prepare it for the update process. The image file(s) need to be in the correct solution:
- A3: 480x272
- A6: 800x480
- A6 G2: 800x480
- A8: 1280 x 800
These are the names and formats you need to save the files in to be used in the update:
- logo.png for OS 1.x
- logo_opusaX_2.X.png for OS 2.x (exchange X with the appropriate numbers)
- logo_egspro_a6-we-landscape.bmp for OS EGSPRO with A6
- recovery_egspro_a6-we-landscape.bmp for OS EGSPRO with A6 (update screen)
- logo_egspro_a8-we-landscape.bmp for OS EGSPRO with A8
- recovery_egspro_a8-we-landscape.bmp for OS EGSPRO with A8 (update screen)
- logo_egscore_b3-te-landscape.bmp for OS EGSCORE with B3
- recovery_egscore_b3-te-landscape.bmp for OS EGSCORE with B3 (update screen)
Additionally, you need to create the MD5 checksum file.
The checksum in the .md5 file needs to contain lower case letters and numbers only! |
If you have an existing check sum file (e.g. from our boot logo), you can create the check sum online, e.g. on https://emn178.github.io/online-tools/md5_checksum.html and replace the existing checksum in the .md5 file with the newly created one.
You can also use a Windows tool like WinMD5sum: http://www.nullriver.com/products/winmd5sum/
Lastly, you can use the Linux system on our device to create the checksum file. Follow these steps to do that:
1. Create the image file as described above
2. Put the image on a FAT32 formatted USB stick
3. Log in to the serial console (login: root, password: A3: opusa3, A6: opusa6, A6 G2 & A8: egspro)
3b. Connect the USB stick to the running device
4. Check that the USB stick is mounted to /disk/usbsda1 by executing the command df
5. Note the path of the USB stick
6. Write and execute the command:
md5sum /disk/usbsda1/logo.png > /disk/usbsda1/logo.png.md5
(for OS 1.x)
md5sum /disk/usbsda1/logo_opusaX_2.X.png > /disk/usbsda1/logo_opusaX_2.X.png.md5
(for OS 2.x)
md5sum /disk/usbsda1/logo_egspro_a6-we-landscape.bmp > /disk/usbsda1/logo_egspro_a6-we-landscape.bmp.md5
(for OS EGSPRO)
md5sum /disk/usbsda1/logo_egscore_b3-te-landscape.bmp > /disk/usbsda1/logo_egscore_b3-te-landscape.bmp.md5
(for OS EGSCORE)
(Change the USB path if the stick was mounted in a different place)
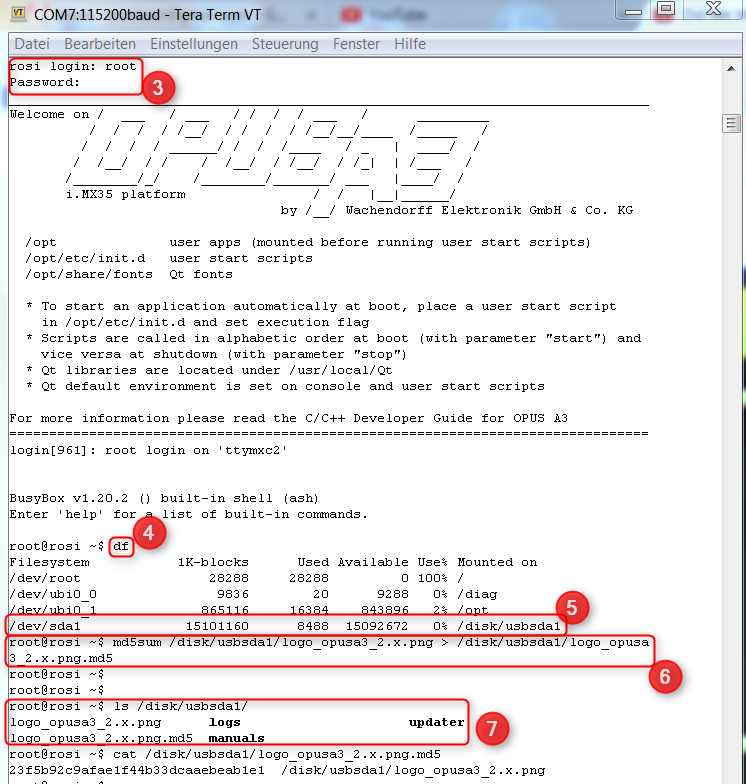
7. Check if the file was created by executing ls /disk/usbsda1 and, optionally, cat /disk/usbsda1/<filename>.md5
The MD5 file has to be encoded in ANSI or UTF8 without BOM. UTF8 doesn’t work. |
The letters in the checksum have to be lower case. |
The line endings in the .md5 file have to be Linux line endings (LF only) |
You can use these two files in the update process described above now and the boot logo will be changed to that image. Be aware that you always have to re-create the md5 checksum file when you change the boot logo image.
There is a second way to change the boot logo directly on one device (quicker for one device, but not suitable for several devices):
1a . (OPUS A3/A6 G1). Create a png image in the appropriate resolution (A3: 480x272, A6: 800x480)
1b . (OPUS A6G2/A8). Create a bmp image in the appropriate resolution (A6 G2: 800x480, A8: 1280x800)
1c . (OPUS B3). Create a bmp image in the appropriate resolution (B3: 800x480)
2. Put the image on a FAT32 formatted USB stick
3. Log in to the serial console (see chapter 4.1)
3b. Connect the USB stick to the running device
4. Check that the USB stick is mounted to /disk/usbsda1 by executing the command df
5. Note the path of the USB stick
6 a. (OPUS A3/A6 G1). Write and execute the command: setbootlogo /disk/u‑sbsda1/imagename.png (change "imagename" to the actual name of the image, and change the USB path if necessary)
6 b. (EGSPRO/EGSCORE devices). To copy the boot logo for the normal start, please use the following command (<image.bmp> is the path to the image file):
cp <image.bmp> /boot/logo.bmp
To change the recovery boot logo, use this command:
cp <image.bmp> /boot/recovery.bmp
Afterwards, execute the command
sync
