![]() Tutorial video about languages in projects
Tutorial video about languages in projects
This feature is used for having a project with multiple languages. First we have a look into the project properties where the languages can be defined.
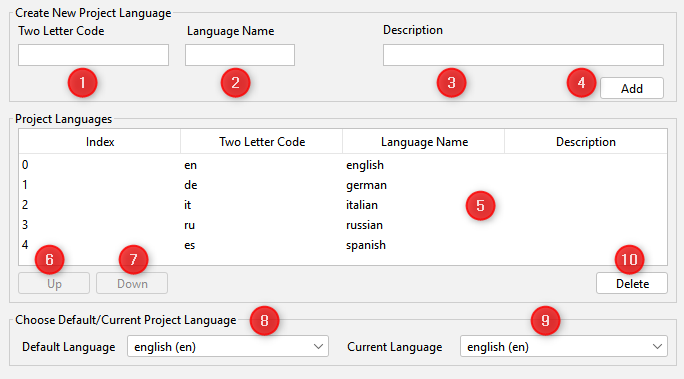
1 |
You can enter a two letter code here for a new language. To determine the right one's you can look into ISO 639 |
|---|---|
2 |
You can define a language name here. |
3 |
You can give the new language a description. |
4 |
Click here to add the language to the project lanugages |
5 |
The list of project lanugages |
6 |
Select a language and move it up in the list. The button is disabled if no language or the first language is selected. |
7 |
Select a language and move it down in the list. The button is disabled if no language or the last language is selected. |
8 |
This setting has no effect. The language settings at runtime are controlled with the variable @SettingsLanguageEnum (see description below). |
9 |
This has only impact during design time. You can do the same by selecting the current language in the toolbar. |
Very important to know is that the options 1,2 and 3 do not have any impact when selecting a language on the device. To change the language on the device please use the variable @SettingsLanguageEnum and use the index of the language.
When working with languages you sooner or later have to deal with Fonts. The tool and the runtime on the device support true type fonts. Please note that we encountered some issues with some Fonts. They work on the PC but will not be recognized on the device. If such an event occurs please use another Font. To import a new Font please choose the category "Font Attribute" inside the project properties. Now you can go to the section "Imported Fonts". Please note that some Fonts are very large and can not be packed. This will lead into large project files and increase the update timings. The combo box shows the current already imported Fonts. You can erase the chosen Font from your project by clicking delete.
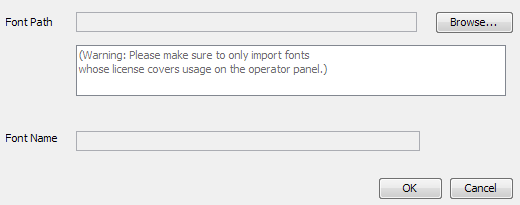
When click on Import the import dialog is shown
With the browse button you can choose the font to import. The font file is than copied to the project folder. The license issue is important, because true type fonts have licenses too. For example the Windows system fonts Arial is not a free font. Please note that the vendor of this tool is not responsible for any issues with copyright laws. You can find on the Internet free alternatives for fonts with copyright. For Arial there is a good alternative with liberation sans. |
To use this feature you first have to set the dependency property of an object to "Language". We will look into that with an string field. Now you can see that two sections are changing.
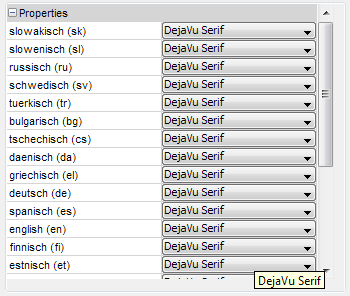
You can now see "..." Buttons at "Preview Value", "Font" and the alignment properties. The Font Attribute can not be changed on language, because it only describes the look and feel of a text. If clicking on a "..." button you will see a dialog coming up, like the one below.
The above screenshot shows the dialog when click ".." on the "Font" property. |
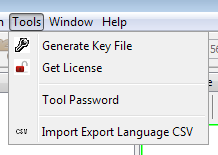
Sooner or later when dealing with languages you do not want to go through all objects to enter a new language. Therefore the language import / export feature was introduced. At least for the master language you have to enter all strings once.
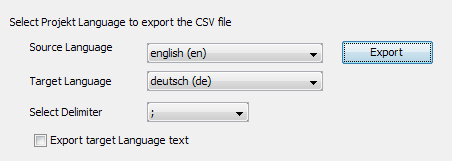
For my example I choose the master language english and want to translate to german.
So I made the above changes in the dialog. When checking the "Export target language text" all current available strings of the target language are exported too. Otherwise the cells are blank.
By clicking ok the ";" seperated CSV file is written to disk. Please note that ";" works perfectly on german windows machines. On english ones the "," delimiter is much better. So please be aware of these settings in your country. The exported file looks like that:
Most columns are self explanatory. The original text of the string can be found in column "Default Text". To translate the text you should use the column "Translated Text". If your translations contain special characters like german Umlauts or languages like Russian or Chinese, please note that if you open the file in MS Excel, the file format will be changed from UTF-8 to ANSI, destroying all special characters that go beyond ANSI. There are different workarounds for that:
- use a text editor like Notepad ++ - use Open / Libra Office, both of which open the file keeping the UTF-8 format - use Excel, but instead of opening the file, create a new table and import the data from the exported .csv file. In the dialog you can set which format should be used, so choose UTF-8. When saving the file, use save as and then select UTF-8 CSV file (this workaround might not work with all Excel versions).
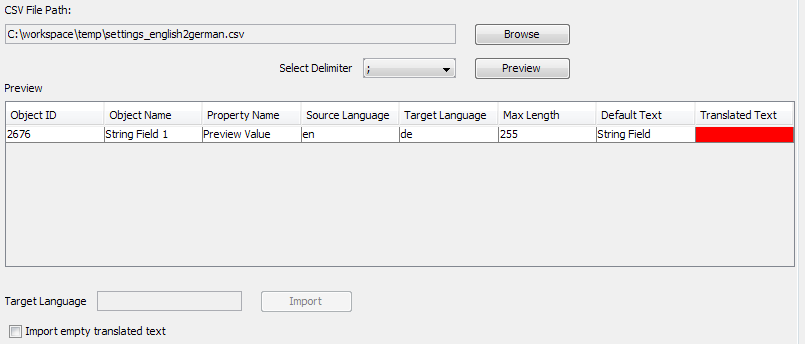
Now we are going to import the CSV file again. First choose the file with browse and afterwards click preview. Please note: The file above changed in Excel is currently not saved to disk yet! Now lets see what the tool will do:
If a cell of a translated text is empty the tool marks it as default as error of the default text is not empty. For some reason this is not error, because the translation file is a preview or whatever. In such cases you can overrule this by checking "Import empty translated text" in the lower left corner. If you check this you see the red field changes to normal and import is enabled. Now we save the example correctly and try again.
If the "Import" button is enabled you can click on it and the import starts. When already texts are defined for the target language the tool warns you that there is already a text. When doing it the first time you can click on "Yes, to all" to overwrite all texts. If you are not sure you have now the chance to check each and every text. |


